Terms and their meaning
AAAtrigger (map creation)
AAAtrigger is the name of one of 7 special textures that are used in strictly defined cases. The list of special textures consists of: AAAtrigger, SKY, CLIP, ORIGIN, HINT, SKIP, NULL.
This is what the texture looks like:


Used to create many brush entity objects that are invisible in the game (for example, triggers or Func group objects). The texture is in a standard WAD file
halflife.wad, which is in the valve folder.
You can use the texture with any other image, as long as its name is AAAtrigger.
Activation (entity objects)
Activation is the calling of one game object to another.
For example, if a player presses a button in a game, then this is an activation of the button. Another example, a button turns on a light bulb. In this case, the light bulb is activated by a button. This term is constantly used in texts about creating maps and is one of the main ones.
Angle (properties of entity objects)
A parameter for many brush entities. This parameter is located in the properties of the entity object and indicates the direction or angle. As you can see from the figure below, the angle can be specified by a number or by rotating the white line in the black circle.
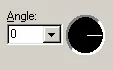
The angle parameter operates in the horizontal plane, which is the floor of your map, so it is most convenient to set the angle using the top view.
In the picture below you can see that on the right is 0°, on the top is 90°, on the left is 180° and on the bottom is 270°.
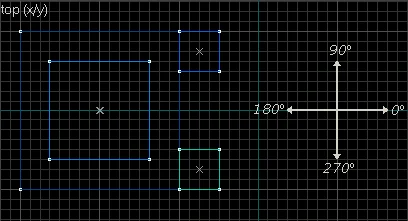
For example, for the light_environment entity object, which is the "sun" of your map, this parameter determines the direction of the light rays. Let's say, if angle = 270°, then the light on the map will be directed at the corresponding angle in the top view.
Another example is the func_door or "sliding door" entity. For this object, the angle parameter specifies the opening direction. Let's assume that if angle = 180°, then the door in the game will move exactly at this angle (in the top view it will be to the left).
BSP1. (Creating maps) Map format in Half-Life.
2. (Compilation) This is the second stage in converting a map from MAP format to BSP format. At this stage, a map tree and a workable bsp file are created. In ZHLT utilities, this process is carried out by the hlbsp.exe compiler.
Brush (map creation)
This term refers to any primitive objects that make up the map. For example, a wall is a brush; the earth is also a brush; mountains, boxes, fences - all these are brushes. We can say that almost the entire visible part of the map consists of brushes.
Brushes can be compared, for example, to blocks. If we need to build a room, then we will use 6 brushes (4 brushes for the walls and 2 for the floor and ceiling).
The picture below shows a "room" without a front wall. This room is built from 5 brushes.
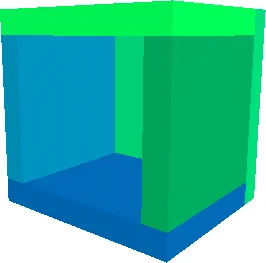
Maps are made from such brushes; players run between the brushes. Naturally, the player sees colored (textured) brushes, and not as monochrome as in our picture.
In addition to the rectangular shape, brushes can be cylindrical, conical, and also take on a more complex shape (for example, a piece of rock) when using the appropriate tool to change the shape.
However, it should be understood that brushes cannot take absolutely any shape. There are a number of strict restrictions, violation of which leads to compilation errors. You can learn more about this from the articles on compilation errors.
Brush-based entity (map creation)
All entity objects are divided into two types: point and brush. In English these names look like: point-based and brush-based.
So, a Brush-based entity is a brush entity object. Outwardly, this type of object is no different from ordinary brushes; in fact, they are called "brushes" because they consist precisely of brushes. But unlike them they have some properties.
In the picture below you can see one of the many types of brush entity objects, namely func_door (or an ordinary door :)
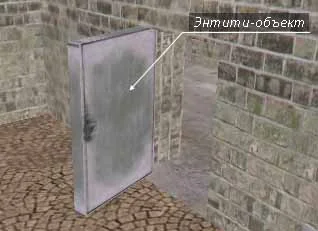
As you can see, in appearance the door differs little from, say, a brick wall (the shape is the same - rectangular, there are no special differences). With the same success, we could make the door a regular brush... However, unlike a wall or any other brush, a door entity can open, and with a given speed and a given direction - that is, the door has properties. This is the main difference between brushes and entities. Entities are a little lively :)
To create a brush entity object, you must first create a regular brush and then
pressing
[Ctrl-T], turn it into an entity.
In the Hammer editor, all brush entities in 2D views are designated
purple.
Now count how many brush entity objects are shown in the picture?
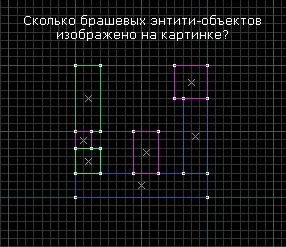
Correct answer: 3.
Carve (map editor function)
Carve ("kav" or in Russian "karve" :) is a Hammer editor function that cuts one geometric body from another. Let's look at the action of this function using an example:
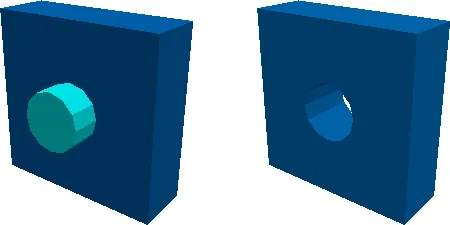
At first we had 2 brushes: rectangular and cylindrical. We then applied the Carve function to the cylinder. As a result, a cylindrical hole was formed in the rectangular brush.
The Carve function is called in the following ways:
- Using the button

- From the menu Tools -> Carve
- Keyboard shortcut Shift-Ctrl-C
- From the right-click context menu (in 2D view)
You can cut objects from each other of any shape, thus obtaining square or cylindrical holes, arches for gates, recesses, etc. It should be noted that when using Carve, the number of brushes increases, for example, if we cut a through square hole in the wall, the wall will be divided into 4 brushes (according to the number of sides of the hole). More sides - more brushes!
ATTENTION! Professional mappers never use this function, because... it doesn't work in the best way. Often, after using Carve, poorly joined brushes appear; in other words, microgaps appear between the brushes. During compilation, such microgaps can affect the calculation of the lighting of these brushes, which will negatively affect their appearance (various glitches with lighting will appear).
It is more correct to create each individual brush yourself (manually). If we want a cylindrical hole, then we need to create 8, 12, 16 or more brushes, changing their shape using the Vertex Manipulation tool and achieving their position in such a way that a cylindrical hole will be formed.
Overall, Carve is bad.
CLIP (map creation)
CLIP is the name of one of 7 special textures that are used in strictly defined cases. The list of special textures consists of: AAAtrigger, SKY, CLIP, ORIGIN, HINT, SKIP, NULL.
This is what the texture looks like:
Used to create CLIP brushes (invisible walls for blocking a player). The texture is in a standard WAD file
halflife.wad, which is in the valve folder.
You can use the texture with any other image, as long as its name is CLIP.
CLIP brush (map creation)
Brush, specially painted on all sides. texture CLIP.
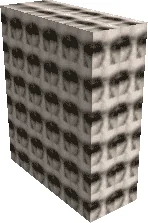
The CLIP brush is used to block the player and is installed in places where the player should not go. The CLIP brush is invisible in the game and does not stop bullets.
Clipping
(map editor function)

This feature of the Hammer editor allows you to cut brushes into pieces. It is attached to the Clipping Tool. Cutting can be done in one of three ways (see picture below).
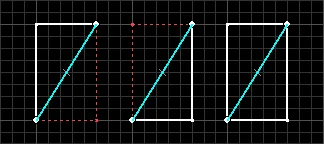
1. In the first case, the left side of the brush remains
2. In the second - right
3. And in the third, both parts are preserved.
To start the cutting procedure, you need to select the object. Then you should select the Clipping Tool (Shift-X), use the mouse to determine the first point of the cutting line, then the second and finish cutting by pressing Enter.
PS: The cut line, as can be seen from the pictures, is depicted in light blue, and the points are white.
Clipnode (game engine)
Surfaces that are determined by the game engine to be impassable for the player. Each brush on the map (be it a wall, floor or box) is "wrapped" in clipnode surfaces. Thanks to clipnodes, the player does not fall through the ground and cannot pass through walls.
Remember the old cheat in Half-Life - noclip (walking through walls)? This is what it is :)
Decal (map creation)

Decals are special textures applied to the surfaces of objects to give various effects, such as: blood splatters, bullet holes on the walls, traces of grenade explosions, painted cracks on the walls, etc.
To apply decals, use a tool in the form of a brown cube with a red target (see figure).
All decals are stored in a special file
decals.wad, which is located in the valve folder.
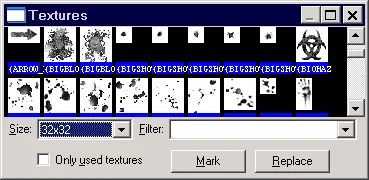
The picture above shows what some decals look like in the editor.
It is also worth noting that when applying a decal to the side of an object, it turns into an entity object
infodecal, which can then be moved or deleted.
Entity (map creation)
Objects that have certain properties, with the help of which events in the virtual world (on the map) are controlled. Examples of entities: glass, cars, elevators, stairs, light and sound sources, players' birth points and many others. etc.
There are two types of entities: point and brush.
Edge (geometry)
The edge of the object, i.e. a line connecting two vertices (vertices).
Face (geometry)
Object side.
FGD fileThis file stores information about all entity objects and their properties that can be used when creating a map. For each of the Half-Life mods there is its own FGD file with records about the objects inherent in this MOD. The FGD file is connected to the map editor.
FPS1.
Frames
Per
Second (frames per second) (game engine).
2.
First
Person
Shooter (first person shooter).
HLWe all know this game very well, which was released by Valve on October 31, 1998.
HLBSP (compilation)
A compiler program included in the ZHLT utilities that creates a map tree and a working BSP file.
HLCSG (compilation)
A compiler program included in the ZHLT utilities, which calculates the overall geometry of the map, creates surfaces, and also checks the size and presence of all necessary textures.
HLRAD (compilation)
A compiler program included in the ZHLT utilities that calculates lighting on the map. In terms of system resource requirements, this process confidently ranks first among all compilation stages.
HLVIS (compilation)
A compiler program included in the ZHLT utilities, which calculates which parts of the map are visible to the player from each specific position and which are not. The calculation result is written to the BSP file in the form of a Visibility Matrix.
Hollow (map editor function)
Hollow is a feature of the Hammer map editor that is best illustrated in action by pictures.
So, we have a regular brush. Let's apply Hollow to it, this can be done:
- From the menu Tools -> Make Hollow
- Keyboard shortcut Ctrl-H
- From the right-click context menu (in 2D view)
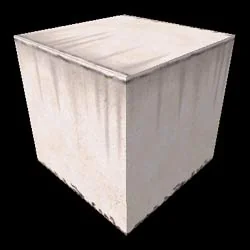
After calling the Hollow function, we will be asked how thick the walls should be. Let's indicate, for example, 32 units. As a result, the brush will be divided into 6 brushes with a thickness of 32 units. A void will appear inside the former brush (seen in the figure below, on the right). That is, we had a brush, but it became a room.
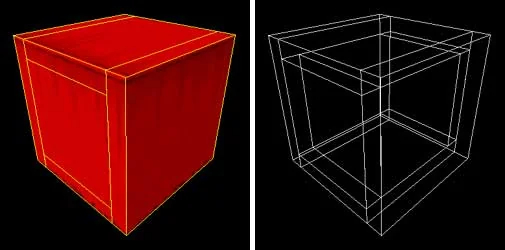
You can also specify a negative thickness value, for example "-32", then new brushes will be formed not inside, but outside the former brush.
Hull (map creation)
Files containing a list of surfaces of the entire map, which are generated by compilers. Information about surfaces is recorded in 4 files. File names are created using a mask: card_name.p0, card_name.p1, card_name.p2, card_name.p3. The first file (.p0) contains information about all visible surfaces of the map, while the other three (p1, p2, p3) contain clipnode information.
HINT (map creation)
HINT is the name of one of 7 special textures that are used in strictly defined cases. The list of special textures consists of: AAAtrigger, SKY, CLIP, ORIGIN, HINT, SKIP, NULL.
This is what the texture looks like:
Used together with the SKIP texture to create HINT brushes, which, in turn, are used to optimize the map. The texture is in WAD files:
zeditor.wad And
zhlt.wad, which come with the ZHLT and ZHLT Custom Build utilities, respectively.
You can use the texture with any other image, as long as its name is HINT.
HINT brush (map creation)
Brush, specially painted. SKIP and HINT textures.
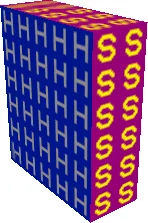
The HINT brush is used to optimize the map, lower the r_speeds parameter and, accordingly, increase FPS on the map.
When compiled, the HINT brush forces the VIS program to make an additional cut in the BSP structure of the map in the place where it is located.
If it is necessary to "cut" a long corridor, then the HINT brush should be slightly larger in size than the corridor (in width and height, but not in length!), 5 of its sides should be painted with the SKIP texture and the sixth (cutting) with the HINT texture.
If it is necessary to make a BSP cut on the floor, then the brush should be painted over as shown in the figure above (the side painted with the HINT texture should be perpendicular to the floor).
Map source (map creation)
The source is a file containing information about your card. In the Valve Hammer Editor, source files have the RMF extension. Also, the map source is considered to be a MAP format file that is used during compilation.
Compilers (map creation)
A set of programs that compile a map.
Compilation (map creation)
The process of converting a map from MAP format to BSP format, i.e. from the source map, which we receive in the editor, into the finished map, perceived by Half-Life.
ConsoleA way for a player to communicate with a game engine through a set of commands and variables. If the game is launched with console support (in the shortcut, in the "Object" field, after hl.exe the parameter is written
-console), then it can be called by pressing the tilde "~".
Leaf (map creation)
An area of playable space on a map bounded by surfaces.
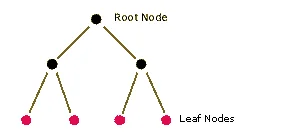
Leafnode (game engine)
End of a branch in the map's BSP tree.
Leak (map creation)
An error on the map that appears if not all point entities are covered with brushes, in other words, if there is a HOLE on the map. If this error occurs, the compilation will be interrupted and the message will be displayed: === LEAK in hull ... ===. You can cope with the error by downloading the PTS file created in this case through the console in Half-Life (the file must be copied to the cstrike/maps folder).
MapperA person who makes maps. Such people are also called mapmakers, level designers, and, finally, map creators :)
MappingThe process of creating a map. There was nothing -> there is a map where you can play with friends :)
MAP (map creation)
The map format used to compile it. The Hammer editor has a feature to export from its native RMF format to the MAP format. Compilers only work with the MAP format.
Model1. (Game engine)
An object created not from brushes, but from triangles and recorded in a special MDL file. For example, hostages in CS or weapons in hands are models. The game engine copes much better with drawing models than brushes (in the r_speeds parameter: wpoly - polygons created by brushes; epoly - models). Models are inserted into the map by an object
cycler.
2. (Creating maps) Brush entity objects are also called models, but they have nothing in common with the previous models.
Name (properties of entity objects)
Many entity objects have a Name parameter in their properties, i.e. object name.
The name is required so that the object can be activated. If object A must activate object B, then the second one needs to be given a name, and the first one must have this name in the "Target" parameter.
Node (game engine)
Branch in the BSP tree of the map.
NULL (map creation)
NULL is the name of one of 7 special textures that are used in strictly defined cases. The list of special textures consists of: AAAtrigger, SKY, CLIP, ORIGIN, HINT, SKIP, NULL.
This is what the texture looks like:
Used to optimize the map. It is applied to those sides of objects that the player will never see (roofs of houses, etc.). When compiling, surfaces painted with a NULL texture are simply not calculated and, thus, it turns out that the number of visible polygons in the game decreases (hence, FPS increases). The texture is in the WAD file
zhlt.wad, which come with the ZHLT Custom Build utilities.
You can use the texture with any other image, as long as its name is NULL.
Object (map creation)
What maps in Half-Life are made of. And they consist of two types of objects: brushes and entities.
Entities are divided into: brush entities and point entities. Entities are often called entity objects.
ORIGIN (map creation)
ORIGIN is the name of one of 7 special textures that are used in strictly defined cases. The list of special textures consists of: AAAtrigger, SKY, CLIP, ORIGIN, HINT, SKIP, NULL.
This is what the texture looks like:
Used to create ORIGIN brushes (i.e. brushes that define the center of rotating entity objects).
The texture is in a standard WAD file
halflife.wad, which is in the valve folder.
You can use the texture with any other image, as long as its name is ORIGIN.
ORIGIN brush (map creation)
Brush, specially painted on all sides. ORIGIN texture.
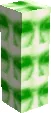
The ORIGIN brush defines the center of a rotating entity object (for example, revolving doors and platforms, fans, and trains and cars).
Here's what you need to know about ORIGIN brushes:
- The ORIGIN brush is painted with a special ORIGIN texture on ALL sides!
- Every rotating object must have an ORIGIN brush
- ORIGIN brush is an integral part of rotating objects
- The center of the ORIGIN brush determines the point through which the object's rotation axis passes
- Object rotation does not depend on the size of the ORIGIN brush
- One object - one ORIGIN brush
- It is unacceptable to have an ORIGIN brush without an object
- The ORIGIN brush is invisible in the game and does not interfere with players
PAK (map creation)
An archive file format that stores all the sounds, models, sprites, and levels of Half-Life. The contents of this archive can be extracted by special programs, for example, PakExplorer, PakScape or Wally.
Pak0.pak (map creation)
The main archive of the Half-Life game (located in the valve folder).
Point-based entity (map creation)
All entity objects are divided into two types: point and brush. In English these names look like: point-based and brush-based.
So, a Point-based entity is a point entity object. Unlike brushes or brush entity objects, this type of object has no shape. Point objects are invisible in the game, they, like brush objects, have some properties, but their size has only a symbolic representation in the editor.
In the picture below you can see an example of two point entity objects, namely light (on the left in the picture, a light bulb) and ambient_generic (on the right, a sound source).
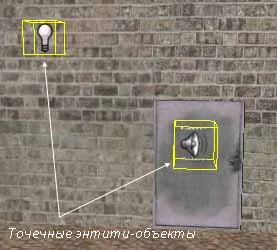
In 3D editor views, point entities are displayed as sprites (as in the picture above) or simply as small cubes (if a sprite has not been created for them and there is no entry in the FGD file).
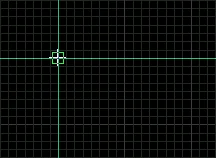
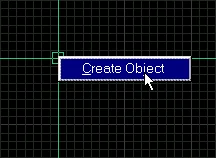
To create a point entity object, you need to select the Entity Tool (Shift-E). Then, having selected the type of object in the list, you can simply click the mouse in the 3D view or insert the object in the 2D view, fixing the creation with the Enter key or from the context menu with the "Create object" command.
Here's what creating a point entity object looks like in 2D views:
Pointfile (map creation)
A file created by compiler programs if a Leak error is found on the map.
To find a hole in the map (Leak error), you need to launch Half-Life, enter the console, load the map, write
pointfile and follow the line of dots until you find the error (first copy the PTS file to the cstrike/maps folder).
Polygon1. (Game Engine) Triangle used to construct the visible game space of Half-Life. The game engine draws 2 types of polygons: epoly and wpoly (see r_speeds).
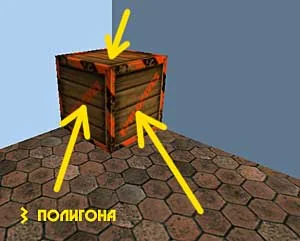
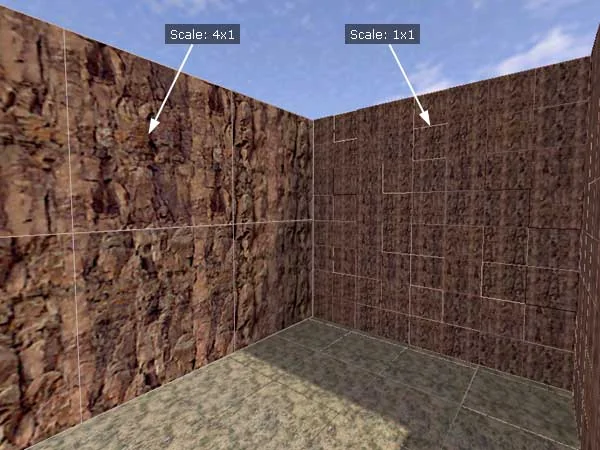
2. (Mapping) A textured surface enclosed between the vertices and edges of an object. The number of polygons depends not least on the scale of the textures.
Portal (compilation)
A surface describing the intersection of two Leafs. Portals are used for mathematical calculation during compilation. They are not written to the BSP card and are not used by the game engine.
Prefab (map creation)
Prefab is a blank object stored in a special *.ol file. Examples of prefabs are tables, chairs, cabinets, trash cans, spotlights, cars - in general, all those objects that are used repeatedly on the map.
You can create your own prefab, write it to an OL file, and then reuse it across different maps, eliminating the need to recreate the object.
R_SPEEDSR_speeds is a special parameter that determines the speed at which the game engine draws the map. The number of frames per second is inversely related to r_speeds, i.e. the higher r_speeds, the fewer frames per second (the card slows down more) and vice versa.
The R_speeds parameter is dynamic, it changes depending on your location on the map. Indeed, if you turn and look into the corner, the number of fps (frames per second) will most likely be a maximum of 99-100. If you go out into open space on the map, then fps will be lower, and r_speeds will be correspondingly higher.
To find out r_speeds on the map you need to enter in the console:
developer 1 And
r_speeds 1. In the lines that appear on the screen:
wpoly (from "world polygons") - this is the number of polygons drawn by the engine that create brushes;
epoly (from "entity polygons") - the number of polygons that models create (hands with weapons, players, other models).
There are quite a few methods to reduce r_speeds and increase FPS on a map.
Here are the main ones:
- Turning brushes into entities
- Upscaling textures
- Closing view of players
- Method of leaving a gap of 1 unit
- Method for using 240x240 pixel textures
- Using SKY or NULL textures
- "Dividing" the map into separate spaces
- Using HINT Brushes
All these methods are discussed in detail in our Tutorial.
RGBA method of forming an image from three colors: red, green and blue. It is used in TVs and monitors with a color electron beam gun.
When creating maps, you often have to set the color of light sources in RGB format. For example, 255 255 255 100 means a white light with a brightness of 100 units.
RMF (map creation)
Map format used in the Valve Hammer Editor (Worldcraft). This format is an improved version of the MAP format, which is used for map compilation. The RMF format stores information about visible and hidden objects on the map, as well as other service information.
SKIP (map creation)
SKIP is the name of one of 7 special textures that are used in strictly defined cases. The list of special textures consists of: AAAtrigger, SKY, CLIP, ORIGIN, HINT, SKIP, NULL.
This is what the texture looks like:
Used together with the HINT texture to create HINT brushes, which, in turn, are used to optimize the map. The texture is in WAD files:
zeditor.wad And
zhlt.wad, which come with the ZHLT and ZHLT Custom Build utilities, respectively.
You can use the texture with any other image, as long as its name is SKIP.
SKY (map creation)
SKY is the name of one of 7 special textures that are used in strictly defined cases. The list of special textures consists of: AAAtrigger, SKY, CLIP, ORIGIN, HINT, SKIP, NULL.
This is what the texture looks like:
Used to create SKY brushes (or, in Russian, the sky on a map :).
Can also be used to optimize the map, because acts like a NULL texture. The texture is in a standard WAD file
halflife.wad, which is in the valve folder.
You can use the texture with any other image, as long as its name is SKY.
SKY brush (map creation)
Brush, specially painted on all sides. SKY texture.
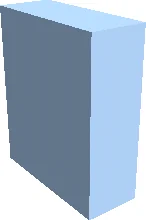
SKY brushes are placed in those places on the map where you need to see the sky. The technique for creating the sky can be different: one large box around the card (unsuccessful method, but fast :) and around the perimeter of the card (preferred method, but longer).
Sprite (map creation)
A picture in SPR format, which has the following distinctive property: when a sprite is placed on the map, it is always directed towards the player's face. No matter from which side the player approaches the sprite, he will never see it from the side.
Sprites are inserted onto the map by the following entity objects:
- cycler
- cycler_sprite
- env_glow
- env_sprite
To create sprites, you can use the following programs: SprWizzard or SpriteMaker.
Target (properties of entity objects)
Many entity objects have a Target parameter in their properties. Literally "target" is translated as "goal", "target".
This parameter is directly related to the concept of "activation". The "Target" parameter contains the name of the object that needs to be activated.
Texture (map creation)
A picture applied to the surface of objects in order to give them a recognizable appearance. Thanks to textures, we can distinguish brickwork from a wooden fence, a forest path from asphalt. Texture sizes in Half-Life must be a multiple of 16.
Texture light (map creation)
A method of lighting a map that creates a lighting effect from the texture. Any texture in Half-Life can emit light, but to do this, you need to create a special RAD file before compilation, in which you should enter the names of all textures that emit light, as well as the characteristics of the light (color and brightness).
Trigger (map creation)
A group of entity objects united under the common name Trigger. "Trigger" can be translated as "to put into action." This name well reflects the purpose of the objects in this group. They all activate something.
Triggers can be either point objects or brush objects. For brush triggers (for example, trigger_multiple or trigger_hurt), a special AAAtrigger texture has been created, which makes these objects invisible in the game.
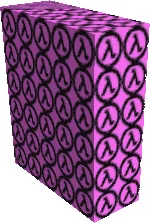
Among brush triggers, the most commonly used is trigger_multiple, which can activate an object multiple times.
Among point triggers, the favorite is trigger_camera, which allows you to create cameras like those on cs_assault and cs_militia.
Unit (map creation)
A unit is a virtual unit of length (and size in general) in Half-Life. For example, the height of a player in Counter-Strike is 64 units, the length of the bridge on De_Aztec is 784 units, and the entire available space for creating a map is a cube with a side of 8192 units.
For beginning mappers, "unit" is one of the most important concepts to understand well. After all, the first thing a young map creator notices is the enormous size of his level compared to the player :)
Vertex (geometry)
The top of the object, i.e. the point at which its edges intersect. For example, a cube has 8 vertices (8 vertices). The Hammer map editor has a tool that allows you to change the positions of vertices. Thus, it becomes possible to create objects that are more complex in shape than the standard cube, cylinder and cone.
VHE (Hammer) (map creation)
The official map editor from Valve for the game Half-Life and its modifications.
Visblocker (map creation)
Any brush on the map that blocks the player's view. Such brushes are processed during compilation by the VIS program, which calculates the visibility of certain areas of the map, depending on the position and direction of the player's view.
WAD (map creation)
A file format used to store textures for the game Half-Life and its modifications. Each WAD file can contain from one texture to several thousand. You can edit and create new WAD files in the Wally program.
Most Half-Life textures are stored in a file
halflife.wad, which is located in the valve folder.
Textures for Counter-Strike maps are stored in the cstrike folder or included in the map (example: de_survivor).
WC (Worldcraft) (map creation)
The official map editor from Valve for the game Half-Life and its modifications. Subsequently renamed Valve Hammer Editor.
ZHLT (map creation)
A set of four compilers (HLCSG, HLBSP, HLVIS, HLRAD) designed to convert a map created in the map editor (MAP format) into a map understandable by Half-Life (BSP format). Zoner's utilities (Zoner is the nickname of the compiler developer) replace old compilers (QCSG, QBSP, etc.), which were also used to compile maps for Quake.
ZHLT Custom Build (map creation)
A set of improved ZHLT compilers. This version of the compilers is being developed by Anthony Moore aka "Merl" and some other people. The Merl version of the utilities has a number of advantages over the original Zoner compilers. In addition, and importantly, ZHLT Custom Build is constantly being improved, and a new version is released approximately every 3 months (ugh, ugh, ugh, so as not to jinx it :)
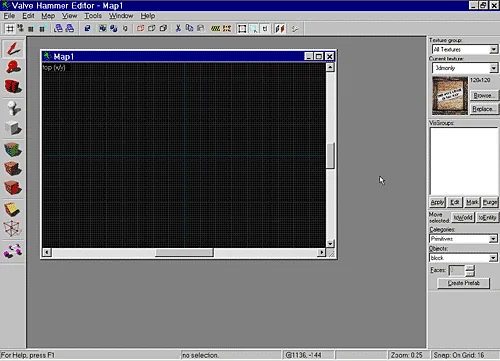
 Valve Hammer Editor (VHE, Hammer, Hammer) is the official map editor for the game Half-Life and its mods: Counter-Strike, Day Of Defeat, Team Fortress, Front Line Force and others. In the same editor (more precisely, in its previous versions called Worldcraft) levels for Half-Life were created.