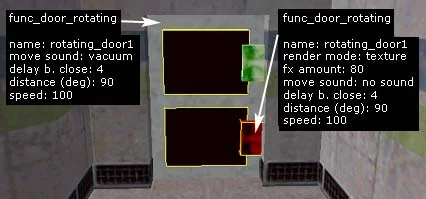
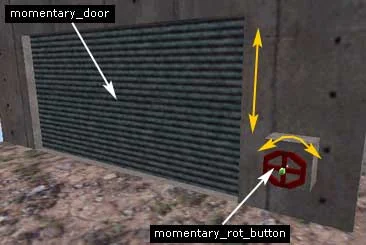
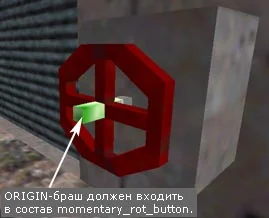
In this article we will tell you how doors that slide to the side and rotate are created. We will also look at ways to open doors using buttons and triggers. Before reading the article, we recommend that you familiarize yourself with the following entity objects:
Activate, i.e. There are several ways to open a sliding door, here are the main ones:
– by touching the door or pressing "Use" (default "E")
– button
– trigger
a) opening the door by touching
Let's say we want to create a door in this opening (see figure below). To do this, select a suitable door texture (for example, C1A0B_DR4A) and build a brush equal in size to the opening. It should be noted that the standard door sizes in Half-Life are 96x64x8 (i.e. 96 units in height, 64 in width and 4 or 8 in thickness). Naturally, this is not a strict rule.
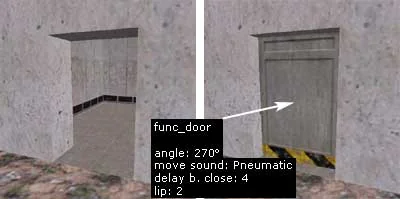
Now select the brush and transform it [Ctrl-T] to an entity object func_door. The door is ready! All that remains is to determine its properties, such as: direction and speed of movement, sounds when moving and stopping, time before automatic closing, etc.
Angle — the direction of movement of the door is indicated here. To determine it correctly, set the view to the top (2D top), then movement to the left will correspond to 180°, to the right - 0°. If you want the door to go up or down, select from the list Up or Down respectively;
Speed — door movement speed (default 100, normal speed);
Move Sound — sound when the door moves, you don't have to specify it;
Stop Sound — the sound of the door stopping, also optional;
Delay before close — time in seconds during which the door will be open, then it will automatically close. If you want the door not to close, set the value "-1" here or check "Toggle" in the flags (see below). By default, the door closes after 4 seconds.
Health (shoot open) - "strength" of the door. If you specify a value greater than zero (> 0), the door will open only after the specified value of damage has been caused to it. For example, if you specify Health = 100, then the door will open after 4-5 shots from the machine gun. Default value is 0.
Lip — with this parameter you can change the distance at which the door opens. By default, the door opens to its width, i.e. If the door is 64 units wide, then it will open 64 units. The formula is very simple: Distance = (Door width - Lip), i.e. if parameter Lip positive, then the door will open to a distance less than its width, and if negative, then, accordingly, to a greater distance.
What is Lip used for? When the door opens completely, its visible side coincides with the wall into which the door was slid, which creates a not very beautiful effect (try it :). If you set the Lip parameter to, say, 2 units, then the door will look out from the wall by 2 units, and there will no longer be an ugly effect.
The remaining parameters are not so important.
Now let's look at the flags.
Starts Open - check this flag if you want the door to be open at the start of the round
Passable — it will be possible to pass through the door (hardly necessary for a normal door)
Toggle - if the door has a name, then it can be opened and closed using a button or trigger (see below). A door with the Toggle flag set will not close automatically
Use Only - if checked, the door will open only when you press "Use" (the default button is "E").
b) opening the door by pressing a button
The door discussed above opens when touched. Let us now consider the opening of a door by pressing a button.
Make exactly the same door. The only difference between this door and the one discussed above will be the presence name (Name). In order for the door to be opened with a button, it must be given a name, for example, sliding_door1.
Now let's make the button itself. Our button will be a brush with dimensions of 12x12x4 units (see figure below), painted with texture +0BUTTON1 and located on the wall next to the door. Naturally, a simple brush won't work, so let's turn it [Ctrl-T] into the button func_button.
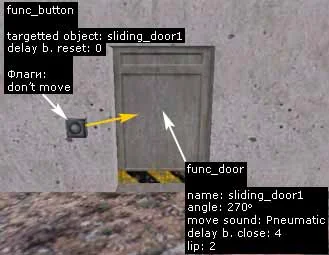
The properties of the button in this case are very simple:
Targetted object — sliding_door1 (here we indicate that when the button is pressed, a door named sliding_door1 will be opened)
Delay before reset — time in seconds during which the button will not operate after it has been pressed. Default: 3 seconds, can be set to 0.
Flags:
Don't Move — if you check this flag, the button will not be pressed into the wall, but the door will still be activated. Naturally, if you want, you can not check this flag, but then you will need to indicate in the "Angle" parameter the direction of movement (pressing) of the button, speed, etc.
c) opening the door by passing through the trigger
Triggers are invisible in the game. When a player passes through a trigger, the object specified in its properties is activated. We use this opportunity to open the door.
So, we already have a door. Let's call her sliding_door2. Now let's create a brush painted with a special texture AAATrigger and place it in the center of the door (see figure below).
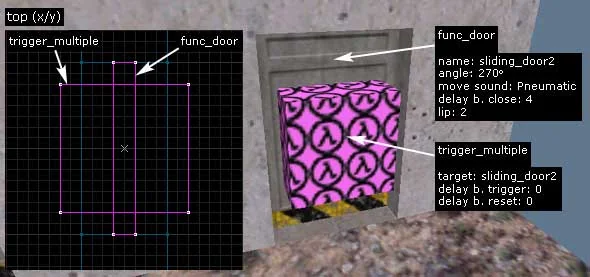
The brush needs to be made slightly larger than the door so that the player touches it on either side of the door (see the top (x/y) view in the figure above).
Select the brush and click [Ctrl-T], select trigger_multiple from the list. This type of trigger allows you to activate an object multiple times.
Let's set the properties of the trigger.
Target — sliding_door2 (the name of the door that the trigger will open is indicated here);
Delay before reset — time in seconds during which the trigger will not work after it has been activated. The default is 10 seconds, but in our case with the door, a value of 0 would be best, so that the door will always open when the player passes through the trigger.
Delay before trigger — time in seconds before the object is activated (before the door opens). For example, if you specify 5 seconds here, the door will only open 5 seconds after the player passes the trigger. It is better to set the door to 0 seconds so that the door opens instantly, without delay.
The remaining parameters can be left unchanged. That's it - the door is ready. When the player passes through the trigger (and it doesn't matter which side, because the trigger "looks out" from both sides of the door), the door will open.
a) opening the door by touching
Make a brush that will be the door.
Since the door (in this case) is a rotating object, it is necessary to determine the axis of rotation for it. This is done using ORIGIN brush, i.e. brush on all sides painted with a special ORIGIN texture.
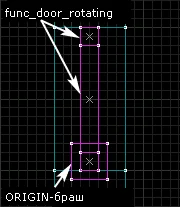
Must be placed correctly ORIGIN brush, because This determines how the door will rotate. So that when opening the door does not "drive" into the wall, ORIGIN brush should be positioned in the top view as shown in the figure below.
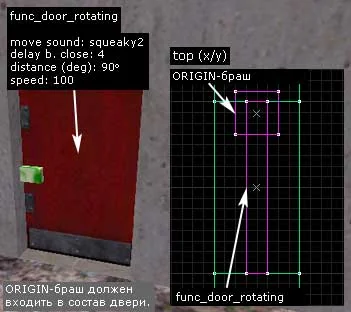
Please note that the center of the ORIGIN brush is located in the middle of the thickness of the door (visible in the top view), and the distance from the edge of the door to this center is equal to half the thickness of the door. The dimensions of the ORIGIN brush do not matter. It could be a very small brush, or it could be a big one.
Select the door (for now the door is a simple brush) and the ORIGIN brush (while selecting, hold down the Ctrl key), press [Ctrl-T] and select from the list func_door_rotating. The door is ready! All that remains to be done is to determine the door rotation parameters. Most of the parameters coincide with the parameters of the func_door sliding door, so we will consider only the new ones.
Distance (deg) — door rotation angle in degrees. By default, the door rotates 90 degrees, which is quite normal.
Now let's look at the flags.
Starts Open - if checked, the door will be open at the beginning of the round;
Reverse Dir — by default the door opens "from the player"; if you check this flag, it will open "towards the player". In the case of a button or trigger opening the door, this flag simply reverses the direction of the door opening;
Passable - if checked, you can walk through the door freely;
One-way — the door will open only in one direction (regardless of which side the player approaches it from);
Toggle - if the door has a name and is opened by a button or trigger, then it will not automatically close. To close the door, you will need to press the button again or go through the trigger;
X-Axis, Y-Axis — these flags determine the axis around which the door will rotate. By default, if you do not check anything, the door rotates around the vertical Z axis, i.e. as usual. You can read more about choosing the axis of rotation in the article Rotating Light. This article discusses the principle of determining the axis of rotation, which can be applied to any rotating object;
Use Only — if you check this flag, the door will open only by pressing "Use" (the default button is "E").
b) opening the door from a button or trigger
The methods for creating an opening door from a button and from a trigger are absolutely the same as for a sliding door, so we will not describe them again. The only thing is, do not forget to include the ORIGIN brush in the revolving door and correctly determine its location.
doors.zip [37Kb] - in the archive there is an example map in BSP and RMF formats.
1. Sliding doors
The easiest way to make a door that slides to the side. We will start with this type of door.Activate, i.e. There are several ways to open a sliding door, here are the main ones:
– by touching the door or pressing "Use" (default "E")
– button
– trigger
a) opening the door by touching
Let's say we want to create a door in this opening (see figure below). To do this, select a suitable door texture (for example, C1A0B_DR4A) and build a brush equal in size to the opening. It should be noted that the standard door sizes in Half-Life are 96x64x8 (i.e. 96 units in height, 64 in width and 4 or 8 in thickness). Naturally, this is not a strict rule.
Now select the brush and transform it [Ctrl-T] to an entity object func_door. The door is ready! All that remains is to determine its properties, such as: direction and speed of movement, sounds when moving and stopping, time before automatic closing, etc.
Angle — the direction of movement of the door is indicated here. To determine it correctly, set the view to the top (2D top), then movement to the left will correspond to 180°, to the right - 0°. If you want the door to go up or down, select from the list Up or Down respectively;
Speed — door movement speed (default 100, normal speed);
Move Sound — sound when the door moves, you don't have to specify it;
Stop Sound — the sound of the door stopping, also optional;
Delay before close — time in seconds during which the door will be open, then it will automatically close. If you want the door not to close, set the value "-1" here or check "Toggle" in the flags (see below). By default, the door closes after 4 seconds.
Health (shoot open) - "strength" of the door. If you specify a value greater than zero (> 0), the door will open only after the specified value of damage has been caused to it. For example, if you specify Health = 100, then the door will open after 4-5 shots from the machine gun. Default value is 0.
Lip — with this parameter you can change the distance at which the door opens. By default, the door opens to its width, i.e. If the door is 64 units wide, then it will open 64 units. The formula is very simple: Distance = (Door width - Lip), i.e. if parameter Lip positive, then the door will open to a distance less than its width, and if negative, then, accordingly, to a greater distance.
What is Lip used for? When the door opens completely, its visible side coincides with the wall into which the door was slid, which creates a not very beautiful effect (try it :). If you set the Lip parameter to, say, 2 units, then the door will look out from the wall by 2 units, and there will no longer be an ugly effect.
The remaining parameters are not so important.
Now let's look at the flags.
Starts Open - check this flag if you want the door to be open at the start of the round
Passable — it will be possible to pass through the door (hardly necessary for a normal door)
Toggle - if the door has a name, then it can be opened and closed using a button or trigger (see below). A door with the Toggle flag set will not close automatically
Use Only - if checked, the door will open only when you press "Use" (the default button is "E").
b) opening the door by pressing a button
The door discussed above opens when touched. Let us now consider the opening of a door by pressing a button.
Make exactly the same door. The only difference between this door and the one discussed above will be the presence name (Name). In order for the door to be opened with a button, it must be given a name, for example, sliding_door1.
Now let's make the button itself. Our button will be a brush with dimensions of 12x12x4 units (see figure below), painted with texture +0BUTTON1 and located on the wall next to the door. Naturally, a simple brush won't work, so let's turn it [Ctrl-T] into the button func_button.
The properties of the button in this case are very simple:
Targetted object — sliding_door1 (here we indicate that when the button is pressed, a door named sliding_door1 will be opened)
Delay before reset — time in seconds during which the button will not operate after it has been pressed. Default: 3 seconds, can be set to 0.
Flags:
Don't Move — if you check this flag, the button will not be pressed into the wall, but the door will still be activated. Naturally, if you want, you can not check this flag, but then you will need to indicate in the "Angle" parameter the direction of movement (pressing) of the button, speed, etc.
c) opening the door by passing through the trigger
Triggers are invisible in the game. When a player passes through a trigger, the object specified in its properties is activated. We use this opportunity to open the door.
So, we already have a door. Let's call her sliding_door2. Now let's create a brush painted with a special texture AAATrigger and place it in the center of the door (see figure below).
The brush needs to be made slightly larger than the door so that the player touches it on either side of the door (see the top (x/y) view in the figure above).
Select the brush and click [Ctrl-T], select trigger_multiple from the list. This type of trigger allows you to activate an object multiple times.
Let's set the properties of the trigger.
Target — sliding_door2 (the name of the door that the trigger will open is indicated here);
Delay before reset — time in seconds during which the trigger will not work after it has been activated. The default is 10 seconds, but in our case with the door, a value of 0 would be best, so that the door will always open when the player passes through the trigger.
Delay before trigger — time in seconds before the object is activated (before the door opens). For example, if you specify 5 seconds here, the door will only open 5 seconds after the player passes the trigger. It is better to set the door to 0 seconds so that the door opens instantly, without delay.
The remaining parameters can be left unchanged. That's it - the door is ready. When the player passes through the trigger (and it doesn't matter which side, because the trigger "looks out" from both sides of the door), the door will open.
2. Revolving doors
Revolving doors are a little more difficult to make and have more properties, but that's okay :)a) opening the door by touching
Make a brush that will be the door.
Since the door (in this case) is a rotating object, it is necessary to determine the axis of rotation for it. This is done using ORIGIN brush, i.e. brush on all sides painted with a special ORIGIN texture.
Must be placed correctly ORIGIN brush, because This determines how the door will rotate. So that when opening the door does not "drive" into the wall, ORIGIN brush should be positioned in the top view as shown in the figure below.
Please note that the center of the ORIGIN brush is located in the middle of the thickness of the door (visible in the top view), and the distance from the edge of the door to this center is equal to half the thickness of the door. The dimensions of the ORIGIN brush do not matter. It could be a very small brush, or it could be a big one.
Select the door (for now the door is a simple brush) and the ORIGIN brush (while selecting, hold down the Ctrl key), press [Ctrl-T] and select from the list func_door_rotating. The door is ready! All that remains to be done is to determine the door rotation parameters. Most of the parameters coincide with the parameters of the func_door sliding door, so we will consider only the new ones.
Distance (deg) — door rotation angle in degrees. By default, the door rotates 90 degrees, which is quite normal.
Now let's look at the flags.
Starts Open - if checked, the door will be open at the beginning of the round;
Reverse Dir — by default the door opens "from the player"; if you check this flag, it will open "towards the player". In the case of a button or trigger opening the door, this flag simply reverses the direction of the door opening;
Passable - if checked, you can walk through the door freely;
One-way — the door will open only in one direction (regardless of which side the player approaches it from);
Toggle - if the door has a name and is opened by a button or trigger, then it will not automatically close. To close the door, you will need to press the button again or go through the trigger;
X-Axis, Y-Axis — these flags determine the axis around which the door will rotate. By default, if you do not check anything, the door rotates around the vertical Z axis, i.e. as usual. You can read more about choosing the axis of rotation in the article Rotating Light. This article discusses the principle of determining the axis of rotation, which can be applied to any rotating object;
Use Only — if you check this flag, the door will open only by pressing "Use" (the default button is "E").
b) opening the door from a button or trigger
The methods for creating an opening door from a button and from a trigger are absolutely the same as for a sliding door, so we will not describe them again. The only thing is, do not forget to include the ORIGIN brush in the revolving door and correctly determine its location.
doors.zip [37Kb] - in the archive there is an example map in BSP and RMF formats.
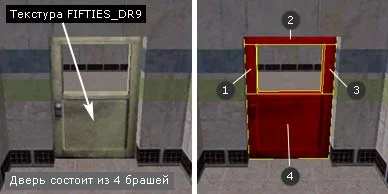
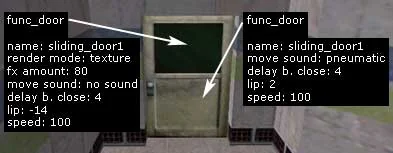
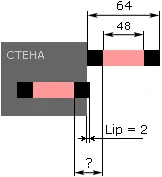 This is the view from above. Black is the main door ("frame"), pink is the internal glass door, gray is the wall. So, the required Lip will be equal to the distance with the question mark minus Lip of the main door ("frame").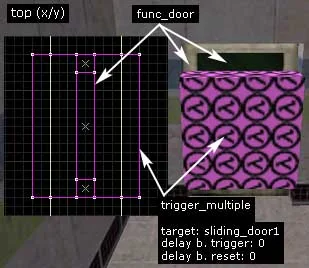
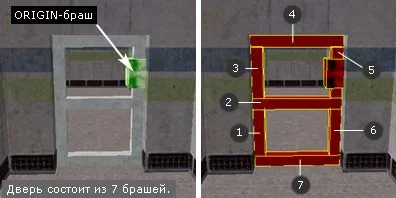
 To make a door, select all 7 brushes and the ORIGIN brush while holding Ctrl. Then click
[Ctrl-T] and select from the list func_door_rotating.
To make a door, select all 7 brushes and the ORIGIN brush while holding Ctrl. Then click
[Ctrl-T] and select from the list func_door_rotating.