In this article we will explain how machines are created. We will need the following entity objects:
Cars appeared in CS not so long ago, then the map de_jeepathon2k was added to the official mappack, which quickly disappeared from there due to numerous glitches associated with cars. So don't be surprised if your car falls through the ground or, on the contrary, hangs at a height of 5 m.
In the picture below you can see what the cars will look like on our test map:
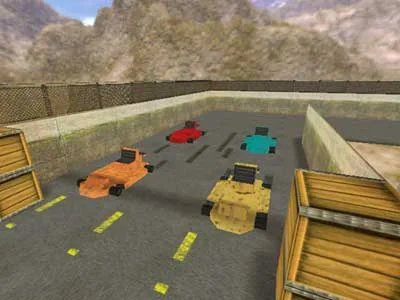
The car itself is a brush entity object func_vehicle, which must necessarily include ORIGIN brush (since a car is a rotating object). First we define the shape of the car with several brushes, then we create ORIGIN brush and turn it all into func_vehicle. Of course, it is not necessary to give the car the shape of a car. You can make a board, a box, and a barrel ride.
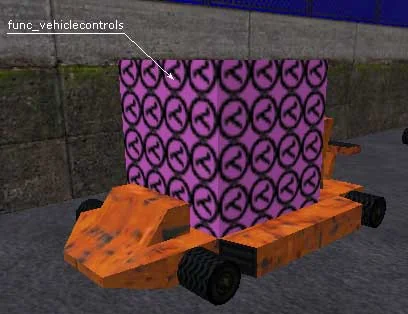
After this, it is necessary to create a zone from which the player will control the car. This zone is defined by the brush entity object func_vehiclecontrols, which must be painted over with texture on all sides AAAtrigger. The control area does not need to be part of the vehicle; it is simply located around the vehicle's cabin.
Well, and lastly, you need to make two point entities path_track, which determine the initial direction of the car (i.e. in which direction it will be deployed).
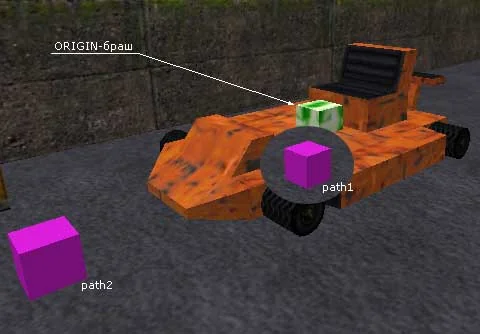
IMPORTANT: When creating a car, it must be oriented in the top view with the cabin to the left (as intended by the developers) so that the game can determine where the front of the car is.
In the game the car will appear at the first object path_track and will be directed to the second object path_track. Thus, it is not at all necessary to place the car exactly in the place where it should appear in the game. The car will appear at the first object path_track.
To correctly determine the value of the "Height above track" parameter, you need to calculate the distance from the center in the editor on the 2D side view ORIGIN brush to the top of the object path_track (see picture below).
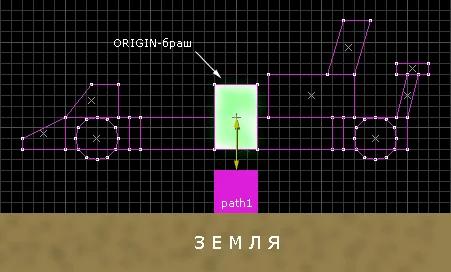 This distance must be recorded in the "Height above track" parameter of the func_vehicle.
Well, and finally, before we present the properties of all the objects involved, it is necessary to add that the composition of the machine (object func_vehicle) can be included CLIP brushes to block the player's movements. For example, you don't want players to be able to climb into the back of a car - create CLIP brush and then create with it func_vehicle.
If something doesn't work out for you with the machines, download an example map and figure it out yourself.
In the picture below you can see what the cars will look like on our test map:
The car itself is a brush entity object func_vehicle, which must necessarily include ORIGIN brush (since a car is a rotating object). First we define the shape of the car with several brushes, then we create ORIGIN brush and turn it all into func_vehicle. Of course, it is not necessary to give the car the shape of a car. You can make a board, a box, and a barrel ride.
After this, it is necessary to create a zone from which the player will control the car. This zone is defined by the brush entity object func_vehiclecontrols, which must be painted over with texture on all sides AAAtrigger. The control area does not need to be part of the vehicle; it is simply located around the vehicle's cabin.
Well, and lastly, you need to make two point entities path_track, which determine the initial direction of the car (i.e. in which direction it will be deployed).
IMPORTANT: When creating a car, it must be oriented in the top view with the cabin to the left (as intended by the developers) so that the game can determine where the front of the car is.
In the game the car will appear at the first object path_track and will be directed to the second object path_track. Thus, it is not at all necessary to place the car exactly in the place where it should appear in the game. The car will appear at the first object path_track.
About ORIGIN brush in cars
The ORIGIN brush must be placed in the center of the car, the car will rotate around it. The size of the ORIGIN brush does not matter; the position of its center is more important, because the location of the car along the vertical axis relative to the road depends on it. It may turn out that the car will appear suspended in the air or buried in the ground. In this case, it is necessary to adjust the "Height above track" parameter (i.e., the height above the ground).To correctly determine the value of the "Height above track" parameter, you need to calculate the distance from the center in the editor on the 2D side view ORIGIN brush to the top of the object path_track (see picture below).
This distance must be recorded in the "Height above track" parameter of the func_vehicle.Well, and finally, before we present the properties of all the objects involved, it is necessary to add that the composition of the machine (object func_vehicle) can be included CLIP brushes to block the player's movements. For example, you don't want players to be able to climb into the back of a car - create CLIP brush and then create with it func_vehicle.
If something doesn't work out for you with the machines, download an example map and figure it out yourself.
Func_vehicle (vehicle)
Name: car1 (car name, required)
First stop target: path1 (name of the first path_track object)
Sound: 2 (sound made when the car is moving)
Length of the vehicle: 150 (vehicle length in units, we recommend setting the value 8-16 units lower for ease of control)
Width of the vehicle: 90 (vehicle width in units, it is also better to reduce by 8-16 units)
Height above track: 8 (the height of the car above the road, determined as written above)
Initial speed: 0 (initial speed of the car, with a value > 0, the car will move itself at the beginning of the round)
Speed: 550 (maximum vehicle speed, units per second)
Damage on crush: 0 (amount of percentage of life taken from the player when hit by a car
Volume (10 = Loudest): 7 (sound volume, values from 0 to 10, where 10 is the maximum volume)
Bank angle on turns:0 (tilt angle of the car in turns)
Flags:
No Pitch (X-rot) — if checked, the car will only rotate around the vertical Z axis
No User Control — if checked, the player will not be able to control the car
Passable — if checked, then the car will be intangible, i.e. it will be possible to pass through it
First stop target: path1 (name of the first path_track object)
Sound: 2 (sound made when the car is moving)
Length of the vehicle: 150 (vehicle length in units, we recommend setting the value 8-16 units lower for ease of control)
Width of the vehicle: 90 (vehicle width in units, it is also better to reduce by 8-16 units)
Height above track: 8 (the height of the car above the road, determined as written above)
Initial speed: 0 (initial speed of the car, with a value > 0, the car will move itself at the beginning of the round)
Speed: 550 (maximum vehicle speed, units per second)
Damage on crush: 0 (amount of percentage of life taken from the player when hit by a car
Volume (10 = Loudest): 7 (sound volume, values from 0 to 10, where 10 is the maximum volume)
Bank angle on turns:0 (tilt angle of the car in turns)
Flags:
No Pitch (X-rot) — if checked, the car will only rotate around the vertical Z axis
No User Control — if checked, the player will not be able to control the car
Passable — if checked, then the car will be intangible, i.e. it will be possible to pass through it
Func_vehiclecontrols (vehicle control zone)
Vehicle name: car1 (name of the car the player will drive)
Path_track (defines the starting position of the car)
Name: path1
Next stop target: path2 (enter the name of the second path_track object here)
There is no need to set any other parameters.
Next stop target: path2 (enter the name of the second path_track object here)
There is no need to set any other parameters.
Path_track (defines the starting direction of the car)
Name: path2
Next stop target: path1 (enter the name of the first path_track object here)
There is no need to set any other parameters.
Next stop target: path1 (enter the name of the first path_track object here)
There is no need to set any other parameters.
func_vehicle.zip
[110Kb] - in the archive there is an example map in BSP and RMF formats.
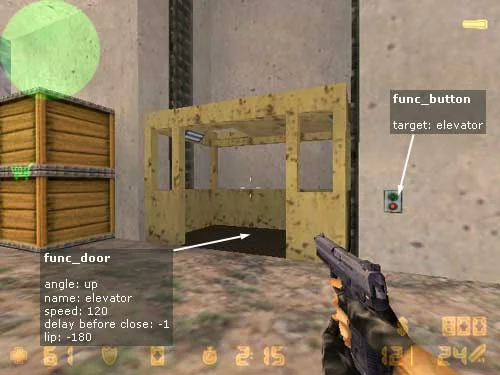
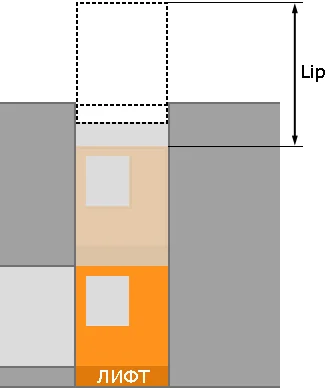 Dimensional lines show what distance is considered "Lip". For us, this distance was 180 units, therefore, we must write the value -180 in the "Lip" parameter.