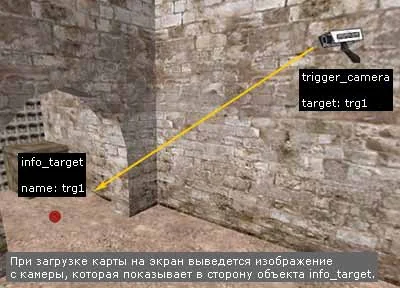
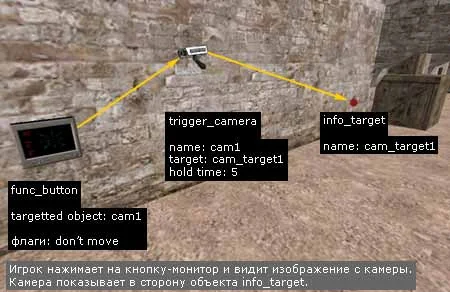
In this article you will learn how to create a breakable camera that becomes inoperable after it is destroyed by the player. To implement this idea, we will need the following entity objects:
The article is quite complicated, at least it will not be easy for a beginner. Believe me, writing it was not so easy either :) If we haven't scared you yet, then we can start. Now we will create a rather spectacular feature.
The main thing that you should understand after reading the article is that objects in Half-Life are not any specific objects, for example, an object
func_door doesn't have to be
exactly the door. We need to understand that objects simply have certain properties that we can use to achieve different goals.
What will we do:
Let's create it somewhere on the map
monitor (this will be the object
func_button, i.e. regular button), by clicking on which the player will see an image with
cameras (object
trigger_camera).
Since the camera itself (
trigger_camera) is a point object, it will be invisible in the game. We need to make a breakable camera, i.e. visible object, so next to the real but invisible camera we will create an object
func_breakable, which will, so to speak, personify (materialize) our camera.
The player thinks that the visible camera (
func_breakable) - this is the camera with which he sees the image, although naturally the function of the camera is performed by a nearby object
trigger_camera.
When the player breaks the visible camera (
func_breakable), you must stop the invisible camera (
trigger_camera). We will do this by translating the target of the monitor button from the camera
trigger_camera to some other object. When you click on the monitor, the image will no longer be displayed, because The monitor no longer activates the camera. This function can be implemented using a point entity object
trigger_changetarget, which can change the "Target" parameter to any object.
Well, one last thing. It is necessary that at the beginning of each round the functions of the monitor button are restored, i.e. the button would again be "directed" to the object
trigger_camera and would activate it. This is again implemented using the object
trigger_changetarget, only now we will return the monitor to the original value of the "Target" parameter.
Scheme of operation of a breakable camera
To make it a little easier for you to understand all this, we have drawn up a diagram of how the breakable camera works (see figure below). The scheme includes 7 entity objects. Now we will try to repeat what was said above again, but using the diagram.
So, the main thing in this diagram is the player. We depicted it with an orange circle.
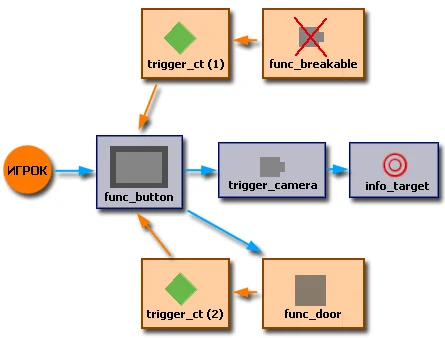
Let's consider
midline scheme consisting of 3 entity objects (
func_button,
trigger_camera,
info_target).
- The player approaches the wall and presses the monitor button (func_button);
- The monitor button activates the camera (trigger_camera);
- The camera shows the player some part of the map. The camera's "look" is directed towards the info_target object
Now let's consider
top line diagrams with two objects (
func_breakable And
trigger_changetarget).
- The player breaks the object representing the camera, i.e. func_breakable;
- Func_breakable activates the trigger_changetarget object, which "translates" the monitor button from trigger_camera to func_door (the blue arrow goes down to the right)
Because the button no longer activates the camera, the player, when clicking on it, sees nothing (the camera is broken). Now, when you press the button, an invisible door will open, but this is what we need and does not interfere at all.
Bottom line schemas (objects
func_door And
trigger_changetarget).
As we have already said, from the article you should understand that objects can be used for other purposes. In this case, we are using the door for purposes other than its intended purpose. Our door will not stand in any opening; moreover, it will be completely transparent, it will be possible to pass through it (as if there is no door), and it will serve as a trigger (activate an object).
In the door properties we will set the following parameter
delay before close: -1, so the door will open once per round. Next we will take advantage of the fact that any open door at the beginning of the next round is automatically closed.
When closing (i.e. at the very beginning of each round) the door will activate another (second) object
trigger_changetarget, which will "translate" the monitor button back to the camera (
trigger_camera), and the player will again, if he wants, be able to see the image from the camera.
/* If everything is clear to you so far, congratulations! You have taken a very big step towards professional mapping! Not every beginner will be able to understand all this right away. But when he understands, he will feel how his hands are freed and he can twist and turn the properties of objects as he wants, achieving the required goal. */
Below we list the properties of all the objects used.
1. Monitor button hanging on the wall. When activated by the player, it activates the trigger_camera.
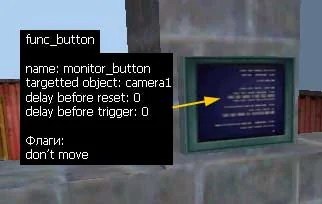 Name:
Name: monitor_button
Targetted object: camera1 (initially the button activates the camera)
Delay before reset: 0 (the button can be pressed as often as desired, without delay)
Delay before trigger: 0 (the button activates the camera instantly, without delay)
Flags:
Don't move: the monitor button does not press into the wall when pressed (this is more convenient and more realistic)
2. Camera (trigger_camera). The camera is aimed at the info_target object and transmits the image to the player.
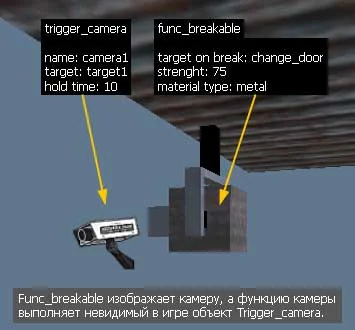 Name:
Name: camera1
Target: target1
Hold time: 10 (time during which the camera transmits the image)
3. The visual part of the camera (func_breakable object). By breaking func_breakable (see figure above), we switch the monitor button from the camera to the hidden door, which acts as a trigger.
Target on break: change_door (name of the first trigger_changetarget object)
Strength: 75 (camera durability, about 3 rifle shots)
Material type: metal (type of material, in this case metal)
4. Camera target (info_target object). The camera's "look" will be directed towards this object.
Name: target1
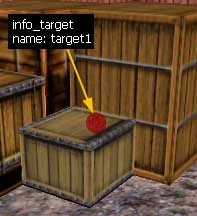 5.
5. Objects that control the monitor button (trigger_changetarget). These objects "redirect" the monitor button from the camera to the hidden door (when the player breaks the camera) and vice versa from the door to the camera at the beginning of each round.
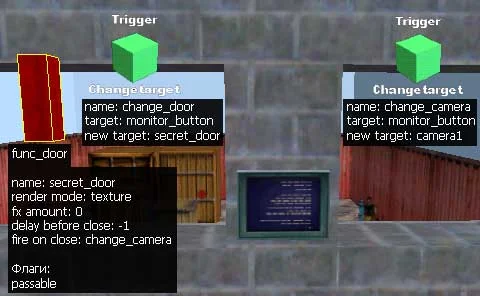 5.1
5.1 The first trigger_changetarget. Moves the button from the camera to the door.
Name: change_door
Target: monitor_button (here we indicate the name of the monitor button, since it is with it that we change the Target parameter)
New target: secret_door (enter the name of the new target for the monitor button here)
5.2 Second trigger_changetarget. Moves the button from the door back to the camera at the beginning of each round.
Name: change_camera
Target: monitor_button (here we indicate the name of the monitor button, since it is with it that we change the Target parameter)
New target: camera1 (enter the name of the initial target for the monitor button here)
6. Secret door (func_door). The invisible door is the object to which the action of the monitor button is transferred after the destruction of the camera, and also the door, when closed at the beginning of each round, activates the second trigger_changetarget.
Size, location and texture for painting are not important! The door in this case is not actually a door.
Name: secret_door
Render mode: texture (this mode together with the following fx amount: 0 makes the door completely transparent)
FX Amount: 0 (this mode, together with the previous one, makes the door completely transparent, regardless of the texture on the door)
Delay before close: -1 (need to keep the door open until the start of the next round, when it will automatically close and activate the second trigger_changetarget)
Fire on Close: change_camera (this trigger_changetarget object will be activated when the door is closed, in our case at the beginning of each round)
Flags:
Passable: It should be noted that players do not collide with the transparent door.
--
Well, that's all. We really hope that you will figure out this whole tricky system, because... The material in this article provides a basic set of knowledge that opens the way to the world of professional mapping.
Well, before you move on to studying further material, I would like to say a few more words.
A similar camera was implemented on the map
DE_ASCHE. Then 10 objects were used. The difference was that the door was not used as a trigger. Instead there were two objects
trigger_multiple, located at the bases of both teams. The task of these triggers was to activate, by the way, through another (second already) hidden door, an object
trigger_changetarget.
As you can see, the same idea has been implemented today without
trigger_multiple using only 7 objects instead of ten. It is possible that there is an even simpler solution; you just need to think a little, remember what other objects there are and try to use their properties more effectively. Here, as in programming, there are many options for solving the same problem.
breakable_camera.zip [40Kb] - in the archive there is an example map in BSP and RMF formats.