Entities Reference.

10 sections. Images are lazy-loaded and sized for stable reading.

E.1

What Is an Entity?

Entity Object Reference
§ 1. What is an entity?

In Counter-Strike, all maps consist of only two types of objects:
  • Brush
  • Entity

1. Brushy

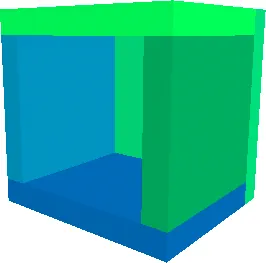
Let's start with brushes. Brushes can be compared to building slabs. Look at the picture below, it shows 5 brushes making up a kind of open room.

The room is built from 5 brushes

Maps are made from such brushes. Players run on the ground, which consists of brushes and between walls - also brushes. Naturally, the player sees colored (textured) brushes, and not as monochrome as in our picture.


2. Entity

Entities are objects that have properties. Examples of entities: an opening door, a button, a light source (light bulb), sound, a car - all these objects have properties (speed, volume, etc.).

With the help of entity objects, we can make the map more interesting - add sounds to it, make water and other special effects.

But entities are not only special effects, but also objects that control events on the map. For example, to make a map with a bomb, you need to insert an entity object of one type onto it, and if with hostages, you need to insert another.

By the way, not a single map in Counter-Strike is complete without the use of at least several entity objects, so studying them is no less important than mastering the technique of creating maps, which is described in the Tutorial.


Entity object classes

In total, 118 entity objects can be used to create CS maps, which are divided into 7 classes. The class to which a particular entity object belongs is indicated in the name, for example:

    func_door — func class object
    info_target — object of class info
    game_text — object of the game class
List of entity object classes:

    env
    func
    game
    info
    trigger
    xen
    everyone else
To create the simplest map, you need to know from 3 to 5 entity objects. For a more complex map, knowledge of 15-20 objects will be required. Well, usually the number of different objects on the map does not exceed 25-30.


Where are entity descriptions stored?

All entities are described in a file with the extension *.fgd (game definition file). There are 2 such files: standard and extended (expert), in which several new types of entities are added and some properties of existing ones are changed. We recommend using it

You can check the version number of your FGD file by opening it in Notepad - the number is written in the second line from the top.


Spot entities, brush entities

Entity objects are interesting because they can look like regular brushes, they can also be transparent, or they can have no size at all! It all depends on the type of entity object. Let's figure out what types of entity objects exist.

Entity objects are divided into two types:

  • Brashevye (brush-based or material entities)
  • Spot (point-based or intangible)
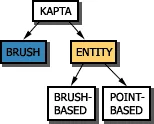
The picture below schematically shows the structure of the map:

Structural components of the map


Brush-based entities

Brush-based entities are entities that are based on a brush. Usually we can see such entities in the game, but there are also those that are visible only in the map editor, but not in the game.

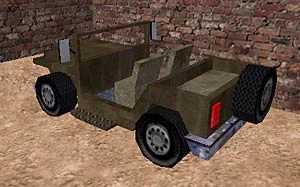
Examples: car, door, glass, button (these are visible entities); triggers (invisible entities)

Example of a brush-based entity

Roughly speaking, brush entities are brushes with properties.


Point-based entities

Point-based entities are entities that are invisible in the game, their size does not matter, the main thing for such objects is their properties.

Examples: sounds, light sources, players' birthplaces, etc.

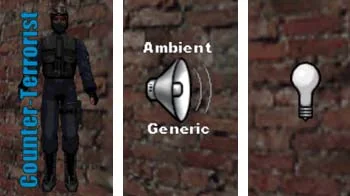
In the editor, point entities are depicted as purple rectangles (squares), and in three-dimensional form - as icons. The figure below shows examples of icons from the 3D view of the editor: contra birthplace, sound source, light source (from left to right).

Examples of point entities


You won't see any icons in the game, but the objects exist and perform their functions.


Editing entity properties

Entity object properties are called by keyboard shortcut [Alt-Enter] or in 2D view in the right-click menu, item Properties. Before calling the properties of an entity object, it must be selected (which is quite logical :).

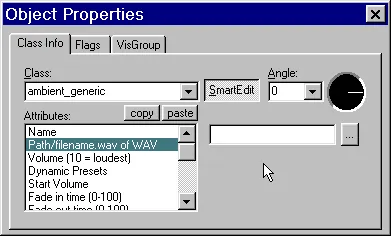
The properties of all entity objects look something like this:

Editing object properties

Explanations for the picture:

Class
The name of the entity object. At the beginning of the name is the class, and after the underscore "_" is the name of the object itself. Transforming one object into another is as easy as shelling pears. Just select another object from the list.

Attributes
Object properties. Each object has both its own properties and common ones that most objects have. General properties include: Name And Target.

    Name
    Object name. A name must be given to an object if it will be activated (turned on/off) by another object.

    Target
    This field contains the name of the object that should be activated. For example, we have a light bulb named LAMP and a button. In order for the light bulb to turn on when you press a button, you need to enter the name LAMP in the "Target" parameter of the button.

Remember that it is not necessary to set all the properties that an object has; it is enough to specify only the necessary ones. It often happens that an object has, say, 10-15 properties, of which only 2-3 are really useful and often used.

Angle
For some objects (light sources, some types of doors, buttons, etc.), an important parameter is "Angle" (see the figure above), which sets the direction of action of the object (the side of the doors opening, the direction of light rays, etc.). You can indicate the direction in degrees or in a black circle, setting the required angle with a dash.

Smart Edit button
"Smart Edit" is a button that switches the display modes of entity object properties. By default, "Smart Edit" is clicked and you see the properties of any object, as shown in the picture above. For some objects there are no such properties. In this case, you need to press "Smart Edit" and change the properties in a slightly less convenient form (but nothing can be done, it's good that there are only a couple of such objects). But at first you will not encounter such objects. Just keep this in mind.

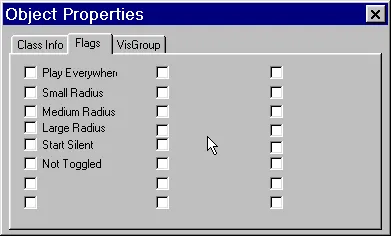
Flags tab
Many entities, along with properties, have flags (additional parameters). Flags are set in the "Flags" tab. For example, for sound there is a flag "Play everywhere" (so that the sound plays throughout the map). Flags, like properties, can be different for different objects. And again, you should not set all the flags - only the necessary ones.

Window where flags are set

Finally, I would like to say that not all objects work correctly and are not buggy. If something doesn't work out for you, just try to implement your idea using other objects. Show the ingenuity characteristic of a Russian person! :)


Entity.

§ 1.   1. Brushes
§ 2.   35 Main Entity Objects
§ 3.   1. Basic Parameters

§ 4.1   Properties of All Env Objects
§ 4.2   Properties of All Func Objects
§ 4.3   Properties of All Game Objects
§ 4.4   Properties of All Info Objects
§ 4.5   Properties of All Trigger Objects
§ 4.6   Properties of All Xen Objects
§ 4.7   Properties of All Other Objects

To the list of objects

E.2

Main Entity Objects


35 main entities

Added by: root
2013-02-07 03:50:10
2761 view

In this article we will look at the properties of 35 main entity objects used to build CS maps. We simply selected the most commonly used entities from the more than 115 described in the rest of the Entity Object Reference Documents.

Despite the huge number of entity objects, only a quarter of them are actually used! The rest are used very rarely and will certainly not be needed by a novice mapper.

To begin with, let's list those objects that almost no map can do without:

The most necessary objects
  info_player_deathmatch   Determines the spawn location of 1 terrorist
  info_player_start   Determines the location where 1 counter appears
  light   "Bulb" (small light source for illuminating rooms)
  light_environment   "Sun" (the main source of light on sky maps)
  func_buyzone   Determines where to buy weapons (usually at team bases)
  func_bomb_target   Determines where to plant a bomb
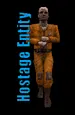
  hostage_entity   Determines the spawn location of 1 hostage
  func_hostage_rescue   Determines a place to rescue hostages

The following objects are also used quite often and represent various objects used by the player (stairs, doors, buttons, breakable objects, cars, cameras, water, etc.).

Frequently used objects
  trigger_auto   Activates an object after the map is loaded (without player participation)
  trigger_multiple   Allows you to activate an object multiple times
  ambient_generic   Inserts sound onto the card
  func_breakable   Breakable object
  func_button   Button
  func_door   Door sliding to the side
  func_door_rotating   Revolving door
  func_illusionary   Visible but intangible object (can be walked through)
  func_ladder   Vertical ladder (for example, like on cs_assault)
  func_pushable   Movable object
  func_tracktrain   Controllable train
  func_traincontrols   Defines the area from which the player can control the train
  path_track   Trajectory point for a controlled train func_tracktrain
  func_vehicle   Car
  func_vehiclecontrols   Defines the area from which the player can control the vehicle
  func_wall   Wall, box, something with properties
  func_water   Water
  info_target   Used as a target for some objects (for example, trigger_camera)
  infodecal   The object is a decal (traces from grenade explosions, bullet holes, etc.)
  trigger_camera   Camera (for example, like on cs_assault)
  trigger_hurt   Damages the player
  cycler   Inserts a model onto the map
  cycler_sprite   Inserts a sprite onto the map
  multi_manager   Can activate up to 16 objects at set intervals
  env_glow   Glow (haze) around light bulbs
  env_sprite   Inserts a sprite onto the map
  env_render   Changes object transparency and other display options


1. The most necessary objects (properties)

1. Info_player_deathmatch

info_player_deathmatch The object determines the spawn location of 1 terrorist. Make sure that this object is located at some distance above the surface of the earth, and is not "built in" into walls and does not touch other similar objects, otherwise, once born, the player will not be able to move or will die altogether.

With the "Angle" parameter you can set the direction the player is looking after he appears. This can be useful if the player is facing a wall and needs to spend time at the beginning of the round turning around. The desired angle can be easily determined in the editor in the top view.


2. Info_player_start
info_player_start The object determines the location where the counter-terrorist will appear. Make sure that this object is located at some distance above the surface of the earth, and is not "built in" into walls and does not touch other similar objects, otherwise, once born, the player will not be able to move or will die altogether.

With the "Angle" parameter you can set the direction the player is looking after he appears. This can be useful if the player is facing a wall and needs to spend time at the beginning of the round turning around. The desired angle can be easily determined in the editor in the top view.


3. Light
light A small light source (something like a light bulb). The object is used to illuminate rooms. In properties you can set the color and brightness of the light.
properties:
Target
Typically this parameter is not used. However, you can enter the name of the target object (info_target) here. Then the light from the light bulb will be directed towards this object. If you leave this parameter empty, the light will spread in all directions

Name
If you give the light bulb a name, it can be turned on/off with a button or trigger

Brightness
The color (in RGB format - red, green, blue) and brightness of the light are indicated here. The first three digits are responsible for color, the last - for brightness

To define a color, click the "Pick color" button and select the desired color. Click OK. The first three digits have already been determined. All that remains is to set the brightness of the light bulb to the fourth digit. Usually the values ​​are set from 80 to 250 (the higher the value, the brighter the light shines)

Note: if you set all four values ​​to 0 0 0 0, the light bulb will glow white with medium brightness

Appearance
Type of light bulb (regular is installed by default, there is also a fast or slow pulsating, etc.)

Custom Appearance
Here you can set the lamp flickering parameters. To do this, combinations of letters of the English alphabet from a to z are used, where "a" is an extinguished light bulb, "z" is a burning one. For example, the combination abcdedcba will make the light bulb first come on, then go out, then repeat

To be able to set your own flickering mode, you need to give the light bulb a name (Name), while there is no need to activate the light bulb, it will light up on its own

flags:
Initialy dark
If checked, the light will be turned off at the start of the round. To turn on a light bulb, it must be activated by a button or trigger


4. Light_environment
light_environment The main source of light on sky maps. Used to create general map lighting that is projected from the sky (i.e. SKY brushes located around the map and painted on all sides with the SKY texture).
properties:
Name
Name (not necessary)

Pitch Yaw Roll (Y Z X)
Here the direction of light is determined. The required direction of light can be easily determined by setting the view from above and indicating the required angle in the "Angle" parameter

Pitch
The angle in degrees at which the light is directed towards the ground. Use only negative values ​​here. For example, a value of -90 means the direction of light is perpendicular to the ground. Commonly used values ​​are -60, -45 and -30. The closer the value is to 0, the longer the shadows cast by walls and other objects on the map will be.

Brightness
The color (in RGB format - red, green, blue) and light brightness (0-255) are indicated here. The first three digits are responsible for color, the last - for brightness

To define a color, click the "Pick color" button and select the desired color. Click OK. The first three digits have already been determined. It remains to set the brightness of the light to the fourth digit. Values ​​from 0 to 255 (the higher the value, the brighter the light). For a night map, set the value to 10-15; for a day map, values ​​from 70 to 150 are usually used


5. Func_buyzone
Defines an area for purchasing weapons (usually located at team bases). The object must be painted over on all sides with a special AAAtrigger texture.
properties:
Team
This indicates which team can buy weapons within this zone (All teams - both teams / Terrorist / Counter-Terrorist)


6. Func_bomb_target
On de-maps, this object determines the location for planting a bomb. Used instead of info_bomb_target, moreover, cancels its effect (if it is present on the map). Allows you to more accurately determine the location of the bomb. To create a bomb site, you need to make a brush, painted on all sides with the AAAtrigger texture and then turn it into the func_bomb_target entity.
properties:
Target (then bomb blows)
The name of the object that should explode with the bomb (like the crates on de_dust). To explode several objects at the same time (for example, 5 boxes), you should turn them into func_breakable, give them the same names and set the "Only trigger" flag for each


7. Hostage_entity
hostage_entity The object determines the spawn location of 1 hostage. Make sure that this object is located at some distance above the surface of the earth, and is not "built in" into the walls and does not touch other similar objects, otherwise, once born, the hostage will not be able to move.
properties:
Model
Path to the *.mdl file with the hostage model, by default models/hostage.mdl

Skin
Here you can select the skin (clothing) of the hostage, if the model has several of them. Models and skins can be viewed using the Half-Life Model Viewer program


8. Func_hostage_rescue
On CS maps, this object determines the location for rescuing hostages. Used instead of info_hostage_rescue, moreover, cancels its effect (if it is present on the map). Allows you to more accurately determine the location of hostage rescue.


2. Frequently used objects (properties)

9. Trigger_auto
trigger_auto Activates the object specified in the "Target" parameter immediately after loading the map. Valid only once, i.e. in the second and all subsequent rounds the object will no longer be activated. We recommend setting the delay before activation to at least 0.5 seconds. This is necessary so that all objects on the map have time to appear before trigger_auto starts activating something.
properties:
flags:
Remove on fire
If checked, then after activation, trigger_auto will be destroyed (Attention! The object will be destroyed for all remaining rounds!)


10. Trigger_multiple
trigger_multiple A trigger allows you to repeatedly activate any object. Often sounds on maps are activated via trigger_multiple.
properties:
Target
Enter here the name of the object that needs to be activated when the player passes through trigger_multiple

Name
If you give a trigger a name, it can be activated by a button or another trigger. If you don't specify a name, the trigger will fire when the player walks through it

Kill target
Here you can enter the name of the object that will be destroyed after activating trigger_multiple (Attention! The object will be destroyed for all remaining rounds!)

Master
Multisource object name

Delay before trigger
Time in seconds until the object specified in "Target" is activated

Delay before reset
Time in seconds after which the trigger can be activated again (during this time the trigger will not work)

flags:
Pushables
If checked, trigger_multiple can be activated not only by passing through it, but also by moving func_pushable objects


11. Ambient_generic
ambient_generic Using this object, sounds in wav format are inserted onto the card.
properties:
Name
If you give a sound a name, you can turn it on/off with a button or trigger

Path/filename.wav of WAV
Here you need to specify the path to the sound file in wav format (usually sounds are placed in the cstrike/sound/ambience folder). You can also find sounds in the pak0.pak archive, in the valve folder

Volume (10 = loudest)
Sound volume. Values ​​(0 - 10), 10 - loudest

Dynamic Presets
Various sound settings (may not be specified)

Start Volume
Initial sound volume (must be specified if the two parameters below are set)

Fade in time (0-100)
Time in seconds until the sound volume increases from the initial value (Start Volume) to the final value (Volume)

Fade out time (0-100)
Time in seconds until the sound volume decreases from the final value (Volume) to the initial value (Start Volume)

Other parameters are rarely used

flags:
Play Everywhere
If checked, the sound will be heard throughout the entire map, i.e. from any point

Small Radius
If checked, the sound will be heard at a short distance (up to 800 units)

Medium Radius
If checked, the sound will be heard at a medium distance (up to 1250 units)

Large Radius
If checked, the sound will be heard over a long distance (up to 2000 units)

Start Silent
If checked, the sound will be turned off at the start of the round and will need to be turned on with a button or trigger

Is NOT Looped
If checked, the sound file will be played once (will not be repeated). To play the sound again, you will need to activate it again


12. Func_breakable
Breakable object (glass, boxes, etc.).
properties:

Name
If you give an object a name, it can be destroyed by another object, as if it were simply shot at

Target on break
Name of the object that will be activated when destroyed func_breakable

Strength
The strength of the object being broken. A durability value of 25-30 approximately corresponds to 1 shot from a rifle, 50-60 - 2 shots, etc. You can set any values ​​up to several thousand

Material type
Type of material (the object will fall apart into pieces of the selected material)

Glass - glass
Wood - tree
Metal - metal
Flesh - flesh
Cinder block - blocks
Ceiling tile - tiles
Computer - computer
Unbreakable glass - unbreakable glass
Rocks - stones

Gibs direction
The direction of scattering of pieces of a destroyed object (Random - in different directions, Relative to attack - depending on which side the object was destroyed from)

Delay before fire
Time in seconds from the destruction of the object to the activation of the object specified in "Target on break"

Gib model
Type of pieces upon destruction (may not be specified)

Spawn on break
An object that appears from a destroyed object (not used in CS)

Explode magnitude (0=none)
The power of the explosion when an object is destroyed (set this to 0 so that there is no explosion)

display options

flags:
Only trigger
If checked, the object cannot be destroyed simply by shooting at it. It will only collapse if activated by another object (trigger)

Touch
If checked, the object will be destroyed when touched.

Pressure
If checked, the object will collapse from pressure

Instant crowbar
If checked, the object will be destroyed by 1 hit with a crowbar (applies to Half-Life)


13. Func_button
Creates a button that can be used to activate other objects (for example, opening doors). When pressed, the button moves in the direction specified in the "Angle" field at a distance equal to its thickness.
properties:
Name
If you give a button a name, it can be activated by another object

display options

Speed
The speed at which the button moves when pressed is 5 by default (does not work when the "Don't move" flag is set)

Targetted object
The name of the object that will be activated when the button is clicked

Health (shootable if > 0)
The "durability" of the button is 1 by default. To enable the button to be pressed by shooting at it, set a value greater than 0. The button will be pressed after the damage level exceeds the specified value

Lip
If it is necessary that when pressed the button moves further or vice versa closer than the distance of its thickness, then specify here the required number of units for additional shift. Both positive and negative values ​​are possible (distance = button thickness - Lip

Master
Multisource object name

Sounds
Sound when pressed

Delay before reset (-1 stay)
Time in seconds during which the button cannot be pressed again. After this time, the button can be pressed again (set the value to "-1" so that the button can only be pressed once per round)

Delay before trigger
Time in seconds from pressing the button to activating the object specified in "Targeted object"

Locked sound, Unlocked sound, Locked sentence, Unlocked sentence
Sounds for different button states (can be omitted)

flags:
Don't move
If checked, then when pressed the button remains motionless and will work instantly (we recommend checking this box)

Toggle
If checked, then after pressing the button will remain depressed; to release it, you must press it again

Sparks
If checked, sparks will shoot out from the unpressed button in different directions.

Touch activates
If checked, you can press the button by simply touching it (no need to press "E")


14. Func_door
Creates a door that slides to the side. The desired direction of door opening is indicated by the "Angle" parameter (by numbers or by rotating the dash to the desired angle). To correctly determine the direction (angle) of opening, set the view from above (2D top), then opening to the left will be equivalent to 180°,
to the right - 0°. You can also select "Up" or "Down" from the list so that the door opens up (to the ceiling) or down (to the floor).

In fact, the use of this object is not limited to creating only sliding doors. Using func_door you can create an elevator, platform and other similar objects.
properties:
Name
If you give the door a name, it can be opened with a button or trigger

display options

Kill target
Enter here the name of the object that needs to be destroyed (removed) after opening the door (Attention! The object will be deleted for all remaining rounds!)

Speed
Door movement speed when opening/closing, default 100

Master
Multisource object name

Move sound
Sound when door moves

Stop sound
Sound when closing the door

Delay before close, -1 stay open
Time in seconds until the door closes automatically (set the value to "-1" to keep the door open)

Lip
By default, the door moves a distance equal to its width. If you set a value here, the door will open at: (distance = width - Lip). Set a negative value to move the door further, a positive value to move it less.

Damage inflicted when blocked
The number of percent of life taken from a player when he gets caught under a closing door (it's better to leave it at 0)

Target
Here you can enter the name of the object that will be activated when the door is opened

Delay before fire
Time in seconds from closing the door to activating the object specified in "Fire on close"

Fire on close
Here you can enter the name of the object that will be activated when the door is closed

Health (shoot open)
The "strength" of the door, by default, is 1. To allow the door to be opened by shooting at it, set a value greater than 0. The door will open after the level of damage exceeds the specified value

Locked sound, Unlocked sound, Locked sentence, Unlocked sentence
Sounds for different door states (can be omitted)

flags:
Starts open
If checked, the door will be open at the beginning of each round.

Passable
If checked, the door will be immaterial, i.e. it will be possible to pass through it

Toggle
If checked, once opened the door will not close automatically until it is activated again

Use only
If checked, the door will open only when you press the "Use" button (default "E")


15. Func_door_rotating
Creates a revolving door. Construct a brush in the form of a door and an axis of rotation (the axis of rotation is determined by the ORIGIN brush, i.e. a brush painted on all sides with the ORIGIN texture). Place the brush axis instead of the rotation axis. Select the door brush and the axis brush at the same time and turn them into func_door_rotating, then start setting the properties.
properties:
The properties are similar to those of the func_door sliding door, with just one new parameter:

Distance (deg)
Door rotation angle when opening in degrees (default 90)

display options

flags:
The flags are similar to the func_door sliding door flags, here are just a few new ones:

Reverse dir
If checked, the door will open in the opposite direction

One-way
If checked, the door will always open in the same direction

X Axis, Y Axis
If necessary, here you can specify the axis relative to which the door will open (by default, the door opens relative to the vertical Z axis)


16. Func_illusionary
Creates an intangible object, i.e. through which you can walk freely.

1. Creating transparent bars or fences

Using func_illusionary, you can create a fence or grate that can be shot through, which will simultaneously block the player's movement. To do this, you need to paint over such a fence with a texture with a mask (the names of such textures begin with a curly bracket "{").

Then turn the fence into func_illusionary and set the following parameters in the properties:
"Render Mode" - Solid, "FX Amount" - 255 (this will make the blue places on the textures transparent in the game).

Now create a regular brush (the same size as the fence), but painted on all sides with the CLIP texture and place it close to the fence. Now you have a shootable transparent fence that you can't get through

2. Creating objects that do not catch the player

In narrow places (corridors, tunnels, ventilation) some small objects, for example, flashlights, etc. can interfere with the player's movement (tangle him). To prevent this from happening, simply turn such an object into a func_illusionary. There is no need to set any additional properties.
properties:
Name
Name (optional)

Contents
Filling the object (we recommend leaving it as "Empty")

display options


17. Func_ladder
Creates an invisible (in-game) area that the player can climb up. Used to create vertical stairs. First you need to create a brush in the shape of a ladder (for painting, use a texture with a mask, the name of such textures begins with a parenthesis "{", for example, {LADDER1), then turn the brush into a func_illusionary and in the properties set the following parameters: "Render Mode" - Solid, "FX Amount" - 255. Then, close to this brush, create another brush of the same size, painted on all sides with the AAAtrigger texture and turn it into func_ladder.
properties:
Name
Name (optional)


18. Func_pushable
Creates an object that can be moved.
properties:
The properties of this object are similar to func_breakable, here are just three new parameters:

display options

Hull Size
Object size (we recommend setting "Point size")

Friction (0-400)
This parameter determines the degree of resistance to movement when the player pushes an object; the larger it is, the more difficult it is to push it. Values ​​from 0 to 400

Buoyancy
Object buoyancy (how long the object will submerge in water), default 20

flags:
Breakable
If checked, the object can not only be moved, but also destroyed (Attention! The object can only be destroyed once; in all subsequent rounds this object will no longer be there!)


19. Func_tracktrain
The object creates a controlled platform or train that travels along a specific route specified by path_track objects, while focusing on them with its center (the center of the train is the center of the ORIGIN brush, see below). Since this is a rotating object, it is necessary to define the axis of rotation. To do this, you should build a brush, painted on all sides with the ORIGIN texture, then place it instead of the rotation axis. Next, you should select the train and brush axle and turn it into func_tracktrain. To be able to control (accelerate/decelerate) such a train, you need to create func_traincontrols. When creating the train, you need to orient the front to the west (left) in the top view, and in the game it will appear on the first path_track object and will be directed to the second path_track object.

Func_tracktrain is one of the few objects that can contain CLIP brushes (a CLIP brush is a regular brush, painted on all sides with a CLIP texture. Such a brush is not visible in the game, but at the same time does not allow the player to pass through it). Use CLIP brushes if you need to limit the player's movements on the platform (train) in certain directions.
properties:
Name
Give the train a name so it can be controlled

display options

Sound
The sound made by a train when moving

First stop target
The name of the first route point (path_track object). At the beginning, the train will be located at this object and directed towards the second such object

Distance between the wheels
Distance between train wheels. This parameter determines how the train will turn, usually the length of the train is suitable

Height above track
The height of the train above the path_track objects (actually the height between the center of the ORIGIN brush and the path_track objects)

Initial speed
The initial speed of the train (if a value other than 0, the train will start moving at the beginning of the round on its own). For uncontrolled trains, this is a constant speed, which, however, can be changed in the properties of path_track objects

Speed
Maximum movement speed for a controlled train, units per second

Damage on crash
The percentage of life taken from a player when he gets hit by a train

Bank angle on turns
Train tilt angle when turning

flags:
No Pitch (X-rot)
If checked, the train will only turn around the vertical Z axis (i.e. left/right only)

No User Control
If checked, the player will not be able to control the train

Passable
If checked, the train will be intangible, i.e. it will be possible to pass through it


20. Func_traincontrols
The object is used to create an area from which the player can control the train. To create such an area, you need to make a brush, painted on all sides with the AAAtrigger texture, turn it into func_traincontrols and place it on the intended location of the train (platform) control. Then, in the "Train Name" parameter, specify the name of the train that you intend to control.
properties:
Train Name
Enter here the name of the train that the player will control


21. Path_track
path_track Using path_track objects, the trajectory of the func_tracktrain train or the initial direction of the func_vehicle are determined.
properties:
Name
Give this object a name

Next stop target
Enter here the name of the next path_track object in the trajectory, the train will move towards it when it crosses this point

Fire On Pass
Enter here the name of the object that needs to be activated when the train passes through this waypoint

Branch Path
Enter the name of another path_track object here if you need to create a branched path. Then, when the path_track object is activated, the train will not go to the "Next stop target", but to this point

Fire on dead end
If the next track point is not specified (empty "Next stop target" parameter) and there is no branched track, then when the train reaches this path_track point, the object specified in this parameter will be activated

New Train Speed
With this parameter you can change the speed of the train after crossing this point on the track

flags:
Disabled
If checked, path_track will be disabled

Fire once
If checked, the object specified in the "Fire On Pass" parameter will be activated only once, and not every time the train passes this waypoint

Branch Reverse
If checked, the train will move to another track specified in the "Branch Path"

Disable train
If checked, the train will stop at this point


22. Func_vehicle
The object creates a controlled vehicle (car) that can drive in any direction, including in reverse. To create a car you will need two path_track and one func_vehiclecontrols objects. Since this is a rotating object, it is necessary to define the axis of rotation. To do this, you should build a brush, painted on all sides with the ORIGIN texture, then place it instead of the rotation axis. Next, you should select the car and the brush axle and turn it into func_vehicle. When creating a car, you need to orient the front to the west (left) in the top view, and in the game it will appear on the first path_track object and will be directed to the second path_track object.
properties:
Name
Give the car a name so it can be driven

display options

First stop target
The name of the first path_track object (at the beginning the car will be located on this object and directed towards the second such path_track object)

Sound
The sound made when the car is moving

Length of the vehicle
Length of the vehicle in units (we recommend setting a value less than the length by 8-16 units for ease of control)

Width of the vehicle
Vehicle width in units (we recommend setting a value smaller than the width by 8-16 units for ease of control)

Height above track
The height of the car above the road (height measured from the center of the ORIGIN brush), in units

Initial speed
Initial movement speed (if the value is greater than 0, the car will start moving at the beginning of the round on its own)

Speed
Maximum vehicle speed, units per second

Damage on crush
The percentage of life taken from a player when he is hit by a car

Volume (10 = Loudest)
Sound volume. Values ​​from 0 to 10 (10 is the loudest)

Bank angle on turns
Vehicle tilt angle when turning

flags:
No Pitch (X-rot)
If checked, the machine will only rotate around the vertical Z axis

No User Control
If checked, the player will not be able to control the car

Passable
If checked, the car will be intangible, i.e. it will be possible to pass through it


23. Func_vehiclecontrols
The object is used to create an area from which the player can control the car. To create this area, make a brush painted on all sides with the AAAtrigger texture, add it to func_vehiclecontrols and in the "Vehicle name" parameter enter the name of the car that you are supposed to control (func_vehiclecontrols should be placed in the intended location for controlling the vehicle).
properties:
Vehicle name
Enter here the name of the car that the player will drive


24. Func_wall
Externally, the object is no different from ordinary brushes. This object can be boxes, walls, and many others. etc. But unlike ordinary brushes, func_wall has properties, for example, it can be transparent (used to create glass).

Grilles and stairs

Also func_wall can be used to create transparent grates and stairs. To do this, the object is painted over with a texture with a mask (the names of such textures begin with a curly bracket "{"). These textures have bright blue parts that will be completely transparent in the game. If you paint with a texture with a mask, for example {LADDER1, a regular brush (not an entity), then in the game the blue places will be black. To make them transparent, turn this brush into func_wall and set the following display parameters in the properties: "Render Mode" - Solid, "FX Amount" - 255.

Unbreakable glass

To create unbreakable glass, turn the brush into func_wall and set the following display parameters in the properties: "Render Mode" - Texture, "FX Amount" - ranging from 0 to 255. The value FX Amount = 0 corresponds to completely transparent glass, and 255 - absolutely opaque.

Map optimization

Use func_wall to convert small parts, such as lamps on ceilings. This will help avoid breaking brushes (walls, ceilings, etc.) into a larger number of polygons (you can read more about map optimization in the articles in the Tutorial).
properties:
Name
Name (optional)

display options


25. Func_water
The object is used to create water.

Water can be created in three different ways, which you can learn about from the articles in the Tutorial.
properties:
The properties are similar to those of func_door, but there are just two new parameters:

Name
If you give the water a name, it can be lowered/raised (ala a swimming pool)

display options

Contents
Liquid type (Water - water, Slime - mucus, Lava - lava)

Wave Height
Wave height, in units. Default value 0


26. Info_target
info_target Used as a target for some objects, for example, trigger_camera, env_beam and some others.
properties:
Name
Give this object a name, and then write it in the "Target" parameter of the trigger_camera object, then the camera will point to info_target. It is not necessary to use info_target for the camera; you can specify any other object with a name, then the camera will point to it. Info_target is used simply for convenience (since it does not require setting practically any properties)


27. Infodecal
This object allows you to insert (or rather apply) decals onto the map, i.e. special textures that are applied on top of the main texture to simulate various scratches, traces of grenade explosions, bullet holes, etc.

You can read more about applying decals in the articles in the Tutorial.


28. Trigger_camera
trigger_camera The object allows you to place a camera on the map, through which the player who activates it will be able to look at predetermined areas of the map (similar cameras are used on cs_assault).

Read more about the various ways to use cameras in the articles in the Tutorial from the "Cameras" section.
properties:
Target
The name of the object to which the camera's gaze will be directed (target). The target can be any object that has a name. Typically the info_target object is used for these purposes.

Delay before trigger
Time in seconds until the KillTarget is destroyed

KillTarget
Here you can enter the name of the object that will be destroyed after the first activation of the camera (Attention! The object will be destroyed for all remaining rounds!)

Name
Give the camera a name so it can be activated using a button or other trigger

Hold time
Time in seconds during which the player will see the camera image

Path corner
Name of the first object path_corner (needed for a moving camera)

Initial speed
Initial speed of camera movement (needed for a moving camera)

Acceleration units/sec^2
Acceleration of camera movement, units per second2

Stop deceleration units/sec^2
Camera braking before the end of movement, units per second2

flags:
Start at player
If checked, the camera will start moving from the location of the player's eyes

Follow player
If checked, the camera will follow the player (keep him in focus)

Freeze player
If checked, the player will not be able to move when looking at the camera


29. Trigger_hurt
trigger_hurt Causes damage of various types to the player who passes through it: electric shock, freezing, etc. For example, you can make a fire and place a trigger_hurt around it, then when passing through the fire, the player will receive damage.
properties:
Name
Give the trigger a name so you can turn it on and off. If you don't specify a name, the trigger will fire when the player walks through it

Target
Enter here the name of the object that needs to be activated when activating trigger_hurt

Master
Multisource object name

Damage
The amount of damage inflicted to a player caught in the trigger area (percentage per second)

Delay before trigger
Time in seconds until the object specified in "Target" is activated

Damage type
Type of damage (general, fall, burn, freezing, poisoning, shock, radiation, paralysis, etc.)

flags:
Target once
If checked, trigger_hurt will activate the object specified in "Target" only once. Otherwise trigger_hurt will activate the object every time someone walks through it

Start off
If checked, the trigger will initially be disabled (no damage will be dealt to the player until the trigger is enabled)

FireClientOnly
the flag is not used in CS

TouchClientOnly
the flag is not used in CS


30. Cycler
cycler Using this object, models (*.mdl files) are inserted onto the map. You can view models using the Half-Life Model Viewer program.
properties:
Name
If a name is given and the model is activated (by a button or trigger), then the animation currently playing will be stopped. And when you shoot at the model, the next animation frame will be played

Model
Path to the *.mdl file with the model (usually models are placed in the cstrike/models folder). You can also find models in the pak0.pak archive, in the valve folder

display options


31. Cycler_sprite
cycler_sprite Using this object, sprites (*.spr files) are inserted onto the map. You can view sprites using the Sprite Explorer program.
properties:
Name
If a name is given and the sprite is activated (by a button or trigger), then the animation currently playing will be stopped. And when you shoot at a sprite, the next frame of animation will be played

Sprite
Path to the *.spr file with the sprite (usually sprites are placed in the cstrike/sprites folder). You can also find sprites in the pak0.pak archive, in the valve folder

Frames per second
Sprite animation playback speed, frames per second. Default value: 10

display options


32. Multi_manager
multi_manager This object allows you to activate up to 16 other objects at specified intervals.

To use it, you need to press the "SmartEdit" button and, by clicking the "Add" button, enter the name of the object in the "Key" parameter and the time of its activation in the "Value" parameter. If there are several objects, the operation must be repeated.
properties:
Name
Give this object a name so it can be activated by a button or trigger

Usage example
Let's create two ambient_generic sounds. Let's name the first sound sound-1, the second sound-2. Now let's install a multi_manager object on the map and give it the name manager-1. In its properties, press the "SmartEdit" button and click "Add". A window will appear with the parameters "key" and "value", where "key" is the name of the object that needs to be activated, "value" is the time in seconds before activating this object

Let's enter the name of the first sound (sound-1) into the "key" parameter, and the value 0 into the "value" parameter. Let's do the same for the second sound, i.e. press the "Add" button again and enter sound-2 in "key", and enter the value 10 in "value"

In the game, after activating the multi_manager object, the sound sound-1 will be played, and after 10 seconds - sound-2. This way we can activate up to 16 different objects. This can be not only sounds, but also doors, lights, as well as other multi_manager objects, etc.

flags:
multithreaded
Allows you to restart multi_manager, even if it is already running and activates some objects. Let's explain the effect of this flag using an example: suppose that when the multi_manager object is activated, 3 messages are displayed on the player's screen in turn (3 game_text objects are used) with an interval of 10 seconds. If at the same time another player reactivates multi_manager, he will not see the messages, because multi_manager has already been started and is doing its job. Check this flag so that the second player can see the messages, i.e. to make multi_manager restart for the second player


33. Env_glow
The object is used to create a glow (shine, haze) effect around the light source. The further the player is from env_glow, the more blurry (transparent) the glow will be.
properties:
Name
Object name (this object cannot be turned on and then turned off by a button or other trigger. To be able to turn on/off the glow (haze) effect, use the env_sprite object instead of env_glow)

Render FX
Visual mode of object display. You can leave it at "Normal", then the haze will blur (disappear) as the player moves away; if you set the "Constant Glow" mode, the haze will have a constant brightness, no matter how far the player is from it (we think this is a less beautiful option).

Render Mode
For this object you should always use the "Glow" mode

FX Amount (1 - 255)
The degree of transparency of the glow (haze). Values ​​(1 - 255). The lower the value, the more transparent the object and vice versa

FX Color (R G B)
Glow color (haze)

You can read more about these parameters in the article "Display Options"

Model
Path to the sprite file. You can find the required sprite in the pak0.pak archive in the Sprites folder. The path should be specified using a forward slash (/), for example: sprites/glow01.spr. If you are using a sprite from the Sprites folder of the cstrike directory, then simply click on the button with three dots and select the desired sprite

Sprite Scale
Sprite scale, default 1x1. The higher the value, the larger the effect size.


34. Env_sprite
The object allows you to insert sprites onto the map.
properties:
Name
If you give it to a sprite, it can be turned on/off with a button or trigger

Render FX
Visual object display mode

Render Mode
For this object you should use the "Additive" (most often) or "Glow" (less often) modes.

FX Amount (1 - 255)
Degree of transparency. Values ​​(1 - 255), 1 is the most transparent

FX Color (R G B)
Sprite color in RGB format (red, green, blue)

You can read more about these parameters in the article "Display Options"

Framerate
If the sprite is animated (for example, sprites/steam1.spr), then this parameter determines the frame rate, default is 10 frames per second

Sprite Name
Path to the sprite file. You can find the required sprite in the pak0.pak archive in the Sprites folder. The path should be specified using a forward slash (/), for example sprites/glow01.spr. If you are using a sprite from the Sprites folder in the cstrike directory, then simply click on the button with three dots and select the desired sprite

Scale
Sprite scale, default 1x1. The higher the value, the larger its size

flags:
Start On
If the env_sprite object has a name, then in order for the sprite to appear, you must activate env_sprite with a button or other trigger. Check this flag to automatically show the sprite from the beginning

Play Once
If checked and the sprite is animated, its animation will only play once. To play the animation again you need to re-activate env_sprite


35. Env_render
This object allows you to change the display parameters of other objects. For example, you can make an object transparent when env_render is activated. But remember that a transparent object does not mean intangible! The object does not disappear anywhere and it will still be impossible to pass through it (transparent).

Let's consider the action of this object using the example of creating a disappearing box. Create a brush that looks like a box, turn it into func_wall (to do this, select the brush, press Ctrl-T and select func_wall from the list). Give the crate a name, for example crate1.

Place env_render next to the box, give it a name, for example, crate1_render and in the properties set the following parameters: "Render Mode" - Texture and "FX Amount" - 0. Then create a brush in the form of a button, turn it into func_button and in the "Target" parameter enter the name of the env_render object, i.e. crate1_render.

Now when you press the button the box will disappear.
properties:
Name
The object must be given a name before it can be activated

Target
Enter here the name of the object whose display parameters need to be changed

Render FX, Render Mode, FX Amount (1 - 255), FX Color (R G B)
These are all display parameters that are assigned to the object specified in "Target". You can read more about them in the article "Display Options"

flags:
No Renderfx
If checked, the Render FX parameter will not be applied to the object specified in "Target"

No Renderamt
If checked, the FX Amount parameter will not be applied to the object specified in "Target"

No Rendermode
If checked, the Render Mode parameter will not be applied to the object specified in "Target"

No Rendercolor
If checked, the FX Color parameter will not be applied to the object specified in "Target"


Entity.

§ 1.   What is an entity?
§ 2. 35 main entity objects
§ 3.   Entity object display options


§ 4.1   Properties of all Env objects
§ 4.2   Properties of all Func objects
§ 4.3   Properties of all Game objects
§ 4.4   Properties of all Info objects
§ 4.5   Properties of all Trigger objects
§ 4.6   Properties of all Xen objects
§ 4.7   Properties of all Light objects
§ 4.8   Properties of all other objects

Share:
Keywords:

E.3

Entity Render Parameters

Entity Object Reference
§ 3. Parameters for displaying entity objects

Most brush entity objects such as: func_door, func_illusionary, func_wall and many others. others have display parameters in their properties, which are responsible for how this object will look in the game (whether it will be transparent or completely invisible, etc.) These important parameters will be discussed in this article.

Contents of the article:
* - only for light, light_environment, light_spot objects.

There are quite a few parameters, but pay special attention to two of them: "Render Mode" and "FX Amount".
All others, if used, are used extremely rarely (1 case out of 100 :)


1. Basic parameters

There are four main parameters: Render FX, Render Mode, FX Amount, FX Color. These parameters should be set as needed. For example, if you want to make glass or a transparent grille, then you will need to change some of these parameters. It is not at all necessary to change the display settings for each object; do this only when necessary.

    a) Render FX

    Render FX allows you to change the visual mode of an object.
    You have the following options to choose from:
    Normal - normal
    Slow Pulse - slow pulsation
    Fast Pulse - fast pulsation
    Slow Wide Pulse - slow wide pulsation
    Fast Wide Pulse - fast wide pulsation
    Slow Fade Away - slow decay (disappearance)
    Fast Fade Away - rapid attenuation (disappearance)
    Slow Become Solid - slow transformation into a continuous medium
    Fast Become Solid - rapid transformation into a continuous medium
    Slow Strobe - slow strobe light
    Fast Strobe - fast strobe light
    Faster Strobe - even faster strobe light
    Slow Flicker - slow flicker
    Fast Flicker - fast flickering
    Constant Glow - constant (continuous) glow
    Distort - distortion
    Hologram (Distort + fade) - hologram (distortion + disappearance)


    When the mode is used:
    This parameter will be useful in cases where you need to make a flickering light, a glow around the light bulbs (for example, when using the env_glow object) or a holographic image.


    b) Render Mode (remember!)

    Render Mode is responsible for how the object will look in the game.
    There are 6 display modes:

      1. Normal — normal (normal) display;

      2. Color — when selecting this display mode, all textures on the object will be replaced with one color, which can be selected in the "FX Color" parameter. The transparency level of the object is set in the "FX Amount" parameter. This mode does not affect monster models (but this does not apply to CS);

      3. Texture — this mode allows you to make an object translucent (for example, used to create glass from func_breakable or func_wall). The transparency level of the object is set in the "FX Amount" parameter;

      4. Glow — this mode, together with the use of the env_glow object, allows you to create a glow (haze) effect around light sources. The transparency level of the glow (haze) is set in the "FX Amount" parameter, and the color is set in "FX Color";

      5. Solid — this mode is applied to objects painted with masked textures (the names of such textures begin with a curly brace "{", for example, {LADDER1 or {FENCE). Such textures and objects are used to create vertical stairs, transparent gratings, fences, etc. The blue parts of the textures will be transparent in the game if the mode is selected: "Render Mode" - Solid and "FX Amount" — 255

      6. Additive — this mode is similar to the "Texture" mode, but unlike it, it allows you to see through an object (used along with the Texture mode when creating water from func_water).


    c) FX Amount (remember!)

    FX Amount changes the transparency of an object. The values ​​of this parameter range from 0 to 255.

      FX Amount = 0 (the object will be completely transparent, invisible in the game)
      FX Amount = 255 (object is opaque).

    All other values ​​from 0 to 255 give the object varying degrees of transparency.


    d) FX Color

    For the "Color" and "Glow" display modes (see points 2 and 4 of the "Render Mode" parameter above) determines the color of the object.


2. Additional display options

(Available only when using ZHLT compilers).

In the very first article of our Tutorial, we agreed to use the Zoner utility (ZHLT) to compile maps. And if so, then additional parameters will be available in the properties of objects, which may be useful in some cases.

    a) Light Flags — lighting flags.

    By default, all entities allow light to pass through, i.e. do not cast shadows. For example, if there is a box on the map made from func_wall, then it will not cast a shadow in the game. If a shadow is needed, you need to change the value of the lighting flags from Normal, for example, to Opaque (Block Light).

    Be careful when using flag (3) - Opaque (Block Light). If you set this flag for destructible func_breakable objects or moving func_pushable objects (this also applies to all kinds of platforms, trains, cars), then when such objects are destroyed/moved, the shadow will remain in place! Therefore, we DO NOT recommend setting lighting flags for such objects.
      1. Normal — default (the object does not cast shadows);

      2. EmbeddedFix - do not use complex lighting correction. Sometimes a brush object passing through a wall is not properly lit. Use this flag to avoid this situation;

      3. Opaque (Block Light) — the object casts shadows. Makes an object "opaque", causing it to cast a shadow. It is useful to use this flag on func_wall, some func_illusionary, func_door and possibly other objects to achieve various effects;

      4. Opaque + Embedded Fix is a combination of the previous two flags;

      5. Opaque + Concave Fix - used for curved func_wall objects, especially arches. When these objects have the Opaque opaque flag (3), the inside of the arch (the concave part) will have dark edges, especially where the brushes join. Setting the ConcaveFix flag solves the problem of dark seams, but the object cannot use the EmbeddedFix flag when doing so.


    b) Light Origin — sets the selective location of the light.

    Light Origin can be used to position a brush object anywhere to calculate lighting. The object doesn't actually move anywhere, but the lighting (shadow) is calculated as if the object were present in a different location.

    To use, install the info_target object in the desired location, give it a name, and then enter this name in the "Light Origin" parameter. If the object is opaque (flag (3) - Opaque (Block Light) is set), the object will cast a shadow in two places: in the place where it itself is, and in the place where info_target is located.


    c) Minimum light level (sometimes found _minlight) — sets the minimum illumination for all surfaces of the object.

    You can use this parameter for objects located in dark areas of the map, so that it (the object) is not completely black and difficult to see. When using a value greater than zero, all sides (surfaces) of the object will be illuminated equally, which looks somewhat unrealistic.


    d) _fade (only light, light_environment, light_spot objects have them).

    Sets the darkness level for the lights on the map (higher values ​​result in less light spreading).

    This parameter is a coefficient in the formula for calculating shading (1/distance2). With it you can adjust the distance over which direct light spreads on the map. Individual lighting objects can have their own dimming values.

    This parameter only affects direct lighting, since reflected light always has a dimming formula (1/distance2). Default value is 1.0; when approaching 0.0 the light will spread further than usual; and above 1.0 the light will spread less.


    e) _falloff (only light, light_environment, light_spot objects have them).

    This parameter allows you to change the formula for calculating dimming (1 = 1/distance; 2 = 1/distance2).


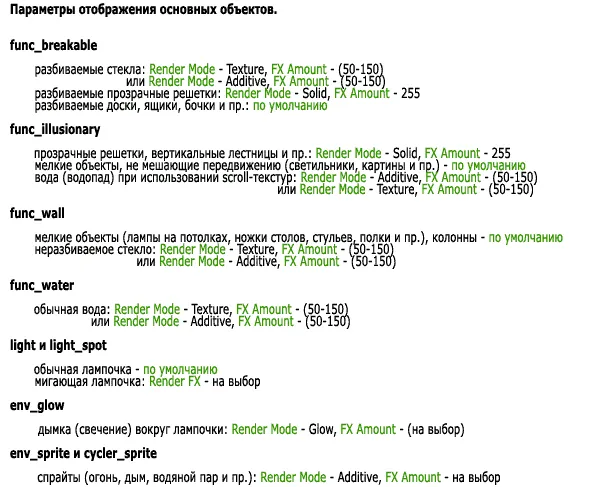
3. Display options for main objects

For convenience, you can use the figure below, which shows the main objects and their display parameters. For other objects, display parameters are set as needed.


Basic Object Display Options


Entity.

§ 1.   1. Brushes
§ 2.   35 Main Entity Objects
§ 3.   1. Basic Parameters

§ 4.1   Properties of All Env Objects
§ 4.2   Properties of All Func Objects
§ 4.3   Properties of All Game Objects
§ 4.4   Properties of All Info Objects
§ 4.5   Properties of All Trigger Objects
§ 4.6   Properties of All Xen Objects
§ 4.7   Properties of All Other Objects

To the list of objects

E.4

Properties of All Env Objects


1. Env_beam
The object is used to create various types of beams from electric to laser.
properties:
Name
If you give an object a name, it can be activated with a button or trigger

Start entity
For the env_beam object, you need to specify the start and end points between which the beam will move. The name of the first object (starting point) is specified here. If the beam is static, then info_target is perfect for the initial object

Ending entity
The name of the second object (endpoint) is specified here. If the beam is static, then info_target is perfect for the target object. If you put several info_target objects and give them the same names, the ray will hit different points (randomly chosen)

Render FX
Beam type (see 1. Basic Parameters)

Brightness (1 - 255)
Brightness (transparency) of the beam. Values ​​(1-255), 255 is the brightest

Beam color (R G B)
Beam color in RGB format (red, green, blue)

Radius
Radius, default 256

Life (seconds 0 = infinite)
Time in seconds that the beam is visible (set to 0 to keep the beam visible)

Width of beam (pixels*0.1 0-255)
Beam width (0-255). In the game, the beam width is calculated using the formula n*0.1, i.e. for example, a value of 100 will correspond to a beam width of 10 pixels in the game

Ammount of noise (0-255)
The degree of beam curvature. Values ​​(0-255), 0 - completely straight (not curved) beam

Sprite name
The name of the sprite that will be the texture for the beam (sprites/laserbeam.spr is taken by default). You can find other ray sprites in the Sprites folder in the pak0.pak archive, which is located in the valve directory

Texture scroll rate (0-100)
Sprite texture movement speed, default 35

Frames per 10 seconds
Beam animation speed

Starting frame
Here you can specify the frame from which to start the animation. Use if there are several beams installed nearby on the map. This will make them look different from each other

Strike again time (secs)
If the value of the "Life" parameter > 0, then here you can set the frequency of the beam appearance in seconds

Damage / seconds
If you want the player to receive damage when hit by the beam, then specify the required value here

flags:
Start On
If the beam has a name, it will be turned off at the beginning of the round. Check this flag to enable the beam

Toggle
If checked, the beam can be turned on and off with a button or other trigger

Random Strike
If checked, the time delay between beam appearances will be a random number from zero (0) to the value specified in "Strike again time"

Ring
This flag is not working yet

Start Sparks
If checked, sparks will fall from the location where the beam appears.

End Sparks
If checked, sparks will shoot from the place where the beam ends

Decal End
If checked, the beam will leave dark spots in the places it hits

Shade Start
If checked, the beginning of the ray will be shaded

Shade End
If checked, the end of the ray will be shaded

Some of these flags do not work quite correctly (namely random strike, ring, start sparks, end sparks and shade end)

If you do not specify the end point, the beam will appear from the start point and hit in a random direction until it reaches the wall. If you do not specify either the start or end points, the beam will appear chaotically in the place where env_beam is located. This can be used to create lightning or teleport

E.5

Properties of All Func Objects

The original Func reference index page is unavailable on cs-mapper2, so this section is rebuilt from the linked individual Func entity pages.

func_bomb_target

Func_bomb_target
On de-maps, this object determines the location for planting a bomb. Used instead of info_bomb_target, moreover, cancels its effect (if it is present on the map). Allows you to more accurately determine the location of the bomb. To create a bomb site, you need to make a brush, painted on all sides with the AAAtrigger texture and then turn it into the func_bomb_target entity.
properties:
Target (then bomb blows)
The name of the object that should explode with the bomb (like the crates on de_dust). To explode several objects at the same time (for example, 5 boxes), you should turn them into func_breakable, give them the same names and set the "Only trigger" flag for each


func_breakable

Func_breakable
Breakable object (glass, boxes, etc.).
properties:
Name
If you give an object a name, it can be destroyed by another object, as if it were simply shot at

Target on break
Name of the object that will be activated when destroyed func_breakable

Strength
The strength of the object being broken. A durability value of 25-30 approximately corresponds to 1 shot from a rifle, 50-60 - 2 shots, etc. You can set any values ​​up to several thousand

Material type
Type of material (the object will fall apart into pieces of the selected material)

    Glass - glass
    Wood - tree
    Metal - metal
    Flesh - flesh
    Cinder block - blocks
    Ceiling tile - tiles
    Computer - computer
    Unbreakable glass - unbreakable glass
    Rocks - stones
Gibs direction
The direction of scattering of pieces of a destroyed object (Random - in different directions, Relative to attack - depending on which side the object was destroyed from)

Delay before fire
Time in seconds from the destruction of the object to the activation of the object specified in "Target on break"

Gib model
Type of pieces upon destruction (may not be specified)

Spawn on break
An object that appears from a destroyed object (not used in CS)

Explode magnitude (0=none)
The power of the explosion when an object is destroyed (set this to 0 so that there is no explosion)

1. Basic Parameters

flags:
Only trigger
If checked, the object cannot be destroyed simply by shooting at it. It will only collapse if activated by another object (trigger)

Touch
If checked, the object will be destroyed when touched.

Pressure
If checked, the object will collapse from pressure

Instant crowbar
If checked, the object will be destroyed by 1 hit with a crowbar (applies to Half-Life)


func_button

Func_button
Creates a button that can be used to activate other objects (for example, opening doors). When pressed, the button moves in the direction specified in the "Angle" field at a distance equal to its thickness.
properties:
Name
If you give a button a name, it can be activated by another object

1. Basic Parameters

Speed
The speed at which the button moves when pressed is 5 by default (does not work when the "Don't move" flag is set)

Targetted object
The name of the object that will be activated when the button is clicked

Health (shootable if > 0)
The "durability" of the button is 1 by default. To enable the button to be pressed by shooting at it, set a value greater than 0. The button will be pressed after the damage level exceeds the specified value

Lip
If it is necessary that when pressed the button moves further or vice versa closer than the distance of its thickness, then specify here the required number of units for additional shift. Both positive and negative values ​​are possible (distance = button thickness - Lip

Master
Multisource object name

Sounds
Sound when pressed

Delay before reset (-1 stay)
Time in seconds during which the button cannot be pressed again. After this time, the button can be pressed again (set the value to "-1" so that the button can only be pressed once per round)

Delay before trigger
Time in seconds from pressing the button to activating the object specified in "Targeted object"

Locked sound, Unlocked sound, Locked sentence, Unlocked sentence
Sounds for different button states (can be omitted)

flags:
Don't move
If checked, then when pressed the button remains motionless and will work instantly (we recommend checking this box)

Toggle
If checked, then after pressing the button will remain depressed; to release it, you must press it again

Sparks
If checked, sparks will shoot out from the unpressed button in different directions.

Touch activates
If checked, you can press the button by simply touching it (no need to press "E")


func_buyzone

Func_buyzone
Defines an area for purchasing weapons (usually located at team bases). The object must be painted over on all sides with a special AAAtrigger texture.
properties:
Team
This indicates which team can buy weapons within this zone (All teams - both teams / Terrorist / Counter-Terrorist)


func_conveyor

Func_conveyor
A conveyor is created using this object. The conveyor pushes the player at a certain speed and in the direction specified in the "Angle" parameter. To create the illusion of a conveyor moving, it must be painted over with a texture starting with the word SCROLL (for example, SCROLL_CONV3, SCROLLTOXIC or SCROLLWATER1).
properties:
Name
If you give the conveyor a name, it can be activated with a button or trigger (with each activation the conveyor will change the direction of its movement)

Conveyor speed
Conveyor speed

flags:
Not Push
If checked, the conveyor will not move objects, but only the player

Not Solid
If checked, the conveyor will be intangible, i.e. it will be possible to pass through it


func_door

Func_door
Creates a door that slides to the side. The desired direction of door opening is indicated by the "Angle" parameter (by numbers or by rotating the dash to the desired angle). To correctly determine the direction (angle) of opening, set the view from above (2D top), then opening to the left will be equivalent to 180°,
to the right - 0°. You can also select "Up" or "Down" from the list so that the door opens up (to the ceiling) or down (to the floor).

In fact, the use of this object is not limited to creating only sliding doors. Using func_door you can create an elevator, platform and other similar objects.
properties:
Name
If you give the door a name, it can be opened with a button or trigger

1. Basic Parameters

Kill target
Enter here the name of the object that needs to be destroyed (removed) after opening the door (Attention! The object will be deleted for all remaining rounds!)

Speed
Door movement speed when opening/closing, default 100

Master
Multisource object name

Move sound
Sound when door moves

Stop sound
Sound when closing the door

Delay before close, -1 stay open
Time in seconds until the door closes automatically (set the value to "-1" to keep the door open)

Lip
By default, the door moves a distance equal to its width. If you set a value here, the door will open at: (distance = width - Lip). Set a negative value to move the door further, a positive value to move it less.

Damage inflicted when blocked
The number of percent of life taken from a player when he gets caught under a closing door (it's better to leave it at 0)

Target
Here you can enter the name of the object that will be activated when the door is opened

Delay before fire
Time in seconds from closing the door to activating the object specified in "Fire on close"

Fire on close
Here you can enter the name of the object that will be activated when the door is closed

Health (shoot open)
The "strength" of the door, by default, is 1. To allow the door to be opened by shooting at it, set a value greater than 0. The door will open after the level of damage exceeds the specified value

Locked sound, Unlocked sound, Locked sentence, Unlocked sentence
Sounds for different door states (can be omitted)

flags:
Starts open
If checked, the door will be open at the beginning of each round.

Passable
If checked, the door will be immaterial, i.e. it will be possible to pass through it

Toggle
If checked, once opened the door will not close automatically until it is activated again

Use only
If checked, the door will open only when you press the "Use" button (default "E")


func_door_rotating

Func_door_rotating
Creates a revolving door. Construct a brush in the form of a door and an axis of rotation (the axis of rotation is determined by the ORIGIN brush, i.e. a brush painted on all sides with the ORIGIN texture). Place the brush axis instead of the rotation axis. Select the door brush and the axis brush at the same time and turn them into func_door_rotating, then start setting the properties.
properties:
The properties are similar to those of the func_door sliding door, with just one new parameter:

Distance (deg)
Door rotation angle when opening in degrees (default 90)

1. Basic Parameters

flags:
The flags are similar to the func_door sliding door flags, here are just a few new ones:

Reverse dir
If checked, the door will open in the opposite direction

One-way
If checked, the door will always open in the same direction

X Axis, Y Axis
If necessary, here you can specify the axis relative to which the door will open (by default, the door opens relative to the vertical Z axis)


func_escapezone

Func_escapezone
Defines an area for "rescuing" terrorists on ES maps, i.e. a place where terrorists must resort to be considered escaped.


func_friction

Func_friction
Allows you to create an area with a reduced level of adhesion, i.e. slippery place (can be used to simulate movement on ice).
properties:
Percentage of standard (0-100)
The level of adhesion to the surface as a percentage of the standard (the lower the value, the more the player will slide). Values ​​from 0 to 100

1. Basic Parameters


func_guntarget

Func_guntarget
Allows you to create a moving target. This object is very similar to func_train, because path_corner objects are used to create the trajectory of its movement.
properties:
Name
Give func_guntarget a name so that you can fire the target with a button or trigger

1. Basic Parameters

Speed (units per second)
Target movement speed, units per second

First stop target
Specify here the name of the first path_corner object (the starting point of the motion path)

Fire on damage
When func_guntarget is damaged (since it is a target), the object whose name is specified here will be activated

Damage to take
The amount of damage that must be dealt to the target (func_guntarget) before it finally stops and activates the object specified in "Fire on damage"

Global entity name
Global object name (not used in CS)


func_healthcharger

Func_healthcharger
The player who activates this object gradually gains percentages of life.
properties:
Global entity name
Global object name (not used in CS)

1. Basic Parameters


func_hostage_rescue

Func_hostage_rescue
On CS maps, this object determines the location for rescuing hostages. Used instead of info_hostage_rescue, moreover, cancels its effect (if it is present on the map). Allows you to more accurately determine the location of hostage rescue.


func_illusionary

Func_illusionary
Creates an intangible object, i.e. through which you can walk freely.

1. Creating transparent bars or fences

Using func_illusionary, you can create a fence or grate that can be shot through, which will simultaneously block the player's movement. To do this, you need to paint over such a fence with a texture with a mask (the names of such textures begin with a curly bracket "{").

Then turn the fence into func_illusionary and set the following parameters in the properties:
"Render Mode" - Solid, "FX Amount" - 255 (this will make the blue places on the textures transparent in the game).

Now create a regular brush (the same size as the fence), but painted on all sides with the CLIP texture and place it close to the fence. Now you have a shootable transparent fence that you can't get through

2. Creating objects that do not catch the player

In narrow places (corridors, tunnels, ventilation) some small objects, for example, flashlights, etc. can interfere with the player's movement (tangle him). To prevent this from happening, simply turn such an object into a func_illusionary. There is no need to set any additional properties.
properties:
Name
Name (optional)

Contents
Filling the object (we recommend leaving it as "Empty")

1. Basic Parameters


func_ladder

Func_ladder
Creates an invisible (in-game) area that the player can climb up. Used to create vertical stairs. First you need to create a brush in the shape of a ladder (for painting, use a texture with a mask, the name of such textures begins with a parenthesis "{", for example, {LADDER1), then turn the brush into a func_illusionary and in the properties set the following parameters: "Render Mode" - Solid, "FX Amount" - 255. Then, close to this brush, create another brush of the same size, painted on all sides with the AAAtrigger texture and turn it into func_ladder.
properties:
Name
Name (optional)


func_mortar_field

Func_mortar_field
Determines the location on the map from which an airstrike can be called.
properties:
Name
Give the object a name so it can be activated by a button or trigger

Spread radius
Bomb dispersion radius (airstrike accuracy)

Repeat count
Number of bombs that will be dropped in one raid

Targeting
Guidance method (Random - random, Activator - at the activation location, Table - according to the table)

X controller, Y controller
These parameters must match the names of the momentary_rot_button objects that define the impact location using Table


func_pendulum

Func_pendulum
Allows you to create a pendulum and objects similar to it (swinging from side to side). Since this is a rotating object, it is necessary to determine the axis of rotation. To do this, you should build a brush, painted on all sides with the ORIGIN texture, then place it instead of the rotation axis. Next, you should select the pendulum and brush axis and turn them into func_pendulum.
properties:
Name
Pendulum name (needed for activation)

1. Basic Parameters

Speed
Pendulum swing speed

Distance (deg)
Pendulum swing angle in degrees (set to a negative value to reverse the movements)

Damping (0-1000)
Slowing down the pendulum. If you set any value here, the pendulum will stop over time. Moreover, it will stop at a position equal to half the value specified in "Distance". For example, if "Distance" is set to 90°, the pendulum will stop at 45°. Values ​​from 0 to 1000

Damage inflicted when blocked
The percentage of life taken from a player when he is hit by a pendulum

flags:
Start on
If checked, the pendulum will swing at the beginning of the round

Passable
If marked, then the pendulum will be immaterial, i.e. it will be possible to pass through it

Auto-return
If checked, then with each activation the pendulum will be returned to its original position (we recommend not setting this flag, because it does not work correctly)

X asis, Y asis
If necessary, here you can specify the axis relative to which the pendulum will swing (by default, relative to the vertical Z axis)


func_plat

Func_plat
Creates a platform that begins to rise as soon as the player steps on it. The platform should be placed in the top position (where the platform should arrive), and in the game it will appear as expected from the bottom.
properties:
Name
If you give the platform a name, it can be activated with a button or trigger

1. Basic Parameters

Move sound
The sound the platform makes when moving

Stop sound
Sound when the platform stops

Sound volume 0.0-1.0
Sound volume. Values ​​from 0.0 to 1.0 (1.0 is the loudest)

Travel altitude (can be negative)
The distance in units that the platform will rise to (if you placed the platform in the top (final) position, then set a positive value, and if you placed it in the bottom (start) position, then set it to negative)

Speed
Platform movement speed, units per second

flags:
Toggle
If checked and the platform is activated by a button or trigger, once raised, it will not automatically lower. To lower the platform, it will need to be reactivated


func_platrot

Func_platrot
Creates a platform that begins to rise as soon as the player steps on it, while it also rotates. The platform should be placed in the top position (where the platform should arrive), and in the game it will appear as expected - from below. Since this is a rotating object, it is necessary to define the axis of rotation. To do this, you should build a brush, painted on all sides with the ORIGIN texture, then place it instead of the rotation axis. Next, you should select the platform and brush axis and turn it into func_platrot.
properties:
The properties are similar to those of the regular func_plat platform, here are just two new parameters:

Speed of rotation
Rotation speed around axis

Spin amount
Angle of rotation in degrees

1. Basic Parameters

flags:
Toggle
If checked and the platform is activated by a button or trigger, once raised, it will not automatically lower. To lower the platform, it will need to be reactivated

X asis, Y asis
If necessary, here you can specify the axis about which the platform will rotate (by default, relative to the vertical Z axis)


func_pushable

Func_pushable
Creates an object that can be moved.
properties:
The properties of this object are similar to func_breakable, here are just three new parameters:

1. Basic Parameters

Hull Size
Object size (we recommend setting "Point size")

Friction (0-400)
This parameter determines the degree of resistance to movement when the player pushes an object; the larger it is, the more difficult it is to push it. Values ​​from 0 to 400

Buoyancy
Object buoyancy (how long the object will submerge in water), default 20

flags:
Breakable
If checked, the object can not only be moved, but also destroyed (Attention! The object can only be destroyed once; in all subsequent rounds this object will no longer be there!)


func_recharge

Func_recharge
The player who activates this object gradually gains interest on his body armor.
properties:
Global entity name
Global object name (not used in CS)

1. Basic Parameters


func_rot_button

Func_rot_button
Creates a lever (switch) that can be used to activate other objects. Since this is a rotating object, it is necessary to define the axis of rotation. To do this, you should build a brush, painted on all sides with the ORIGIN texture, then place it instead of the rotation axis. Next, select the lever and brush axis and turn it into func_rot_button.
properties:
Name
If you give the lever a name, it can be activated not only by the player, but also by a trigger

Targetted object
The name of the object that will be activated when the lever is pressed

Master
Multisource object name

Speed
Speed ​​of movement (rotation) of the lever, default 50

Health (shootable if > 0)
The "strength" of the lever is 1 by default. To enable the lever to be activated by shooting at it, set a value greater than 0. The lever will activate after the level of damage exceeds the specified value

Sounds
Sound when the lever is activated

Delay before reset
Time in seconds during which the button cannot be pressed (used) again. After this time has passed, the button can be pressed again

Delay before trigger
Time in seconds between pressing the lever and activating the object specified in "Targeted object"

Distance (deg)
Lever rotation angle in degrees

1. Basic Parameters

flags:
Not solid
If checked, the lever will be intangible

Reverse dir
If checked, the lever will rotate in the opposite direction

Toggle
If checked, then after pressing the lever will not automatically return to its original position; to return it, you must activate it again

X asis, Y asis
If necessary, here you can specify the axis about which the lever will rotate

Touch activates
If checked, the lever will be activated by simply touching it (no need to press the "E" button)


func_rotating

Func_rotating
Allows you to create rotating objects. Using this entity you can make, for example, a fan. Since this is a rotating object, it is necessary to define the axis of rotation. To do this, you should build a brush, painted on all sides with the ORIGIN texture, then place it instead of the rotation axis. Next, you should select the object and the brush axis and turn it into func_rotating.
properties:
Name
If you give a name, the rotating object can be stopped and restarted with a button or trigger

1. Basic Parameters

Rotation speed
Maximum object rotation speed

Volume (10 = loudest)
The volume of the sound made when rotating. Values ​​from 0 to 10 (10 is the loudest)

Friction (0-100%)
The parameter is responsible for the smooth acceleration and deceleration of the fan (the "Acc/Dcc" flag must be checked). Values ​​from 0 to 100%

Fan sounds
Sound made when rotating

WAV Name
If you don't like standard sounds, then here you can specify the path to your sound in WAV format

Damage inflicted when blocked
The percentage of life taken from a player when they are hit by a rotating object

flags:
Start on
If checked and the object has a name, then at the beginning of each round it will rotate (no need to additionally activate)

Reverse direction
If checked, the object will rotate in the opposite direction

X asis, Y asis
If necessary, here you can specify the axis about which the object will rotate (by default, relative to the vertical Z axis)

Acc/Dcc
If checked, the object will be able to accelerate/decelerate when enabled/disabled

Fan Pain
If checked, the player will suffer damage if hit by a spinning object

Not solid
If checked, the object will be intangible, i.e. it will be possible to pass through it

Small radius
Sets a small sound radius

Medium radius
Sets the average radius of sound propagation

Large radius
Sets a large sound radius


func_tank

Func_tank
Creates a controlled (rotating) machine gun (cannon). The machine gun should be placed with the muzzle to the right in the top view. The angle of rotation of the machine gun (the real angle at which the machine gun will be rotated in the game) is set in the "Angle" field with numbers or by rotating the dash to the desired angle. Since this is a rotating object, it is necessary to define the axis of rotation. To do this, you should build a brush, painted on all sides with the ORIGIN texture, then place it instead of the rotation axis. Next, you should select the machine gun and brush axis and turn them into func_tank. To be able to control such a machine gun, you need to create func_tankcontrols.
properties:
Name
Give the machine gun a name so it can be controlled using func_tankcontrols

Target
The object name is ambient_generic, i.e. the sound made when shots are fired. Ambient_generic should be installed next to the machine gun

1. Basic Parameters

Yaw rate
The horizontal speed of the machine gun is 30 by default. For ease of control, we recommend setting a slightly higher value

Yaw range
Horizontal rotation angle in degrees

Pitch rate
The vertical speed of the machine gun is 15 by default. For ease of control, we recommend setting a slightly higher value

Pitch range
Vertical rotation angle in degrees

Barrel Length
Distance in units from the center of the ORIGIN brush to the end of the barrel

Barrel Horizontal
Distance in units from the center of the ORIGIN brush to the center of the trunk horizontally

Barrel Vertical
Distance in units from the center of the ORIGIN brush to the center of the barrel vertically

Smoke sprite
The name of the sprite that will appear as smoke when shooting

Flash sprite
The name of the sprite that will appear at the end of the barrel as a flash when firing (flame), for example, sprites/muzzleflash2.spr

Sprite scale
Sprite scale, default 1

Rotate sound
Sound when machine gun rotates

Rate of Fire
Machine gun rate of fire (rounds per second), default 1

Damage Per Bullet
Killing power of bullets

Firing persistence
Used for unguided machine guns. When the player leaves the "field of visibility", the machine gun will fire in his direction for some more time, instead of immediately stopping shooting,
default 1

Bullet accuracy
Shot accuracy

Minimum target range
Minimum firing range

Maximum target range
Maximum firing range

Bullets
Bullet type (unspecified, 9mm, MP5, 12mm)

flags:
Active
Activates a machine gun, used to control monsters with a machine gun (the flag is not needed in CS)

Only direct
If checked, the machine gun will only fire at visible targets

Controllable
It should be noted that the machine gun can be controlled

To make the machine gun controllable, give it a name ("Name") and check the "Controllable" flags, then place a func_tankcontrols object directly behind it. For the func_tankcontrols object, enter the name of the machine gun in the "Tank entity name" parameter.


func_tankcontrols

Func_tankcontrols
The object is used to create an area from which the player can control the func_tank machine gun. For this object, you need to make a brush, painted on all sides with the AAAtrigger texture and then turn it into the func_tankcontrols entity.
properties:
Tank entity name
Enter here the name of the func_tank machine gun that the player will control


func_tanklaser

Func_tanklaser
A variation of the func_tank object, it also creates a controlled machine gun, with the difference that this machine gun fires a laser. To create it you will also need an env_laser object. Give the env_laser object a name and enter the name of the machine gun in the "Target of Laser" parameter. In the machine gun itself, in the "env_laser Entity" parameter, enter the name of the env_laser object. The machine gun will now fire laser beams.

If you also use the ambient_generic object (the sound of shots) together with env_laser, then give these two objects the same names. Then, when the mortar is fired, both sound will be heard and laser beams will appear.
properties:
The properties are similar to those of the regular func_tank machine gun, but there is just one new parameter:

env_laser Entity
Enter the object name env_laser here


func_tankmortar

Func_tankmortar
Used to create a mortar. This object is a variation of the func_tank object and has similar properties.
properties:
The properties are similar to those of the regular func_tank machine gun, but there is just one new parameter:

Explosion magnitude
Explosion power of shells

You can also place an env_shake object to simulate the shaking of the ground when fired. Simply give the env_shake object a name ("Name") and enter it into the "Target" parameter of the func_tankmortar mortar. If you also use the ambient_generic object (the sound of shots) together with env_shake, then give these two objects the same names. Then, when the mortar is fired, there will be a sound and an earthquake will occur


func_trackautochange

Func_trackautochange
The object allows you to automatically move an uncontrolled train from one track to another. Since this is a rotating object, it is necessary to define the axis of rotation. To do this, you should build a brush, painted on all sides with the ORIGIN texture, then place it instead of the rotation axis.

In the last path_track object of the first track (from which the train needs to be moved) there is no need to specify the "Next stop target" parameter. Instead, enter the name func_trackautochange in the Fire on dead end parameter. Having approached the last point (path_track) of the first track, the train will stop and activate the func_trackautochange object. The train will then be moved onto the new track at the point (path_track) specified in the "Bottom track" parameter of the func_trackautochange object and will then automatically continue on the new track.
properties:
Name
Give the object a name so it can be activated

1. Basic Parameters

Move Sound
Sound when moving

Stop Sound
Sound when stopping

Sound volume 0.0-1.0
Sound volume. Values ​​from 0.0 to 1.0 (1.0 is the loudest)

Travel altitude
Distance in units by which the train should be raised or lowered

Spin amount
The angle of rotation of the train in degrees so that it can align itself with the new tracks

Train to switch
Enter here the name of the train for which you need to change track

Top track
The name of the last path_track object that defines the end of the first track (which the train travels on first)

Bottom track
The name of the first path_track object, which defines the beginning of a new track (on which the train is moved)

Move\rotate speed
Speed ​​of movement of the platform moving the train (If the "Rotate only" flag is checked, then this is the rotation speed) units per second

flags:
Auto activate train
(Not working)

Relink track
(Not working)

Start at bottom
If checked, the moving platform will appear in the bottom position

Rotate only
If checked, the platform will only rotate (no raising or lowering)

X asis, Y asis
If necessary, here you can specify the axis about which the platform will rotate (by default, relative to the vertical Z axis)


func_trackchange

Func_trackchange
The object allows you to automatically move the func_tracktrain controlled train from one track to another. Since this is a rotating object, it is necessary to define the axis of rotation. To do this, you should build a brush, painted on all sides with the ORIGIN texture, then place it instead of the rotation axis.

This object should be used to move the controlled train, because Once set to a new path, it will not start moving on its own.
properties:
Properties and flags are the same as func_trackautochange


func_tracktrain

Func_tracktrain
The object creates a controlled platform or train that travels along a specific route specified by path_track objects, while focusing on them with its center (the center of the train is the center of the ORIGIN brush, see below). Since this is a rotating object, it is necessary to define the axis of rotation. To do this, you should build a brush, painted on all sides with the ORIGIN texture, then place it instead of the rotation axis. Next, you should select the train and brush axle and turn it into func_tracktrain. To be able to control (accelerate/decelerate) such a train, you need to create func_traincontrols. When creating the train, you need to orient the front to the west (left) in the top view, and in the game it will appear on the first path_track object and will be directed to the second path_track object.

Func_tracktrain is one of the few objects that can contain CLIP brushes (a CLIP brush is a regular brush, painted on all sides with a CLIP texture. Such a brush is not visible in the game, but at the same time does not allow the player to pass through it). Use CLIP brushes if you need to limit the player's movements on the platform (train) in certain directions.
properties:
Name
Give the train a name so it can be controlled

1. Basic Parameters

Sound
The sound made by a train when moving

First stop target
The name of the first route point (path_track object). At the beginning, the train will be located at this object and directed towards the second such object

Distance between the wheels
Distance between train wheels. This parameter determines how the train will turn, usually the length of the train is suitable

Height above track
The height of the train above the path_track objects (actually the height between the center of the ORIGIN brush and the path_track objects)

Initial speed
The initial speed of the train (if a value other than 0, the train will start moving at the beginning of the round on its own). For uncontrolled trains, this is a constant speed, which, however, can be changed in the properties of path_track objects

Speed
Maximum movement speed for a controlled train, units per second

Damage on crash
The percentage of life taken from a player when he gets hit by a train

Bank angle on turns
Train tilt angle when turning

flags:
No Pitch (X-rot)
If checked, the train will only turn around the vertical Z axis (i.e. left/right only)

No User Control
If checked, the player will not be able to control the train

Passable
If checked, the train will be intangible, i.e. it will be possible to pass through it


func_train

Func_train
The object creates an uncontrolled platform that travels along a specific route specified by path_corner objects, while focusing on them with its center (the center of the train is the center of the ORIGIN brush, see below). Since this is a rotating object, it is necessary to define the axis of rotation. To do this, you should build a brush, painted on all sides with the ORIGIN texture, then place it instead of the rotation axis. Next, you should select the train and brush axis and turn it into func_train. When creating a train, you need to orient its front to the west (left) in the top view, and in the game it will appear on the first path_corner object.
properties:
Name
Give the platform a name so that it can be stopped and restarted with a button or trigger (if a name is not given, the platform will start moving on its own at the beginning of the round)

1. Basic Parameters

First stop target
Name of the first route point (path_corner object)

Move Sound
Sound when moving

Stop Sound
Sound when stopping

Speed (units per second)
Constant speed of platform movement, units per second. The speed can be changed in the properties of path_corner objects

Angular velosity (Y Z X)
The parameter is responsible for the rotation of the platform (not necessary to specify)

Damage on crush
The percentage of life taken from a player when he gets hit by a platform

Sound Volume 0.0-1.0
Sound volume. Values ​​from 0.0 to 1.0 (1.0 is the loudest)

flags:
Not Solid
If checked, the platform will be intangible, i.e. it will be possible to pass through it


func_traincontrols

Func_traincontrols
The object is used to create an area from which the player can control the train. To create such an area, you need to make a brush, painted on all sides with the AAAtrigger texture, turn it into func_traincontrols and place it on the intended location of the train (platform) control. Then, in the "Train Name" parameter, specify the name of the train that you intend to control.
properties:
Train Name
Enter here the name of the train that the player will control


func_vehicle

Func_vehicle
The object creates a controlled vehicle (car) that can drive in any direction, including in reverse. To create a car you will need two path_track and one func_vehiclecontrols objects. Since this is a rotating object, it is necessary to define the axis of rotation. To do this, you should build a brush, painted on all sides with the ORIGIN texture, then place it instead of the rotation axis. Next, you should select the car and the brush axle and turn it into func_vehicle. When creating a car, you need to orient the front to the west (left) in the top view, and in the game it will appear on the first path_track object and will be directed to the second path_track object.
properties:
Name
Give the car a name so it can be driven

1. Basic Parameters

First stop target
The name of the first path_track object (at the beginning the car will be located on this object and directed towards the second such path_track object)

Sound
The sound made when the car is moving

Length of the vehicle
Length of the vehicle in units (we recommend setting a value less than the length by 8-16 units for ease of control)

Width of the vehicle
Vehicle width in units (we recommend setting a value smaller than the width by 8-16 units for ease of control)

Height above track
The height of the car above the road (height measured from the center of the ORIGIN brush), in units

Initial speed
Initial movement speed (if the value is greater than 0, the car will start moving at the beginning of the round on its own)

Speed
Maximum vehicle speed, units per second

Damage on crush
The percentage of life taken from a player when he is hit by a car

Volume (10 = Loudest)
Sound volume. Values ​​from 0 to 10 (10 is the loudest)

Bank angle on turns
Vehicle tilt angle when turning

flags:
No Pitch (X-rot)
If checked, the machine will only rotate around the vertical Z axis

No User Control
If checked, the player will not be able to control the car

Passable
If checked, the car will be intangible, i.e. it will be possible to pass through it


func_vehiclecontrols

Func_vehiclecontrols
The object is used to create an area from which the player can control the car. To create this area, make a brush painted on all sides with the AAAtrigger texture, add it to func_vehiclecontrols and in the "Vehicle name" parameter enter the name of the car that you are supposed to control (func_vehiclecontrols should be placed in the intended location for controlling the vehicle).
properties:
Vehicle name
Enter here the name of the car that the player will drive


func_vip_safetyzone

Func_vip_safetyzone
Defines an area for VIP rescue on as-maps. To create such a zone, make a brush painted on all sides with the AAAtrigger texture and turn it into func_vip_safetyzone. When the VIP enters this area, he will be saved.


func_wall

Func_wall
Externally, the object is no different from ordinary brushes. This object can be boxes, walls, and many others. etc. But unlike ordinary brushes, func_wall has properties, for example, it can be transparent (used to create glass).

Grilles and stairs

Also func_wall can be used to create transparent grates and stairs. To do this, the object is painted over with a texture with a mask (the names of such textures begin with a curly bracket "{"). These textures have bright blue parts that will be completely transparent in the game. If you paint with a texture with a mask, for example {LADDER1, a regular brush (not an entity), then in the game the blue places will be black. To make them transparent, turn this brush into func_wall and set the following display parameters in the properties: "Render Mode" - Solid, "FX Amount" - 255.

Unbreakable glass

To create unbreakable glass, turn the brush into func_wall and set the following display parameters in the properties: "Render Mode" - Texture, "FX Amount" - ranging from 0 to 255. The value FX Amount = 0 corresponds to completely transparent glass, and 255 - absolutely opaque.

Map optimization

Use func_wall to convert small parts, such as lamps on ceilings. This will help avoid breaking brushes (walls, ceilings, etc.) into a larger number of polygons (you can read more about map optimization in the Tutorial.
properties:
Name
Name (optional)

1. Basic Parameters


func_wall_toggle

Func_wall_toggle
The object is similar to func_wall with the only difference being that it can disappear/appear when activated by a button or trigger.
properties:
Name
Give the func_wall_toggle object a name so it can be activated by a button or trigger

1. Basic Parameters

flags:
Starts Invisible
If checked, the object will be invisible at the beginning of the round


func_water

Func_water
The object is used to create water.

Water can be created in three different ways, which you can learn about from the articles in the Tutorial.
properties:
The properties are similar to those of func_door, but there are just two new parameters:

Name
If you give the water a name, it can be lowered/raised (ala a swimming pool)

1. Basic Parameters

Contents
Liquid type (Water - water, Slime - mucus, Lava - lava)

Wave Height
Wave height, in units. Default value 0


E.6

Properties of All Game Objects

Entity Object Reference
§ 4.3 Properties of all Game objects

Game objects are not often used on maps, however, some of them can be useful for achieving certain goals. In the 3-D view of the editor, Game objects are depicted as bright blue cubes with captions, as in the pictures below.


1. Game_counter
Activates the specified object after a specified number of its own activations.
properties:
Name
Give the object a name so it can be activated by a button or other trigger

Target
The name of an object that is activated after a specified number of activations game_gounter

Deley before trigger
Time in seconds before the object specified in "Target" is activated

Killtarget
The name of the object that needs to be destroyed after the specified number of game_counter activations (Attention! The object will be deleted for all remaining rounds!)

Master
Multisource object name or game_team_master

Init value
Counter initial value

Limit value
When the number of game_counter activations reaches this value, the object specified in "Target" will be activated

flags:
Remove on fire
If checked, the game_counter will be deleted after the specified number of activations (Attention! The object will be deleted for all remaining rounds!)

Reset on fire
If checked, then when the object specified in "Target" is activated, the counter value will be reset to the initial one


2. Game_counter_set
This object is used to change the value of the game_counter counter.
properties:
Name
Give the object a name so it can be activated by a button or other trigger

Target
Name of the game_counter object to change the counter value

Master
Multisource object name or game_team_master

New value
New counter value

flags:
Remove on fire
If checked, the game_counter_set will be deleted after its activation (Attention! The object will be deleted for all remaining rounds!)


3. Game_end
When game_end is activated, the map changes. The next one from the list in the mapcycle.txt file is loaded
properties:
Name
Give the object a name so it can be activated by a button or other trigger

Master
Multisource object name or game_team_master


4. Game_player_equip
This object allows you to determine the initial weapons and set of things that will be given to the player as soon as he joins the game. If you put this object on the map, then the players will only have the weapons and items that are indicated on it. If you activate this object for only one team (using game_team_master), then the players of the other team will be equipped only with body armor.
properties:
Name
If you give this object a name, it can be activated by a button or other trigger. To ensure that the weapon is given out when a player joins the game, do not give a name

Team Master
Multisource object name or game_team_master

In the list you select the type of weapon, the number of cartridges for it, types of grenades (you can give two flash grenades), etc. Just indicate Yes or No next to a particular object (Yes - give the object to the player,
No - do not issue)

flags:
Use only
If checked, then weapons and other things will be issued only when you click on "Use" (by default the "E" button)


5. Game_player_hurt
When activated, it damages the player. The object is similar in action to trigger_hurt, but unlike it, it damages the player depending on his (the player's) actions, and not on his (the player's) location. It is also possible to treat (increase health) the player. To do this, you must specify a negative value in the "Damage to Apply" parameter. A simple example of using game_player_hurt would be a button that, when clicked, will cause damage to the player. It is also possible to limit the effect of game_player_hurt to only one team (you need to use the game_team_master object to do this).
properties:
Name
Give this object a name so it can be activated by a button or other trigger

Damage to apply
The number of percent of life taken away. Negative value for addition (treatment)

Team Master
Multisource object name or game_team_master

flags:
Remove on fire
If checked, then after activation, game_player_hurt will be deleted (Attention! The object will be deleted for all remaining rounds!)


6. Game_player_team
The object allows the player who activated it to change teams.
properties:
Name
Give the object a name so it can be activated by a button or other trigger

Game_team_master to use
The name of the game_team_master object that specifies the new team

Team Master
Multisource object name or game_team_master

flags:
Remove on fire
If checked, then after activation, game_player_team will be deleted (Attention! The object will be deleted for all remaining rounds!)

Kill player
If checked, then when changing teams the player will be killed

Gib player
If checked, the player will be torn to pieces when changing teams


7. Game_score
The object adds or takes away frags from a player or team.
properties:
Name
Give the object a name so it can be activated by a button or other trigger

Points to add (+/-)
Number of frags added or subtracted

Master
Multisource object name or game_team_master

flags:
Allow negative
If checked, then when frags are taken away it is allowed to make their number negative

Team points
If checked, frags will be added or, vice versa, taken away from the entire team, the player who activated the game_score


8. Game_team_master
The object is used as a relay, allowing only a specific command to activate another object.
properties:
Name
If game_team_master is used as a relay, then the object must be given a name so that it can be activated by a button or other trigger

Target
If game_team_master is used as a relay, then the object whose name is specified here will be activated

Delay before trigger
Time in seconds before the object specified in "Target" is activated

Kill target
If game_team_master is used as a relay, then the object whose name is specified here will be deleted (Attention! The object will be deleted for all remaining rounds!)

Trigger state
Switch state, it can be:

    on — Works only to turn on an object, i.e. only affects disabled objects

    off — Works only to turn off an object (for example, turns off a burning light bulb or a playing sound)

    toggle — Activates an object regardless of state

Team index
A command that can activate an object specified in "Target" ("1" - terrorists, "2" - counters,
"-1" - any of the commands)

Master
Multisource object name or game_team_master

flags:
Remove on fire
If checked, then after activation, the game_team_master will be deleted (Attention! The object will be deleted for all remaining rounds!)


9. Game_team_set
When activated, changes the team index in the game_team_master object to the team index of the player who activated it.
properties:
Name
Give the object a name so it can be activated by a button or other trigger

Target
The name of the game_team_master object in which to change the team index

Delay before trigger
Time in seconds before command index changes

Kill target
The name of the object that needs to be destroyed after activating the game_team_set (Attention! The object will be deleted for all remaining rounds!)

Master
Multisource object name or game_team_master

flags:
Remove on fire
If checked, then after activation, game_team_set will be deleted (Attention! The object will be deleted for all remaining rounds!)


10. Game_text
Allows you to display a message on the screen. This object is a replacement for the env_message object. To display a message on multiple lines, put \n where the line ends (for example, This is line one\nThis is line 2). Do not use messages longer than 127 letters - this may cause the editor to crash (this problem was relevant for WorldCraft 3.3).
properties:
Name
Give the object a name so it can be activated by a button or other trigger

Target
The name of the object that is activated after game_text is triggered

Message text
Message text that will be displayed on the screen

X (0 - 1.0 = left to right) (-1 = center)
The position of the text on the screen along the X axis (from left to right) ("-1" is the text in the center)

Y (0 - 1.0 = top to bottom) (-1 = center)
The position of the text on the screen along the Y axis (top to bottom) ("-1" is the text in the center)

Text effect
"0"-Fade In/Out, "1"-Credits, "2"-Scan Out - Options for text appearance effects

Color1
Primary text color

Color2
Backlight color

Fade in time (or character scan time)
Time in seconds the text appears

Fade out time
Time in seconds for text to disappear

Hold time
Time in seconds that the text will be displayed on the screen

Scan time (scan effect only)
Delay between drawing letters and lines when using the Scan Out effect

Text chanel
Text can be displayed in one of four channels. When using the same channel in different game_text objects, the previous information is erased

Master
Multisource object name or game_team_master

flags:
All players
If checked, the text will be displayed for all players (not only the one who activates game_text)


11. Game_zone_player
Activates an object depending on the location of the players in relation to itself.
properties:
Name
Give the object a name so it can be activated by a button or other trigger

Target for IN players
The name of the object that will be activated for all players within the game_zone_player area

Target for OUT players
The name of the object that will be activated for all players outside the game_zone_player range

Counter for IN players
The name of the game_counter object, which will have a value equal to the number of players in the area of ​​effect of the game_zone_player object

Counter for OUT players
The name of the game_counter object, which will have a value equal to the number of players outside the range of the game_zone_player object

Master
Multisource object name or game_team_master

Usage example: suppose that there is a button on the map that activates game_zone_player, which in turn activates 2 targets: the "Target for IN players" parameter activates the game_score object, which adds frags to all players within the game_zone_player's range, and the "Target for OUT players" parameter simultaneously activates another game_score, which takes away frags from all players outside the game_zone_player's range


Entity.

§ 1.   1. Brushes
§ 2.   35 Main Entity Objects
§ 3.   1. Basic Parameters

§ 4.1   Properties of All Env Objects
§ 4.2   Properties of All Func Objects
§ 4.3   Properties of All Game Objects
§ 4.4   Properties of All Info Objects
§ 4.5   Properties of All Trigger Objects
§ 4.6   Properties of All Xen Objects
§ 4.7   Properties of All Other Objects

To the list of objects

E.7

Properties of All Info Objects

Entity Object Reference
§ 4.4 Properties of all Info objects

The most commonly used Info objects are info_player_deathmatch and info_player_start, without which no map is complete. The remaining objects are used quite rarely.


1. Info_bomb_target
info_bomb_target On de-maps, this object determines the point for planting a bomb. We recommend using func_bomb_target instead of info_bomb_target to more accurately determine the location of the bomb.


2. Info_compile_parameters
info_compile_parameters This object allows you to define compilation parameters in its properties and not enter them on the command line. Works only with the improved version of ZHLT compilers (Custom Build by Anthony Moore aka "Merl").
If you do not have this object, open the FGD file (usually it is located in the X:\Hammer\FGD\Counter-Strike directory) and paste the following code at the end of this file:

@PointClass size(-8 -8 0, 8 8 32) = info_compile_parameters : "Compile Options" 
[ 
    hlcsg(choices) : "HLCSG" : 1 =
    [
        1 : "Normal"
        2 : "Onlyents"
        0 : "Off"
    ]
    hlbsp(choices) : "HLBSP" : 1 =
    [
        0 : "Off" 
        1 : "Normal"
        2 : "Leakonly"
    ]
    hlvis(choices) : "HLVIS" : 2 = 
    [ 
        0 : "Off"
        1 : "Fast"
        2 : "Normal" 
        3 : "Full"
    ]
    hlrad(choices) : "HLRAD" : 1 =
    [
        0 : "Off"
        1 : "Normal"
        2 : "Extra"
    ]
    texdata(string) : "Texture Data Memory (in KB)" : "4096" 
    estimate(choices) : "Estimate Compile Times?" : 0 = 
    [ 
        0: "Yes" 
        1: "No" 
    ] 
    bounce(integer) : "Number of radiosity bounces" : 0 
    ambient(string) : "Ambient world light (0.0 to 1.0, R G B)" : "0 0 0" 
    smooth(integer) : "Smoothing threshold (in degrees)" : 0 
    dscale(integer) : "Direct Lighting Scale" : 1 
    chop(integer) : "Chop Size" : 64 
    texchop(integer) : "Texture Light Chop Size" : 32 
    hullfile(string) : "Custom Hullfile" 
    priority(choices) : "Priority Level" : 0 =
    [
        0 : "Normal"
        1 : "High"
        -1 : "Low"
    ]
    wadautodetect(choices) : "Wad Auto Detect" : 0 =
    [
        0 : "Off"
        1 : "On"
    ]
    wadconfig(string) : "Custom Wad Configuration" : ""
    verbose(choices) : "Verbose compile messages" : 0 =
    [
        0 : "Off"
        1 : "On"
    ]
    noclipeconomy(choices) : "Strip Uneeded Clipnodes?" : 1 = 
    [
        1 : "Yes"
        0 : "No"
    ]
    nocliphull(choices) : "Generate clipping hulls" : 0 =
    [
        0 : "Yes"
        1 : "No"
    ]
    noskyclip(choices) : "No Sky Clip" : 0 =
    [
        1 : "On"
        0 : "Off"
    ]
    sparse(choices) : "Vismatrix Method" : 2 =
    [
        0 : "No Vismatrix"
        1 : "Sparse Vismatrix"
        2 : "Normal"
    ]
    circus(choices) : "Circus RAD lighting" : 0 =
    [
        0 : "Off"
        1 : "On"
    ]
]        

properties:
Texture Data Memory
Maximum memory size allocated for textures in KB (default 4 MB). If your card uses a larger number of textures, increase this parameter

Estimate Compile Times ?
Show estimated compilation time (yes - show, no - do not show)

Number of radiosity bounces
Number of light reflections. By the time this operation is performed, all the data has already been pre-calculated, so the additional number of reflections will not take much time. Increasing the number of reflections smooths out shadows and illuminates dark areas of the map in a more realistic way

Ambient world light
Illumination of the surrounding world (from 0.0 to 1.0, RGB format). This option sets the minimum "brightness" of each map surface so that none of them are completely black. The parameters correspond to red, green and blue with values ​​from 0.0 to 1.0

Smoothing threshold (in degrees)
Smoothing threshold (in degrees). If the angle between two surfaces is less than that specified in this parameter, the lighting calculation will be done using anti-aliasing technology (simulating a smooth transition - roundness - between surfaces)

Direct Lighting Scale
Multiplier for lighting. To create the most realistic maps, it is necessary to calculate direct lighting once (values: "1" - the most realistic shadows and lighting, "0" - removes direct lighting from the map and leaves only reflected light, "3-4" - strong contrast between shadows and illuminated areas)

Chop Size
Patch size for regular textures. By increasing the patch size you can speed up hlrad execution and reduce memory requirements, but this will lead to a loss of quality on the finished map (uneven, angular, unrealistic shadows). Reducing the patch size, on the contrary, will lead to better lighting of the map, but will require more computer resources

Texture Light Chop Size
Patch size for glowing textures. Typically, the patch size should be half the size of a regular texture patch in order for the lighting to look good

Custom Hullfile
Upload your own bounding area information file

flags:
Run CSG
Launch CSG

No Clip
Disable the creation of bounding areas on the map. The player will not only be able to walk through walls, but also fall through the ground (if gravity is turned on)

Only Ents
Update the value of entity parameters from the *.map source in the finished *.bsp map

No Sky Clip
Disable map sky limitation

Run BSP
Launch BSP

Leak Only
Run HLBSP only to find holes (LEAK error)

No Clip
Do not process bounding region

Run VIS
Launch VIS

Fast
Accelerated analysis of visible areas on the map

Run RAD
Launch RAD

Sparse
Use the algorithm with a matrix with limited memory

Circus Mode
Allow "circus" mode to detect unlit areas. This is a debug option that replaces all black dots on any surface with a random bright color

Extra Mode
Enable more accurate lighting calculations (9 point oversampling)


3. Info_hostage_rescue
info_hostage_rescue On CS maps, this object determines the place where rescued hostages should be taken. We recommend using func_hostage_rescue instead of info_hostage_rescue to more accurately determine the rescue location.


4. Info_lights_rad
info_lights_rad This object performs the function of a RAD file that contains information about glowing textures on your map (not yet used by compilers). In the improved version of the ZHLT 2.5.3 compilers (Custom Build), the info_texlights object is used for these purposes.


5. Info_map_parameters
info_map_parameters In the properties of this object, you can specify which team can buy weapons, as well as the radius of the bomb explosion on de-maps.
properties:
Weapon_buying
This indicates which team can buy weapons (only terrorists / only counters / both can buy / both cannot)

Bomb radius
The radius of the bomb explosion is indicated here (default is 500 units)


6. Info_null
info_null This object is used as a target for the light_spot object.
properties:
Name
Give this object a name, and then write it in the "Target" parameter of the light_spot object, then the light will be directed towards info_null


7. Info_player_deathmatch
info_player_deathmatch The object determines the spawn location of 1 terrorist. Make sure that this object is located at some distance above the surface of the earth, and is not "built in" into walls and does not touch other similar objects, otherwise, once born, the player will not be able to move or will die altogether.

With the "Angle" parameter you can set the direction the player is looking after he appears. This can be useful if the player is facing a wall and needs to spend time at the beginning of the round turning around. The desired angle can be easily determined in the editor in the top view.


8. Info_player_start
info_player_start The object determines the location where the counter-terrorist will appear. Make sure that this object is located at some distance above the surface of the earth, and is not "built in" into walls and does not touch other similar objects, otherwise, once born, the player will not be able to move or will die altogether.

With the "Angle" parameter you can set the direction the player is looking after he appears. This can be useful if the player is facing a wall and needs to spend time at the beginning of the round turning around. The desired angle can be easily determined in the editor in the top view.


9. Info_target
info_target Used as a target for some objects, for example, trigger_camera, env_beam and some others.
properties:
Name
Give this object a name, and then write it in the "Target" parameter of the trigger_camera object, then the camera will point to info_target. It is not necessary to use info_target for the camera; you can specify any other object with a name, then the camera will point to it. Info_target is used simply for convenience (since it does not require setting practically any properties)


10. Info_teleport_destination
info_teleport_destination The object defines the point to which the player who activates (passes through) the trigger_teleport teleport will move.


11. Info_texlights
info_text_lights This object performs the function of a RAD file, which contains information about the glowing textures on your map. Works only in the improved version of ZHLT (Custom Build) compilers.
Disable the "SmartEdit" button, click the "Add" button, in the "Key:" field enter the name of the luminous texture, and in the "Value:" field the color of the light emitted by the texture and its brightness in RGB XXX format, where XXX is the brightness (for example, 1000 or 20000)

In version 0.7.7 there is no such object in the fgd file. It can be easily added. To do this, open the fgd file in a suitable text editor and add the following line to the end:

@PointClass color(255 128 0) = info_texlights : "Texture Light Config" []
Don't forget to save the file with *.fgd extension


12. Info_vip_start
info_vip_start The object determines the location of the VIP's appearance on as-maps. Make sure that this object is located at some distance above the surface of the earth, and is not "built in" into walls and does not touch other similar objects, otherwise, once born, the player will not be able to move or will die altogether.

With the "Angle" parameter you can set the direction the player is looking after he appears. This can be useful if the player is facing a wall and needs to spend time at the beginning of the round turning around. The desired angle can be easily determined in the editor in the top view.


13. Infodecal
This object allows you to insert (or rather apply) decals onto the map, i.e. special textures that are applied on top of the main texture to simulate various scratches, traces of grenade explosions, bullet holes, etc.

You can read more about applying decals in the articles in the Tutorial.


Entity.

§ 1.   1. Brushes
§ 2.   35 Main Entity Objects
§ 3.   1. Basic Parameters

§ 4.1   Properties of All Env Objects
§ 4.2   Properties of All Func Objects
§ 4.3   Properties of All Game Objects
§ 4.4   Properties of All Info Objects
§ 4.5   Properties of All Trigger Objects
§ 4.6   Properties of All Xen Objects
§ 4.7   Properties of All Other Objects

To the list of objects

E.8

Properties of All Trigger Objects

Entity Object Reference
§ 4.5 Properties of all Trigger objects

Trigger objects or simply triggers are one of the most frequently used objects on any map. Triggers are used to activate other objects. For example, triggers are often created that, when passed through, produce a sound.

7 out of 10 triggers are brush triggers. To make them, brushes are created, painted on all sides with a special AAAtrigger texture. The brush then turns into a trigger.


1. Trigger_auto
trigger_auto Activates the object specified in the "Target" parameter immediately after loading the map. Valid only once, i.e. in the second and all subsequent rounds the object will no longer be activated. We recommend setting the delay before activation to at least 0.5 seconds. This is necessary so that all objects on the map have time to appear before trigger_auto starts activating something.
properties:
Target
Enter here the name of the object that needs to be activated at the beginning of the game

Delay before trigger
Time in seconds before activation of the object specified in "Target" (we recommend setting at least 0.5 seconds)

KillTarget
Here you can enter the name of the object that will be destroyed after activating trigger_auto (Attention! The object will be destroyed for all remaining rounds!)

Trigger state
Switching state. It is responsible for how the trigger will activate objects (more precisely, in what cases). There are 3 states in total:

    on
    If you select "on", the trigger will only turn on objects (for example, turn on a light bulb); if the light bulb is already on, then the trigger will not affect it in any way

    off
    If you select "off", the trigger will only turn off objects (for example, turn off the sound), if the sound is not playing (already turned off), then the trigger will not affect it in any way

    toggle
    If you select "toggle", the trigger will activate the object in any case (regardless of whether it is enabled or not)
flags:
Remove on fire
If checked, then after activation, trigger_auto will be destroyed (Attention! The object will be destroyed for all remaining rounds!)


2. Trigger_camera
trigger_camera The object allows you to place a camera on the map, through which the player who activates it will be able to look at predetermined areas of the map (similar cameras are used on cs_assault).

Read more about the various ways to use cameras in the articles in the Tutorial from the "Cameras" section.
properties:
Target
The name of the object to which the camera's gaze will be directed (target). The target can be any object that has a name. Typically the info_target object is used for these purposes.

Delay before trigger
Time in seconds until the KillTarget is destroyed

KillTarget
Here you can enter the name of the object that will be destroyed after the first activation of the camera (Attention! The object will be destroyed for all remaining rounds!)

Name
Give the camera a name so it can be activated using a button or other trigger

Hold time
Time in seconds during which the player will see the camera image

Path corner
Name of the first object path_corner (needed for a moving camera)

Initial speed
Initial speed of camera movement (needed for a moving camera)

Acceleration units/sec^2
Acceleration of camera movement, units per second2

Stop deceleration units/sec^2
Camera braking before the end of movement, units per second2

flags:
Start at player
If checked, the camera will start moving from the location of the player's eyes

Follow player
If checked, the camera will follow the player (keep him in focus)

Freeze player
If checked, the player will not be able to move when looking at the camera


3. Trigger_changetarget
trigger_changetarget Allows you to change the "Target" parameter of any object.

Suppose there are 2 light bulbs on the map (light bulb-1 and light bulb-2). There is also a button that turns on light bulb 1. Using trigger_changetarget we can change the target of the button from light bulb-1 to light bulb-2, i.e. Now the button will turn on the second light bulb.
properties:
Target
The name of the object for which the "Target" parameter needs to be changed

Delay before trigger
Time in seconds before changing the "Target" parameter of an object

KillTarget
Here you can enter the name of the object that will be destroyed after activating trigger_changetarget (Attention! The object will be destroyed for all remaining rounds!)

Name
Name (needed for activation)

New target
New value for the "Target" parameter for the mutable object


4. Trigger_counter
trigger_counter Activates the object specified in the "Target" field only after a certain number of its own activations.
properties:
Target
Enter here the name of the object you want to activate

Name
Give trigger_counter a name so that it can be activated by another trigger. If you don't give a name, the trigger will go off when the player walks through it

Kill target
Here you can enter the name of the object that will be destroyed after trigger_counter is activated (Attention! The object will be destroyed for all remaining rounds!)

Master
Multisource object name

Delay before trigger
Time in seconds until the object specified in "Target" is activated

Count before activation
The required number of trigger_counter activations before it in turn activates the object

flags:
Pushables
If checked, the trigger will be activated (count its activation) when movable func_pushable objects (not just players) hit it


5. Trigger_gravity
trigger_gravity Changes the gravity level for the player who activated the trigger (passed through it). Remember that to restore normal gravity, the player must pass through a second such object, which returns gravity to the standard level, i.e. two trigger_gravity objects must be used.
properties:
Target
Enter here the name of the object that needs to be activated when the player passes through trigger_gravity

Name
Give the trigger a name so it can be activated by a button or other trigger. If you don't specify a name, the trigger will fire when the player walks through it

Kill target
Here you can enter the name of the object that will be destroyed after activating trigger_gravity (Attention! The object will be destroyed for all remaining rounds!)

Master
Multisource object name

Delay before trigger
Time in seconds until the object specified in "Target" is activated

Gravity (0.0-1)
Gravity level ranging from 0 to 1, where 1 is normal gravity level

flags:
Pushables
If checked, trigger_gravity will affect not only players, but also func_pushable objects


6. Trigger_hurt
trigger_hurt Causes damage of various types to the player who passes through it: electric shock, freezing, etc. For example, you can make a fire and place a trigger_hurt around it, then when passing through the fire, the player will receive damage.
properties:
Name
Give the trigger a name so you can turn it on and off. If you don't specify a name, the trigger will fire when the player walks through it

Target
Enter here the name of the object that needs to be activated when activating trigger_hurt

Master
Multisource object name

Damage
The amount of damage inflicted to a player caught in the trigger area (percentage per second)

Delay before trigger
Time in seconds until the object specified in "Target" is activated

Damage type
Type of damage (general, fall, burn, freezing, poisoning, shock, radiation, paralysis, etc.)

flags:
Target once
If checked, trigger_hurt will activate the object specified in "Target" only once. Otherwise trigger_hurt will activate the object every time someone walks through it

Start off
If checked, the trigger will initially be disabled (no damage will be dealt to the player until the trigger is enabled)

FireClientOnly
the flag is not used in CS

TouchClientOnly
the flag is not used in CS


7. Trigger_multiple
trigger_multiple A trigger allows you to repeatedly activate any object. Often sounds on maps are activated via trigger_multiple.
properties:
Target
Enter here the name of the object that needs to be activated when the player passes through trigger_multiple

Name
If you give a trigger a name, it can be activated by a button or another trigger. If you don't specify a name, the trigger will fire when the player walks through it

Kill target
Here you can enter the name of the object that will be destroyed after activating trigger_multiple (Attention! The object will be destroyed for all remaining rounds!)

Master
Multisource object name

Delay before trigger
Time in seconds until the object specified in "Target" is activated

Delay before reset
Time in seconds after which the trigger can be activated again (during this time the trigger will not work)

flags:
Pushables
If checked, trigger_multiple can be activated not only by passing through it, but also by moving func_pushable objects


8. Trigger_once
trigger_once The trigger activates the object specified in "Target" when the player passes through it (works once).
properties:
Properties and flags are similar to trigger_multiple. The only difference from trigger_multiple is that you cannot set a time delay when it can be activated again, because it only works 1 time


9. Trigger_push
trigger_push The trigger creates an invisible area that, when entered, will push the player in a certain direction with a certain force. Using trigger_push you can create, for example, an underwater current or a powerful fan. Remember the catapult on de_rats3, which helps you get from the floor to the flying saucer? The author of the map just used trigger_push to push the player.
properties:
Target
Enter here the name of the object that needs to be activated when the player passes through trigger_push

Name
If you give a trigger a name, it can be activated by a button or another trigger. If you don't specify a name, the trigger will fire when the player walks through it

Kill target
Enter here the name of the object that needs to be destroyed after activating trigger_push (Attention! The object will be destroyed for all remaining rounds!)

Master
Multisource object name

Delay before trigger
Time in seconds until the object specified in "Target" is activated

Speed of push
Speed ​​in units at which the trigger will push the player

flags:
Once only
If checked, the trigger will only fire once (will push the player once)

Start off
If checked, the trigger will initially be disabled (will not push the player until it is enabled)

Pushables
If checked, trigger_push will push not only the player, but also func_pushable objects


10. Trigger_relay
trigger_relay Using this trigger, you can activate the object specified in the "Target", depending on whether it is enabled or disabled.
properties:
Name
Name (needed for activation)

Target
Enter here the name of the object that needs to be activated when the trigger_relay is triggered

Delay before trigger
Time in seconds until the object specified in "Target" is activated

Kill target
Enter here the name of the object that needs to be destroyed after trigger_relay is activated (Attention! The object will be destroyed for all remaining rounds!)

Trigger state
Switching state. It is responsible for how the trigger will activate objects (more precisely, in what cases). There are 3 states in total:

    on
    If you select "on", the trigger will only turn on objects (for example, turn on a light bulb); if the light bulb is already on, then the trigger will not affect it in any way

    off
    If you select "off", the trigger will only turn off objects (for example, turn off the sound), if the sound is not playing (already turned off), then the trigger will not affect it in any way

    toggle
    If you select "toggle", the trigger will activate the object in any case (regardless of whether it is enabled or not)
flags:
Remove on fire
If checked, then after its first activation the trigger_relay will be destroyed (Attention! The trigger will be destroyed for all remaining rounds!)


11. Trigger_teleport
trigger_teleport Teleports (transports) the player to a specified location on the map. The location is indicated by the info_teleport_destination object.
properties:
Target
The name of the info_teleport_destination object where the player will be teleported to

Name
If you give a trigger a name, it can be activated by a button or another trigger. If you don't specify a name, the trigger will fire when the player walks through it

Kill target
Enter here the name of the object that needs to be destroyed after activating trigger_teleport (Attention! The object will be destroyed for all remaining rounds!)

Delay before trigger
Time in seconds before the player is transported to the teleportation point

flags:
Pushables
If checked, the trigger will teleport not only players, but also func_pushable objects


Entity.

§ 1.   1. Brushes
§ 2.   35 Main Entity Objects
§ 3.   1. Basic Parameters

§ 4.1   Properties of All Env Objects
§ 4.2   Properties of All Func Objects
§ 4.3   Properties of All Game Objects
§ 4.4   Properties of All Info Objects
§ 4.5   Properties of All Trigger Objects
§ 4.6   Properties of All Xen Objects
§ 4.7   Properties of All Other Objects

To the list of objects

E.9

Properties of All Xen Objects

Entity Object Reference
§ 4.6 Properties of all Xen objects

All six objects xen are point-like. These objects are unlikely to be used in CS, because they represent unrealistic vegetation from the Xen levels in Half-Life. But since these objects have been added to the new version of the FGD file, then for the sake of completeness of the reference book, we will describe them too.


1. Xen_hair
Appearance xen_hair Xen_hair looks like tall grass. If you place several such objects on the map and check the "Sync Movement" flag, the grass will sway synchronously.


2. Xen_plantlight
Appearance xen_plantlight Xen_plantlight looks like..., um..., look at the picture. When a player approaches such a plant, it hides inside itself. The plant can also activate an object. To do this, you need to give the plant a name and enter the name of the activated object in the "Target" parameter.


3, 4, 5. Xen_spore_small (medium, large)
Appearance xen_spore It's something like a big alien spore. They just sit and pulsate. There are three similar objects of different sizes to choose from.


6. Xen_tree
Appearance xen_tree Xen trees. Causes damage to the player if he gets too close. The rotation angle is set in the "Angle" parameter.


Entity.

§ 1.   1. Brushes
§ 2.   35 Main Entity Objects
§ 3.   1. Basic Parameters

§ 4.1   Properties of All Env Objects
§ 4.2   Properties of All Func Objects
§ 4.3   Properties of All Game Objects
§ 4.4   Properties of All Info Objects
§ 4.5   Properties of All Trigger Objects
§ 4.6   Properties of All Xen Objects
§ 4.7   Properties of All Other Objects

To the list of objects

E.10

Properties of All Other Objects

Entity Object Reference
§ 4.7 Properties of all other objects

We have combined into this group all the remaining objects that do not belong to the previous large groups. Most of these objects are point objects, but there are also three brush objects: button_target, momentary_door and momentary_rot_button.

The most frequently used objects: ambient_generic, cycler, cycler_sprite, hostage_entity, light, light_environment, light_spot, multi_manager, path_corner, path_track.


1. Ambient_generic
ambient_generic Using this object, sounds in wav format are inserted onto the card.
properties:
Name
If you give a sound a name, you can turn it on/off with a button or trigger

Path/filename.wav of WAV
Here you need to specify the path to the sound file in wav format (usually sounds are placed in the cstrike/sound/ambience folder). You can also find sounds in the pak0.pak archive, in the valve folder

Volume (10 = loudest)
Sound volume. Values ​​(0 - 10), 10 - loudest

Dynamic Presets
Various sound settings (may not be specified)

Start Volume
Initial sound volume (must be specified if the two parameters below are set)

Fade in time (0-100)
Time in seconds until the sound volume increases from the initial value (Start Volume) to the final value (Volume)

Fade out time (0-100)
Time in seconds until the sound volume decreases from the final value (Volume) to the initial value (Start Volume)

Other parameters are rarely used

flags:
Play Everywhere
If checked, the sound will be heard throughout the entire map, i.e. from any point

Small Radius
If checked, the sound will be heard at a short distance (up to 800 units)

Medium Radius
If checked, the sound will be heard at a medium distance (up to 1250 units)

Large Radius
If checked, the sound will be heard over a long distance (up to 2000 units)

Start Silent
If checked, the sound will be turned off at the start of the round and will need to be turned on with a button or trigger

Is NOT Looped
If checked, the sound file will be played once (will not be repeated). To play the sound again, you will need to activate it again


2. Armoury_entity
armoury_entity Using this object, you can place weapons, grenades and body armor on the map. One such object houses one type of weapon or ammunition.
properties:
Item
The type of weapon or ammunition is indicated here

Count
Number of specified weapons or ammunition


3. Button_target
A button, like func_button, but when you press this button, it does not press into the wall. To activate a button_target object, you need to shoot at it or, by checking the "Use Activates" flag, click on the "Use" button (default "E").
properties:
Target
Enter here the name of the object that needs to be activated when you click on this button

Master
Multisource object name

1. Basic Parameters

flags:
Use Activates
If checked, then to activate (press) the button, you will need to press the "E" key

Start On
If checked, the button will initially be colored with a texture that corresponds to the pressed state


4. Cycler
cycler Using this object, models (*.mdl files) are inserted onto the map. You can view models using the Half-Life Model Viewer program.
properties:
Name
If a name is given and the model is activated (by a button or trigger), then the animation currently playing will be stopped. And when you shoot at the model, the next animation frame will be played

Model
Path to the *.mdl file with the model (usually models are placed in the cstrike/models folder). You can also find models in the pak0.pak archive, in the valve folder

1. Basic Parameters


5. Cycler_sprite
cycler_sprite Using this object, sprites (*.spr files) are inserted onto the map. You can view sprites using the Sprite Explorer program.
properties:
Name
If a name is given and the sprite is activated (by a button or trigger), then the animation currently playing will be stopped. And when you shoot at a sprite, the next frame of animation will be played

Sprite
Path to the *.spr file with the sprite (usually sprites are placed in the cstrike/sprites folder). You can also find sprites in the pak0.pak archive, in the valve folder

Frames per second
Sprite animation playback speed, frames per second. Default value: 10

1. Basic Parameters


6. Cycler_wreckage
cycler_wreckage Using this object, you can create clouds of smoke, like from a smoke grenade.
properties:
Name
Object name

1. Basic Parameters

Framerate
Smoke puff animation speed, default 10 frames per second

Sprite Name
Path to the *.spr file with the smoke sprite, by default sprites/dot.spr

Scale
Sprite scale, default 1x1. The larger the scale, the larger the clouds of smoke

flags:
Toggle
If checked, the smoke can be turned on/off (if there is a name)

Start ON
If checked, smoke will emit immediately after the start of the round


7. Gibshooter
gibshooter The object, when activated, scatters pieces of meat and bloody bones 8]
properties:
Name
Give the object a name so it can be activated by a button or trigger

Number of Gibs
The number of bones, pieces, etc. thrown out at a time. Default value: 3

Delay between shots
Time in seconds before the next piece is ejected

Gib Velocity
Piece emission speed, default 200

Course Variance
This parameter determines how much flying pieces will deviate away from a straight line. Default value 0.15

Gib Life
Time in seconds during which the thrown pieces will lie on the ground (then they will disappear)

flags:
Repeatable
If checked, the object can be activated multiple times


8. Hostage_entity
hostage_entity The object determines the spawn location of 1 hostage. Make sure that this object is located at some distance above the surface of the earth, and is not "built in" into the walls and does not touch other similar objects, otherwise, once born, the hostage will not be able to move.
properties:
Model
Path to the *.mdl file with the hostage model, by default models/hostage.mdl

Skin
Here you can select the skin (clothing) of the hostage, if the model has several of them. Models and skins can be viewed using the Half-Life Model Viewer program


9. Item_battery
item_battery Using this object, you can place a battery on the map to repair your body armor.
properties:
Name
Object name

Target
Here you can specify the name of the object that will be activated after the player uses recharge

Delay before trigger
Time in seconds until the object specified in "Target" is activated (does not work)

Kill Target
The name of the object that needs to be destroyed after the player uses recharge (does not work)

flags:
Not in Deathmatch
If checked, the object will not appear


10. Item_healthkit
item_healthkit First aid kit to replenish the player's life. Each first aid kit adds 15 percent life.
properties:
Name
Object name (optional)

Target
Here you can specify the name of the object that will be activated after the player takes the first aid kit

Delay before trigger
Time in seconds until the object specified in "Target" is activated (does not work)

Kill Target
The name of the object that needs to be destroyed after using the first aid kit (does not work)

flags:
Not in Deathmatch
If checked, the object will not appear (and why is it needed then? :)


11. Item_longjump
item_longjump Using this object, you can place a backpack with a "longjump" on the map for large jumps.
properties:
Name
Object name (optional)

Target
Here you can specify the name of the object that will be activated after the player takes the backpack

Delay before trigger
Time in seconds until the object specified in "Target" is activated (does not work)

Kill Target
Name of the object that needs to be destroyed after using the backpack (does not work)

flags:
Not in Deathmatch
If checked, the object will not appear (and why is it needed then? :)


12. Light
light A small light source (something like a light bulb). The object is used to illuminate rooms. In properties you can set the color and brightness of the light.
properties:
Target
Typically this parameter is not used. However, you can enter the name of the target object (info_target) here. Then the light from the light bulb will be directed towards this object. If you leave this parameter empty, the light will spread in all directions

Name
If you give the light bulb a name, it can be turned on/off with a button or trigger

Brightness
The color (in RGB format - red, green, blue) and brightness of the light are indicated here. The first three digits are responsible for color, the last - for brightness

To define a color, click the "Pick color" button and select the desired color. Click OK. The first three digits have already been determined. All that remains is to set the brightness of the light bulb to the fourth digit. Usually the values ​​are set from 80 to 250 (the higher the value, the brighter the light shines)

Note: if you set all four values ​​to 0 0 0 0, the light bulb will glow white with medium brightness

Appearance
Type of light bulb (regular is installed by default, there is also a fast or slow pulsating, etc.)

Custom Appearance
Here you can set the lamp flickering parameters. To do this, combinations of letters of the English alphabet from a to z are used, where "a" is an extinguished light bulb, "z" is a burning one. For example, the combination abcdedcba will make the light bulb first come on, then go out, then repeat

To be able to set your own flickering mode, you need to give the light bulb a name (Name), while there is no need to activate the light bulb, it will light up on its own

flags:
Initialy dark
If checked, the light will be turned off at the start of the round. To turn on a light bulb, it must be activated by a button or trigger


13. Light_environment
light_environment The main source of light on sky maps. Used to create general map lighting that is projected from the sky (i.e. SKY brushes located around the map and painted on all sides with the SKY texture).
properties:
Name
Name (not necessary)

Pitch Yaw Roll (Y Z X)
Here the direction of light is determined. The required direction of light can be easily determined by setting the view from above and indicating the required angle in the "Angle" parameter

Pitch
The angle in degrees at which the light is directed towards the ground. Use only negative values ​​here. For example, a value of -90 means the direction of light is perpendicular to the ground. Commonly used values ​​are -60, -45 and -30. The closer the value is to 0, the longer the shadows cast by walls and other objects on the map will be.

Brightness
The color (in RGB format - red, green, blue) and light brightness (0-255) are indicated here. The first three digits are responsible for color, the last - for brightness

To define a color, click the "Pick color" button and select the desired color. Click OK. The first three digits have already been determined. It remains to set the brightness of the light to the fourth digit. Values ​​from 0 to 255 (the higher the value, the brighter the light). For a night map, set the value to 10-15; for a day map, values ​​from 70 to 150 are usually used


14. Light_spot
light_spot Little spring directed light (this is how this object differs from light). To specify the direction of the light, an info_null or info_target object is used. You can specify the inclination of the rays and their direction manually (which is less convenient) in the "Pitch" and "Angle" parameters, respectively.
properties:
Name
If you give the light bulb a name, it can be turned on/off with a button or trigger

Target
Enter the name of the target object here (info_null or info_target). Then the light from the light bulb will be directed towards this object. Using info_null or info_target objects to determine the direction of light is more convenient than specifying angles manually

Inner (bright) angle
The angle of the cone that will be formed by light rays around the axis of its propagation. The brightness of the light inside this cone will be maximum. Default value: 30°

Outer (fading) angle
The angle of the cone that will be formed by light rays around the axis of its propagation. This cone forms shading (decrease in brightness) of light. Default value: 45°

Pitch
The angle in degrees at which the light is directed towards the ground. Positive values ​​(greater than zero) - the light is directed upward, negative (less than zero) - the light is directed downward

Brightness
The color (in RGB format - red, green, blue) and brightness of the light are indicated here. The first three digits are responsible for color, the last - for brightness

To define a color, click the "Pick color" button and select the desired color. Click OK. The first three digits have already been determined. All that remains is to set the brightness of the light bulb to the fourth digit. Usually the values ​​are set from 80 to 250 (the higher the value, the brighter the light shines)

Note: if you set these four values ​​to 0 0 0 0, the light bulb will still shine white with medium brightness

Is Sky
There are two options here: "No" and "Yes". The default is "No". The value "Yes" is used to create the effect of lighting from the sky, without the light coming from the light_spot itself. Usually set to "No"

Appearance
Type of light bulb (regular - default, also available with fast or slow pulsating, etc.)

Custom Appearance
Here you can set the lamp flickering parameters. To do this, combinations of letters of the English alphabet from a to z are used, where "a" is an extinguished light bulb, "z" is a burning one. For example, the combination abcdedcba will make the light bulb first come on, then go out, then repeat

To be able to set your own flickering mode, you need to give the light bulb a name (Name), and there is no need to activate the light bulb, it will light up on its own

flags:
Initialy dark
If checked, the light will be turned off at the start of the round. To turn on a light bulb, it must be activated by a button or trigger


15. Momentary_door
A door that slides to the side and can only be opened by a momentary_rot_button object.

The direction of door opening is indicated by the "Angle" parameter (by numbers or by rotating the dash to the desired angle). To correctly determine the door opening direction, set the top view (2D top), then opening to the left will be equivalent to 180°, to the right - 0°. You can also select "Up" or "Down" from the list so that the door opens up (to the ceiling) or down (to the floor).
properties:
Name
Give the door a name so it can be opened/closed using the momentary_rot_button object

1. Basic Parameters

Kill target
Here you can enter the name of the object that will be destroyed after opening the door (Attention! The object will be deleted for all remaining rounds!)

Speed
Door movement speed when opening/closing, default 100

Master
Multisource object name

Move sound
The sound of a door opening

Stop sound
The sound of a door closing

Delay before close, -1 stay open
Time in seconds until the door closes automatically (set to "-1" to keep the door open until the end of the round)

Lip
With this parameter you can change the distance at which the door opens. By default, the door moves a distance equal to its width. If you set any value here, the door will open to the distance: S = (door width - Lip). Set a negative value to move the door further, a positive value to move it less (the door will not open all the way)

Damage inflicted when blocked
The percentage of life taken from a player when he is caught under a closing door

Target
Here you can enter the name of the object that will be activated when the door is opened

Delay before fire
Time in seconds from closing the door to activating the object specified in "Fire on close"

Fire on close
Here you can enter the name of the object that will be activated when the door is closed

Health (shoot open)
"Strength" of the door. Set a value greater than zero if you want the door to open when fired. The door will open after the damage level exceeds the specified value

Locked sound, Unlocked sound, Locked sentence, Unlocked sentence
Sounds for different door states (can be omitted)

flags:
Starts open
If checked, the door will be open at the beginning of each round.

Passable
If checked, the door will be immaterial, i.e. it will be possible to pass through it

Toggle
If checked, once opened the door will not close automatically until it is activated again

Use only
If checked, the door will open only when you press the "Use" button (default "E")


16. Momentary_rot_button
Using this object, you can create a rotating valve (button) to open the momentary_door.

Since this is a rotating object, it is necessary to define the axis of rotation. To do this, you should build a brush, painted on all sides with the ORIGIN texture. The center of such an ORIGIN brush determines the center of the object and, accordingly, the location of the rotation axis. Then you should select the valve and ORIGIN brush and turn them into momentary_rot_button.
properties:
1. Basic Parameters

Name
If you give the valve a name, it can be activated by a trigger

Targetted object
Enter the name of the momentary_door object here (i.e. the name of the door)

Speed
Valve rotation speed, default 50

Master
Multisource object name

Sounds
Sound made when valve rotates

Distance (deg)
Valve rotation angle in degrees, default value: 90°

Auto-return speed
Valve auto return speed (the speed must be specified if the "Auto Return" flag is checked)

flags:
Door Hack
Used to rotate two or more objects simultaneously. Example: let's create two gates from momentary_rot_button and specify the same name in the "Target" parameter for each of them (it is not at all necessary that an object with the same name exists on the map, it may not exist - that's why this flag is called "Door Hack"). Then mark the "Door Hack" flag at one of the gates. In the game, when we activate one of the valves, both will begin to rotate synchronously

Not useable
If checked, the valve can only be activated by a trigger, i.e. by pressing the "Use" button (default "E") the valve will not rotate

Auto Return
If checked, the valve will automatically rotate in the opposite direction when released. The rotation speed is determined in the "Auto-return speed" parameter

X asis, Y asis
If necessary, here you can specify the axis about which the object will rotate (by default, relative to the vertical Z axis)


17. Multi_manager
multi_manager This object allows you to activate up to 16 other objects at specified intervals.

To use it, you need to press the "SmartEdit" button and, by clicking the "Add" button, enter the name of the object in the "Key" parameter and the time of its activation in the "Value" parameter. If there are several objects, the operation must be repeated.
properties:
Name
Give this object a name so it can be activated by a button or trigger

Usage example
Let's create two ambient_generic sounds. Let's name the first sound sound-1, the second sound-2. Now let's install a multi_manager object on the map and give it the name manager-1. In its properties, press the "SmartEdit" button and click "Add". A window will appear with the parameters "key" and "value", where "key" is the name of the object that needs to be activated, "value" is the time in seconds before activating this object

Let's enter the name of the first sound (sound-1) into the "key" parameter, and the value 0 into the "value" parameter. Let's do the same for the second sound, i.e. press the "Add" button again and enter sound-2 in "key", and enter the value 10 in "value"

In the game, after activating the multi_manager object, the sound sound-1 will be played, and after 10 seconds - sound-2. This way we can activate up to 16 different objects. This can be not only sounds, but also doors, lights, as well as other multi_manager objects, etc.

flags:
multithreaded
Allows you to restart multi_manager, even if it is already running and activates some objects. Let's explain the effect of this flag using an example: suppose that when the multi_manager object is activated, 3 messages are displayed on the player's screen in turn (3 game_text objects are used) with an interval of 10 seconds. If at the same time another player reactivates multi_manager, he will not see the messages, because multi_manager has already been started and is doing its job. Check this flag so that the second player can see the messages, i.e. to make multi_manager restart for the second player


18. Multisource
multisource A multisource object allows another object to be activated only after several conditions are met.
properties:
Name
Give this object a name so it can be activated by a button or trigger

Target
Enter here the name of the object that will be activated after the condition is met

Global State Master
The name of the global variable that is set by the env_global object to control the multisource state (optional)

Usage example
Let's create 4 func_button buttons and one ambient_generic sound, give it the name sound-1. Next, we will create a multisource object, give it the name source-1 and enter the name of the sound in the "Target" parameter, i.e. sound-1. Then, in the "Targeted object" parameter of all four buttons, enter the name of the multisource object, i.e. source-1

In the game, when we press all four buttons, sound-1 will be played, but only if the All buttons. If at least one of the buttons is pressed until all the others are pressed, the sound will not be played.


19. Path_corner
path_corner Using path_corner objects, a func_train train trajectory (path) is created.
properties:
Name
Give this object a name

Next stop target
Enter the name of the next path_corner object in the trajectory here, the train will move towards it when it crosses this point

Fire On Pass
Here you can enter the name of the object that will be activated when the train passes through this waypoint

Wait here (secs)
The time in seconds for which the train will stop at a given point on the route. It will then continue moving unless the "Wait for retrigge" flag is checked.

New Train Speed
With this parameter you can change the speed of the train after crossing this point on the track

New Train rot. Speed
With this parameter you can change the rotation speed of the train (if the train is rotating)

flags:
Wait for retrigger
If checked, the train will stop at this point on the route and wait for a new activation

Teleport
If checked, the train will be teleported to this point

Fire once
If checked, the object specified in the "Fire On Pass" parameter will be activated only once, and not every time the train passes this point on the route


20. Path_track
path_track Using path_track objects, the trajectory of the func_tracktrain train or the initial direction of the func_vehicle are determined.
properties:
Name
Give this object a name

Next stop target
Enter here the name of the next path_track object in the trajectory, the train will move towards it when it crosses this point

Fire On Pass
Enter here the name of the object that needs to be activated when the train passes through this waypoint

Branch Path
Enter the name of another path_track object here if you need to create a branched path. Then, when the path_track object is activated, the train will not go to the "Next stop target", but to this point

Fire on dead end
If the next track point is not specified (empty "Next stop target" parameter) and there is no branched track, then when the train reaches this path_track point, the object specified in this parameter will be activated

New Train Speed
With this parameter you can change the speed of the train after crossing this point on the track

flags:
Disabled
If checked, path_track will be disabled

Fire once
If checked, the object specified in the "Fire On Pass" parameter will be activated only once, and not every time the train passes this waypoint

Branch Reverse
If checked, the train will move to another track specified in the "Branch Path"

Disable train
If checked, the train will stop at this point


21. Player_weaponstrip
path_track When this object is activated, absolutely all weapons (including the knife) are taken away from the player.
properties:
Name
Object name. If you do not specify a name and place such an object on the map, then the weapon will be taken away from all players


Entity.

§ 1.   1. Brushes
§ 2.   35 Main Entity Objects
§ 3.   1. Basic Parameters

§ 4.1   Properties of All Env Objects
§ 4.2   Properties of All Func Objects
§ 4.3   Properties of All Game Objects
§ 4.4   Properties of All Info Objects
§ 4.5   Properties of All Trigger Objects
§ 4.6   Properties of All Xen Objects
§ 4.7   Properties of All Other Objects

To the list of objects