Chapter III. Compilation (ZHLT).

Everything about ZHLT compilation: compiler tools, parameters, error diagnosis, log analysis, decompilation, and speeding up builds.

3.1

What Is Compilation?

2026 update. The basic idea has not changed: editors save a source map, compilers turn MAP into BSP. What changed is the toolchain. Hammer's RMF and J.A.C.K.'s JMF are editor project formats; export or compile through MAP. TrenchBroom works directly with MAP/Valve 220. For compiling, prefer VHLT v34 or SDHLT instead of the original ZHLT 2.5.3.
From this article you will learn what compilation is and what are the computer requirements for compilation. And we will introduce you to compiler programs in the following articles from this Chapter.

Compilation

Compilation is the process of converting a map from MAP format to BSP format. The map must be compiled, because Half-Life cannot use maps in MAP format. The Hammer map editor uses its own RMF (Rich Map Format) format, which is an advanced version of the MAP format. However, compilers cannot use it. They only need a map in MAP format. This is precisely why it is necessary to save the map in MAP format before compilation. This is done in the editor through the menu item "File\Export to MAP".
Compilation is carried out by special compiler programs. There are four of them in total. Each of these programs performs its own stage in the formation of the finished map. The best compilers are considered to be Zoner's Halflife Tools (ZHLT for short).

Map source

Map source is your uncompiled map saved in RMF or MAP format. Maps in RMF format are only understandable by the Hammer editor (and its previous versions of Worldcraft). Other editors (for example, Quark, GtkRadiant) do not work with such files. They can open the original map in the simpler but more versatile MAP format.
The MAP format is a universal format that can be understood by all map editors. Also, MAP is the only format that compilers understand.
The difference between the MAP and RMF format is that in RMF the editor stores additional information, such as grouped or hidden objects. We recommend storing the source files of your maps in RMF format.

Computer requirements and compilation time

Compilation is a fairly demanding process on system resources. The decisive factors determining compilation time are: amount of RAM And CPU frequency, but to a lesser extent the duration of compilation depends on the structure of the map itself. If the map is not built correctly, if it has not been optimized and is also quite large, then compilation can take several hours or even days!
Maps representing several rooms are compiled in about 30 seconds (computer: PIII-667 MHz, 128 MB). Medium, closer to small, maps take about 30-40 minutes to compile. Large maps, with large open spaces, with a lot of light sources (and especially if there are glowing textures) can take 3-4 hours or more to compile on the above computer. If your compilation lasts more than 4 hours, it means that there is something wrong with the map structure or there is simply not enough computing power on your computer.
We know of cases where on a Pentium III 667 MHz with 128 MB of RAM, compiling a large map lasted 36 hours! The main reason for such a long compilation is the small amount of RAM (128 MB). The compilation "stalled" at the "MakeScales" operation of the compiler that calculates lighting, namely HLRAD. When all RAM was exhausted, the page file began to be actively used, which led to a significant increase in compilation time.
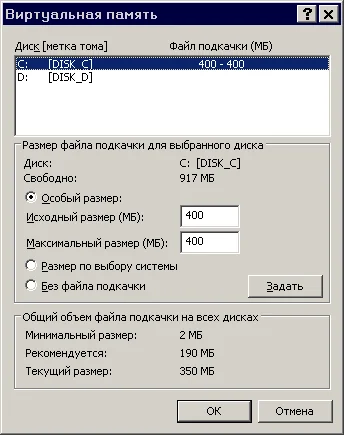
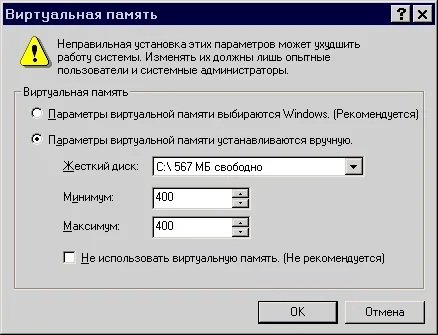
If you have little RAM (128 MB or less), and the card is quite large, then be sure to increase the size of the SWAP file (the swap file that determines the size of the virtual memory). We recommend making the paging file at least 400 MB with 128 MB of RAM. You can also try to compile the map by adding the parameter -sparse to the HLRAD compiler startup line. This will reduce RAM costs by 10% by increasing the load on the processor. Well, the best solution to the problem would be to buy additional RAM :) It is necessary that the computer has "at least" 384-512 MB.

Changing the paging file size in Windows

For Windows 98/Me
The paging file size changes to: "Start\Settings\Control Panel\System\Performance\Virtual Memory".
t3compile1 For Windows XP
In XP this parameter is hidden a little deeper :), namely in: " Start\Settings\Control Panel\System\Advanced\Performance - Settings\Advanced\Virtual Memory - Change".
t3compile2 In the next article of this Chapter we will talk about the best compilers for maps based on the Half-Life engine - ZHLT.
3.2

ZHLT Compilers

Modern compiler recommendation. ZHLT is the historical name used throughout this chapter. In current GoldSrc mapping, VHLT v34 is the established successor to ZHLT Custom Build, and SDHLT is a newer fork based on VHLT v34. SDHLT installs the same four stages as ZHLT, but with names such as sdHLCSG.exe, sdHLBSP.exe, sdHLVIS.exe, and sdHLRAD.exe. Its 64-bit builds avoid many old memory-allocation failures, and it adds features such as studiomodel shadows, extra tool textures, world extent options, and portal-file handling for J.A.C.K.
Zoner's Halflife Tools (ZHLT) are the world's best compilers for maps based on the Half-Life engine. These compilers are also called Zoner Utilities or ZHLT Utilities. The ZHLT utilities include four small console compiler programs.
The main differences between the ZHLT compilers and the standard ones that come with the Hammer editor:
  • more parameters to configure compilation
  • better lighting rendering
  • faster and better map optimization
  • detailed error reporting system
  • more information about the compilation progress
  • fewer errors
The advantages of ZHLT compilers over standard ones are obvious. That's why they are used by 99% of all mappers in the world.

Different versions of ZHLT compilers

Thanks to the open source code of the ZHLT utilities, it became possible to improve them, which Anthony Moore aka "Merl" did not fail to take advantage of. This good man improved ZHLT and named them ZHLT Custom Build.
So, there are two versions of ZHLT compilers:
  1. ZHLT (official compilers from Zoner);
  2. ZHLT Custom Build (improved compilers from Merle).
The official ZHLT compilers, unfortunately, have not been updated for a long time (the latest version 2.5.3 was released in 2001), but to this day they cope with their task perfectly and produce maps of excellent quality.
The improved ZHLT Custom Build compilers, fortunately, are updated regularly (you can read about the latest version of these compilers in the next article, this is Chapters).
Which version of ZHLT should I use? Probably, after all, ZHLT Custom Build, although we recommend downloading both, because Simple ZHLTs have a useful program called Ripent for changing the properties of objects on the map without recompiling it.

More about compiler programs

So, as we already know, there are four compilers in total:
  1. HLCSG.EXE — calculates the general geometry of the map and creates 4 hull files for processing by the HLBSP compiler;
  2. HLBSP.EXE — creates a map tree and a working BSP file;
  3. HLVIS.EXE — creates the visual part and optimizes the map for faster rendering in the game;
  4. HLRAD.EXE — calculates the lighting on the map.
ZHLT compilers in their standard package do not have a graphical interface and are launched from the command line by specifying compilation parameters. The startup sequence of the compilers is the same as in the list above. To date, several graphical shells have been released for ZHLT, which allow you to control compilation parameters and actually start compiling the map using the usual menus and dialogs. A few that immediately come to mind are ZHLT Compile GUI and Batch Compiler.
During the compilation process, ZHLT writes information about the compilation progress to a LOG file (the file is named after the map name, for example, de_dust.log or de_aztec.log). If errors occur during compilation, the process will be interrupted, and an ERR file describing the error will be created in the directory with compilers (the file is also called by the name of the map, for example, de_dust.err). If errors are found, you can try to fix them, and our article describing all possible compilation errors will come in handy here.
The set parameters greatly influence the compilation time. For example, you can compile a map very quickly, but both the lighting quality and optimization for higher FPS (Frames Per Second) will suffer. This compilation option is used for testing the card, when appearance is not so important. On the contrary, you can set parameters that will make the map as high quality as possible, but you will have to pay for it with longer compilation time. This option is used for the final version of the map, when it is best lit and optimized.
There are quite a lot of compilation parameters (several dozen), but not all of them are used. A description of all parameters for each compiler can be found in one of the following articles in this Chapter.

About the NetVIS compiler

The ZHLT utilities include another compiler - NETVIS.EXE, which is the network version of the HLVIS compiler. If the compilation time of HLVIS is too long, you can combine several computers and count this stage together. To do this, one computer must be a server and the others must be clients.
Starting the server: netvis.exe -server mapname, where mapname is the name of the map;
Joining the server: netvis.exe -connect servername, where servername is the name or IP address of the server.
By default, clients connect to the server on port 21212, which can be changed with the parameter -port.
By default, information is exchanged with the server every 60 seconds. You can change this indicator using the parameter -rate.

Installing and connecting ZHLT to the editor

Copy the contents of the archive with compilers to some folder. For convenience, you can create a ZHLT folder in the directory with the installed editor (for example, "D:\Hammer\ZHLT") and copy the files there. If you want to compare the usability of both versions of ZHLT, you can create 2 folders. To a second folder (for example, "D:\Hammer\ZHLT_CB") can accommodate improved ZHLT Custom Build compilers. However, only one compiler can be connected to the editor, so it is more convenient to use BAT files for compilation. In this case, you will not need to change the editor settings.
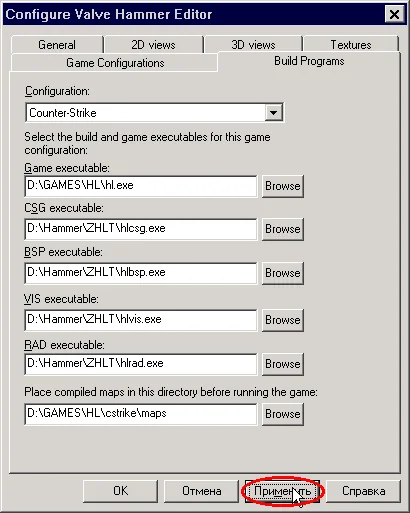
If you plan to compile maps using the Hammer editor, then compilers must be connected. To do this, in the "Tools\Options" menu, select the "Build Programs" tab and specify the paths to each of the compilers.
Everything should look something like this:
t2wcopt6 If you will use a batch BAT file or shell programs for compilation (for example, Batch Compiler or ZHLT Compile GUI), then you do not need to connect the utilities to the editor.
3.3

Improved ZHLT Custom Build

Historical section. ZHLT Custom Build 1.7 was important because it introduced many features that mappers still rely on. Today those ideas live on in VHLT and SDHLT, so do not hunt for the old Custom Build unless you are reproducing an old map build. Use the notes below to understand the features, then check the documentation for your chosen compiler package for exact modern parameter names and limits.
Along with the official compilers from Sean Cavanaugh aka "Zoner", there is an improved version of them, the so-called Custom Build from Anthony Moore aka "Merl". The version of utilities from Anthony Moore has a number of advantages, which will be discussed in this article. All options described in this article apply ONLY to ZHLT Custom Build and do not apply to simple ZHLT.
The latest version of ZHLT Custom Build is 1.7. You can also find the designation 2.5.3-1.7, but since When new versions of Custom Build are released, only the second part of the numbers changes, so 2.5.3 is usually omitted. Links to download both versions of ZHLT compilers are provided in the section What Programs Are Needed to Create Maps?.
Contents of the article:

New in version 1.7

  • Support for switchable glowing textures
  • Support for translucent and colored shadows for entities
  • Possible value of "-subdivide" parameter increased to 512
  • Updated information about the "info_compile_parmeters" object

Null texture

Null texture is designed to reduce the number of polygons drawn by the game, i.e. to reduce r_speeds and, accordingly, increase the number of frames per second. This texture must be applied to those sides of objects that the player will never see in a normal situation in the game.
When compiling, null textures are simply removed, so the Half-Life engine does not render surfaces painted with null textures in the game. You can apply a null texture to both regular brushes and brushed entity objects.
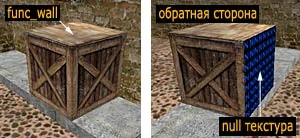
Example of use. Let's say we have a box on the map (func_wall). In the game he will spend 6 epoly according to the number of sides. The player cannot see the lower part of the box (bottom) under normal conditions. By painting it with a null texture, we will reduce the epoly value by 1 polygon. If the box is near the wall (as in the picture), then you can also paint the leaning edge.
An example of using a null texture
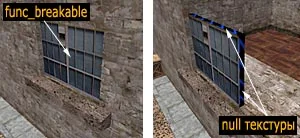
Second example. We have a window opening with glass made from func_breakable or from the same func_wall. In the game, glass also takes up 6 epoly. But the player sees only 2 sides of the glass - we can easily paint the other 4 with a null texture, thus saving 4 epoly.
An example of using a null texture
But these are all measures that save epoly, while the more important thing for us is saving wpoly. Therefore, the null texture needs to be applied to the roofs of houses, the top edges of fences, walls, tall boxes - in general, to those sides that the player cannot see. By the way, instead of a null texture, you can just as well use a regular SKY texture. In both cases, r_speeds decreases.
If you use a null texture, do not forget to copy zhlt.wad (comes with the compilers) to some folder and connect it to the editor through the "Tools\Options\Textures" menu.

Automatic detection of wad files

This simple function makes it possible to connect any number of texture textures to the editor. WAD files, and at the same time, only actually used WAD files will be included in the finished BSP map file.
To enable this function, you need to add the parameter to the HLCSG compiler startup line -wadautodetect.

Clipnode saving mode

This mode is enabled by default in the HLCSG compiler, so there is no need to enable it with additional parameters.
Clipnode - surfaces defined by the game engine as impassable for the player. Each brush on the map (be it a wall, floor or box) is "wrapped" in clipnode surfaces. Thanks to clipnodes, the player does not fall through the ground and cannot pass through walls. Remember the old Halfa cheat "noclip" (walking through walls) - this is it :)
The number of such planes, like many other things in Half-Life, is limited. If the number of clipnode planes exceeds the maximum allowed value, then errors will occur during compilation.
In this version of the compilers, CSG analyzes the use of clip planes on the map. If in some cases it is possible to avoid their use (for example, func_illusionary does not need to use such planes), then such clipnode planes are removed. However, the clipnode economy mode does not eliminate the occurrence of the MAX_MAP_CLIPNODES error during compilation, but simply reduces the likelihood of its occurrence.
You can read more about the MAX_MAP_CLIPNODES error in the article Compilation Errors.

Scattered light

This feature allows you to create more realistic lighting using the light_environment object. In this case, the HLRAD compiler uses information about the color and intensity of the light not from the standard "_light" parameter, but from the "_diffuse_light" parameter (You specify the color and brightness of the light, as usual, but only in the "_diffuse_light" parameter). In this case, the light will be projected not from the sun, but from the entire sky, which should make the lighting more realistic.

Changing object shadows

This is a new feature in ZHLT Custom Build 1.7 that allows the mapper to change the transparency and color of the shadow cast by brush entities.
To enable this function, you need to set the "Opaque" flag in the properties of the entity object, in the "zhlt_lightflags" parameter.
Next, you need to press the "Smart Edit" button and add a new parameter by name zhlt_customshadow . This parameter determines the transparency of the entity object, values ​​from 1.0 to 0.0 (where 1.0 is an opaque object (normal, full shadow), and 0.0 is a completely transparent object (no shadows)).
To change the color of the cast shadow (for example, if you are making a shadow effect from colored glass), you need to specify not 1 parameter, but 3, which will determine the color of the shadow in RGB format (Red, Green, Blue). For example, to give a shadow a red tint, you need to enter 0.5 0.0 0.0 in the properties. When you specify values ​​greater than 1.0, the HLRAD compiler will create something like a luminescent shadow.
To make all this work together with reflected light (and by default these effects do not work with reflected light), you need to add the following parameter to the HLRAD compiler startup line -customshadowwithbounce.
  • If together with the parameter -customshadowwithbounce You also use the parameter -sparse, then the compilation process may take a long time. Recommended together with the parameter -customshadowwithbounce use parameter -nomatrix ;
  • Parameter -customshadowwithbounce only works with regular (greyscale) shadows, i.e. Doesn't work with people of color.

WAD configuration file

And here is a significant innovation compared to conventional ZHLT compilers - the WAD configuration file.
The WAD configuration file is used to store various texture file configurations. For example, you can create a texture configuration for one of your maps and a different configuration (write different textures) for another.
The WAD configuration file named WAD.CFG must be located in the same directory as the ZHLT Custom Build compilers.
Let's assume that you are simultaneously creating several maps that use different texture WAD files. What are you forced to do? After working on one map, you open the editor options and disable textures that are not used by another map and, on the contrary, enable those that are used. After working with the second map for some time, you decide to go back and finish the first map, and again open the editor options, disable and connect textures... - in general, it is very inconvenient.
The WAD configuration file helps to cope with this problem.
Below we provide the syntax of this file.
  • configuration_name
    {
    c:\path\wad1.wad
    c:\path\wad2.wad
    ...
    include c:\path\wad3.wad
    }
Where:
  • Configuration_name — any name (it's convenient to name the configuration by the name of the card).
    c:\path\wad1.wad - full path to the first WAD file
    c:\path\wad2.wad - full path to the second WAD file
    include c:\path\wad3.wad - the "include" parameter means that textures from this WAD file will be included in the BSP file of the map.
You can use any number of configurations and WAD file entries.
Let's look at a small example:
Let's assume that our DE_MAP map uses 3 standard WAD files (halflife.wad, liquids.wad and decals.wad) and one non-standard one (MAP.WAD), which we made ourselves. Then our entry in the WAD.CFG file will look like this:
  • MAP
    {
    c:\Games\Half-Life\valve\halflife.wad
    c:\Games\Half-Life\valve\liquids.wad
    c:\Games\Half-Life\valve\decals.wad
    include c:\Wads\map.wad
    }
Before compilation, you need to add the following option to the HLCSG compiler: -wadconfig MAP.
Thus, it turns out that during compilation, HLCSG will see that it is necessary to use a configuration called MAP, reads the information from the WAD.CFG file and then will use textures from standard WAD files, and will include textures from our WAD file (MAP.WAD).

Path to wad.cfg file

Parameter -wadcfgfile allows you to manually specify the path to the WAD.CFG file (by default, compilers look for this file in their directory or in the directory with Half-Life). If WAD.CFG is located in some other directory, then you need to add the parameter -wadcfgfile path_to_file to the HLCSG compiler startup line.

Support for info_compile_parameters object

This version of the utilities supports the use of the info_compile_parameters object on the map. You can specify compilation parameters in the properties of this object, instead of specifying them on the command line. If you do not have this object, information about it must be added to the FGD file. You can find out how to do this and generally learn more about the object in the section "Entity".

Support for info_texlights object

This version of the utilities supports the use of the info_texlights object on the map. This object is used instead of a RAD file, which records information about glowing textures on the map. You can read more about this object in the section "Entity".

Switchable glowing textures

A great innovation in ZHLT Custom Build 1.7 is switchable glowing textures. Now any glowing texture can blink, pulsate, or simply be turned on/off like a regular light bulb. Previously this was not possible, but now with the release of Custom Build 1.7, it has become real.
The secret is this: in the FGD file, in the properties of brush entity objects (for example, func_wall, as the most common), you need to add the following code:
style(choices) : "Texlight style" : 0 =
	[
		0 : "Normal"
		-3: "Grouped"
		10: "Fluorescent flicker"
		2 : "Slow, strong pulse"
		11: "Slow pulse, noblack"
		5 : "Gentle pulse"
		1 : "Flicker A"
		6 : "Flicker B"
		3 : "Candle A"
		7 : "Candle B"
		8 : "Candle C"
		4 : "Fast strobe"
		9 : "Slow strobe"
		12: "Underwater"
	]
By adding this code to the func_wall object, you can select a style for this object in the editor.
Style Grouped designed to create glowing textures that can be turned on/off like a light bulb.
So, we create func_wall, paint it with a luminous texture (the texture will only become luminous if it is written in a special RAD file, which is then included during compilation), give func_wall a name (for example, WALL-1), set the style to "Grouped" and (ATTENTION!) create a regular light bulb with the same name (WALL-1) near func_wall. Set the brightness of the light bulb to 0.01.
As a result, the compiler that calculates the lighting, and this is HLRAD, will think that the light is emitted by a light bulb, and not by a luminous texture. To turn off or turn on the lighting from the texture, you need to activate the light bulb. All this could not have been done if CS supported switchable glowing textures, as is done, for example, in Spirit of Half-Life.

-subdivide option

This HLBSP compiler option allows you to change the step at which the map surface is divided into polygons. By default, a cut is made every 240 texture pixels, which means that the side of an object with a 256x256 pixel texture overlay will be divided into 4 polygons (1 large polygon with a size of 240x240 pixels and 3 small ones), which can ultimately lead to a significant increase in the total number of polygons on the map.
By setting the parameter value -subdivide 256 we will significantly reduce the number of polygons on the map, provided that we use 256x256 pixel textures. This happens because now the map surface will be cut every 256 pixels of the texture, which means the side of the object will create not 4, but only 1 polygon.
If we use textures larger than 256 pixels, then it's worth trying to increase the parameter even more "-subdivide". However, according to the developer of ZHLT Custom Build, if you increase this parameter, problems may arise with launching the map in Software mode. But, considering that the Software mode is used extremely rarely (and is generally a mustdie :), you can safely use this wonderful parameter.
But there is one very big "BUT" here - the parameter does not work :) More precisely, in some cases the map compiles normally, in others the compilation stops and an error message is displayed at the lighting rendering stage (HLRAD). This has been the case at least since ZHLT Custom Build 1.7. We are waiting for improvements.

Maximum vis distance

Maximum Distance Visibility (MDV) is a new feature that helps overcome the problem of drawing long-distance features on your map. After all, there are no guarantees that all areas of the map will be drawn in the game (some distant areas may begin to disappear). By using this option, you will ensure that the map is accurately drawn within the maximum visual distance (MDV).
To use this function you must enter the parameter -maxdistance # to the HLVIS startup line, where # is the maximum distance in units.
However, there is one side effect when using MDV. The performance of the HLRAD compiler in optimizing lighting is highly dependent on the size of the visibility matrix. As a result, a regular RAD compiler can, as it were, "cut off" the light. But we have nothing to worry about and here's why.
This problem is solved by using a special version of the HLRAD compiler from Adam Foster instead of the standard RAD compiler. And the ZHLT Custom Build utilities include the HLRAD compiler from Adam Foster.
If the parameter -maxdistance If the HLVIS compiler is installed, an additional *.VDT file will be created with information about the size of the real visual matrix (without using MDV). This file is then used by the HLRAD compiler to generate the correct map lighting.

New options for ZHLT Custom Build compilers

These options only apply to the enhanced version of the ZHLT Custom Build compilers and will not work with regular ZHLTs. Naturally, all other parameters that work in official utilities can be applied to improved compilers. You can read about these parameters in the corresponding article from this Chapter.
HLCSG
  • -nonulltex — Disables the use of NULL textures;
  • -noclipeconomy — Disables clipnode plane saving mode;
  • -wadconfig configuration_name — Specifies the name of the wad files configuration in the wad.cfg file;
  • -wadautodetect — Enables auto-detection mode for wad files;
  • -wadcfgfilepath_to_wad.cfg_file — Allows you to manually specify the path to the wad.cfg file; by default, compilers look for this file in their directory and in the directory with Half-Life;
HLBSP
  • -nonulltex — Disables the use of NULL textures;
  • -subdivide x, where x is a value from 240 to 512; — Changes the step at which the map is cut into polygons (default 240);
HLVIS
  • -maxdistance x, where x is the distance in units; — Sets the maximum vis distance;
HLRAD
  • -colourgamma r g b — Sets the gamma value in the format r, g, b (red, green, blue);
  • -colourscale r g b — Sets the lightscale value in the format r, g, b (red, green, blue);
  • -colourjitter r g b — Adds noise (interference) of various colors, used for blurring (dithering);
  • -jitter r g b — Adds noise (interference) of monochrome (one) color, used for blurring (dithering);
  • -nodiffuse — Disables diffuse hack for the light_environment object;
  • -nospotpoints — Turns off the point display mode of the light_spot object;
  • -softlight r g b d — Sets the values ​​for the backwards-light hack;
  • -customshadowwithbounce — Allows the use of translucent shadows for entity objects in reflected light;
NETVIS
  • No changes
3.4

Compiler Parameters

This article describes all the options for ZHLT compilers. In addition to these parameters, the improved ZHLT Custom Build compilers use some additional ones. You can read about them in one of the previous articles about the improved version of ZHLT. This article is a translation of the official document that comes with the ZHLT. Article taken from: http://alexnd.narod.ru/. We thank the author for the excellent translation!
Each of the four compilers has both its own parameters and 9 common ones that apply to any of the compilers.
Content:

1. HLCSG

Launch example: hlcsg.exe -estimate -nowadtextures karta.map
-nowadtextures
Include all textures used in the final map file (.bsp). This option is useless with the parameter input -wadinclude and is left only for backward compatibility.
-wadinclude file
Include textures from the specified .wad file in the final map file (.bsp). This option allows you to include textures from the specified .wad file in the final (.bsp) file. Allows the use of partial name matching, is not case sensitive, and is able to recognize not only file names, but also folder names. If you need to insert multiple texture files, you must specify several parameters -wadinclude, one for each texture file. Only textures actually used in the map will be inserted into the .bsp file.
-noclip
Do not create a "boundary" area for the map. Maps in Half-life, like Quake1, have 4 closed areas (hulls) used by the game engine: 1 area is visible (for drawing visible areas of the map), and 3 areas are restrictive (to limit the movement of players on the map). This option allows you to disable the creation of restrictive areas on the map, making it "airy". The player will not only be able to walk through walls, but also fall through the ground (if gravity is turned on). Useful for saving time during test compilation. You can only observe changes made on the map in Spectator mode.
-onlyents
Update the value of object parameters from the source (.map) in the finished map (.bsp) This option updates objects in an already created map (.bsp file). In most cases, however, objects cannot be edited. Adding or removing an object can disorganize other objects, ruining brush objects, especially triggers.
-noskyclip
Disable automatic map limiting to the sky. By default, hlcsg limits the space available to the player with brushes with a CLIP texture, and also removes all polygons outside the map or "inside" the sky, which speeds up program execution hlvis And hlrad.
-tiny #
Set the minimum brush area, less than which brushes are removed. Surfaces with a small area are removed during compilation. The default threshold is 0.5 square "unit" (the unit of measurement in Half-Life, the Worldcraft/Hammer editor). It is quite dangerous to remove surfaces in this way, as the map may become unusable and errors LEAF PORTAL SAW INTO LEAF or HALL-OF-MIRRORS (mirror corridor - the effect when a player goes beyond the boundaries of the map in observer mode).
-brushunion #
Set a threshold for messages about intersecting brushes. This option is provided for debugging purposes. Its value sets the percentage of the volumes of intersecting brushes, upon reaching which a warning is issued. A fairly high value (95% or higher) is a good place to start, as lowering this setting results in hundreds or even thousands of messages. For each intersection of brushes, information about the brush numbers and the percentage of overlap is displayed. This option is disabled by default; Enabling it significantly slows down hlcsg.
-hullfile
Upload your own file with information about restrictive areas. Loads its own file with information about bounding areas. The file consists of 3 lines with 3 numbers each, which indicate the size of the area along the X Y Z axes. This option is given to the authors and mappers of certain Half-life mods, so you shouldn't worry too much about it.

2. HLBSP

Launch example: hlbsp.exe -estimate karta.map
-leakonly
Run HLBSP only to search for leaks (LEAK error). If you know that the card has holes (LEAK), use this option to search for holes and create a special file with information about the holes (.pts file).
-subdivide #
Set the size of the surface divider. Surfaces in Half-life are divided into polygons of the size specified in this parameter (in units). The default and maximum value of the parameter is 240. However, improved ZHLT Custom Build compilers allow you to increase this parameter, but this almost always causes all sorts of errors :) This was the case, at least, until version ZHLT Custom Build 1.7. It is usually not a good idea to decrease this parameter, as this will increase r_speeds.
-maxnodesize #
Set the maximum portal size. This setting changes the maximum portal size. Reducing it leads to the map being divided into more portals and, as a result, to an increase in the r_speeds value. However, r_speeds can actually be reduced by faster or more accurate calculation of visible areas on the map during vis execution.
-notjunc
Do not break brushes into smaller ones when they touch (T-connections) (not for final compilation). This option is for debugging/tuning and should not be used during normal compilation.
-noclip
Do not process bounding region (not for final compilation). This option is a continuation of the option -noclip in the compiler hlcsg. It tells hlbsp that hlcsg compiled the map with the option -noclip and that bounding regions should not be processed since they are not present in the .bsp file.
-nofill
Don't "fill in" the outside world (ignores LEAK leaks) (not for final compilation). This option allows you to avoid "filling" the void on the "outside" of the card, resulting in all outer surfaces being preserved. You shouldn't run a lighting calculation on a map compiled this way, although vis will work fine.

3. HLVIS

Launch example: hlvis.exe -estimate -full karta.map
-fast
Accelerated analysis (not for final compilation). Accelerated analysis of visible areas on the map is convenient for quickly examining the map being created. However, the value of r_speeds leaves much to be desired, as does the number of object polygons (epoly - entity polygons). The map can be "lit" using hlrad, but the quality of lighting and compilation time of the lighting of such a map will suffer. The map you are developing should be compiled regularly with a full visibility analysis, as a faster analysis may prevent you from noticing a sudden increase in the full analysis time, which indicates a poor architecture and a large resulting r_speeds value.
-full
Full analysis. This parameter uses an additional block for calculating visible areas on the map, which reduces the number of errors compared to conventional analysis (hlvis without parameters). Compilation time increases by about 30%. The r_speeds value remains approximately the same, with some decreases in some places on the map, and increases in others (mainly due to elimination of errors in the analysis).

4. HLRAD

Launch example: hlrad.exe -estimate -chart -extra -smooth 100 -dscale 1 -bounce 4 karta.map
-sparse
Use the algorithm with a matrix with limited memory. Hlrad breaks the map into many blocks - patches, from which a matrix is ​​subsequently created to calculate the lighting on the map. Initially, the matrix algorithm is limited to 65535 "patches" or blocks. The memory usage of this algorithm grows exponentially as the number of patches increases (the required memory in bytes is calculated as the number of patches squared divided by 16). This hlrad parameter enables a matrix compression algorithm, which, due to the additional use of the processor, allows you to overcome the limit of 65535 patches, and also reduce the RAM requirement to 10% of the amount required for a conventional matrix algorithm.
-nomatrix
Disable the use of the matrix completely Due to the fact that the use of a "truncated" matrix (parameter -sparse) leads to data compression; precise synchronization of processes is required, which is difficult to achieve on machines with more than 2 processors. Option -nomatrix was added to solve this problem. However, the addition of "opaque brush objects" in ZHLT 2.2 greatly impacted the performance of this lighting compilation method to the deterioration. This method does not imply the use of a matrix at all, and therefore does not require memory to store such a data structure.
-extra
Enable more accurate lighting calculations (9 point oversampling). Allows you to compile a map with the most realistic and beautiful lighting.
-bounce #
Set the number of "reflections" of light. This parameter sets the number of times the light is reflected. By the time this operation is performed, all the data has already been pre-calculated, so the additional number of reflections will not take much time. Increasing the number of reflections smooths out shadows and illuminates dark areas of the map in a more realistic way.
-ambient r g b
Set the illumination of the surrounding world (from 0.0 to 1.0, r g b). This option sets the minimum "brightness" of each map surface so that none of them are completely black. The parameters correspond to red, green and blue with values ​​from 0.0 to 1.0.
-maxlight #
Set the maximum light intensity. This setting is used to limit the brightness in well-lit areas, making the map darker.
-circus
Enable 'circus' mode to detect unlit areas. This is a debug option that replaces all black dots on any surface with a random bright color. For calculations, only direct illumination is taken into account and reflected light is ignored.
-nopaque
Disable blocking of light by objects. This is a debugging option that allows you to disable blocking light by objects (casting shadows) that have their glow flags set (2). Blocking light by objects slows down hlrad, so this option is useful for debug/staging compilation.
-smooth #
Set the smoothing threshold (in degrees). By default, hlrad illuminates each surface separately, resulting in visually distinct surfaces in the finished map. If the angle between two surfaces is less than that specified in this parameter, the lighting calculation will be done using smoothing technology (simulating a smooth transition - roundness - between surfaces).
-chop #
Set patch size for regular textures. Each surface is divided into a grid with a step equal to the patch size. The resulting blocks are used to calculate surface lighting. By increasing the patch size you can speed up hlrad execution and reduce memory requirements, but this will lead to a loss of quality on the finished map (uneven, angular, unrealistic shadows). Reducing the patch size, on the contrary, will lead to better lighting of the map, but will require more computer resources.
-texchop #
Set the patch size for glowing textures. Glowing surfaces (textures are described in lights.rad and emit light) are broken into blocks of a different size than regular surfaces. Typically, the block size should be half the block size of a normal surface (-chop) to make the lighting look good. Enabling the -extra option automatically sets the value of this option to half the value of -chop.
-notexscale #
Don't resize patches when changing texture sizes. By default, hlrad uses texture scale data when creating meshes and dividing surfaces into illuminated patches. This option disables patch scaling for scalable textures, which almost always results in more patches since many maps have wall textures that are 2-3 times larger.
-coring #
Set the minimum lighting threshold. This option controls the amount of illumination required on the surface so that it is not completely black.
-dlight #
Set the maximum brightness of direct (non-reflected) light. This option is similar to the -maxlight option, except that it allows you to "normalize" the light instead of "cutting" excess brightness.
-nolerp #
The nolerp option disables blending of reflected light values ​​for nearby patches (uses the closest value instead). Added by the author for internal testing of the map lighting code.
-dscale #
Set the multiplier for lighting. Due to a bug in the original qrad lighting compilation program, the direct lighting calculation was done twice during compilation. To create the most realistic maps, it is necessary to perform this calculation only once, however, due to the fact that for a long time maps were created with this parameter specified manually, it was left in this version of the compilers. Using a value of "1" will produce the most realistic shadows and lighting. However, since this setting is mutable, it has several other uses. So, using a value of "0" will completely remove direct lighting from the map and leave only reflected light. Thus, we were able to check the quality of only reflected light (the opposite of the parameter -bounce 0). Using values ​​of 3-4 will create a very strong contrast between shadows and highlights, which can be useful on maps with deserts or arctic ice.
-fade #
Set the darkness level for all lights on the map (higher values ​​result in less light spread). This parameter is a coefficient to the dimming calculation formula (1/[square of distance]). With it you can adjust the distance over which direct light spreads on the map. Individual lighting objects can have their own dimming values. This parameter only affects direct lighting, since reflected light always has a dimming formula (1/[square of distance]).
-falloff #
Set the formula for calculating shading (1 = 1/distance, 2 = 1/[square distance]). This option allows you to change the shade calculation formula.
-scale #
Set the multiplier for the final lighting on the map. This setting affects the final values ​​of light sources after all lighting calculations have been completed. Decreasing this parameter darkens the map, increasing it brightens it.
-gamma #
Set the global color value. This option affects the final compiled data by adding color correction.
-sky #
Determine the effect of sunlight on shaded surfaces. Many surfaces on the map face the sky but are in the shadow of other objects. This option controls how much "solar" ("sky") illumination should be added to the shaded surface.
-lights filename.rad
Specify a file with glowing textures manually (.rad file). One .rad file can be added manually, in addition to the automatically used lights.rad and <map_name>.rad files
-noskyfix
Disable global application of the light_environment object. ZHLT 2.1 added an easier-to-use sky lighting system using the light_environment object. According to the new rules, only one light_environment object is required on the map, and its location does not matter - the entire sky begins to emit light. The -noskyfix option disables this behavior and uses the old algorithm, when different areas of the map required separate light_environments objects to properly illuminate the outer areas of the map.
-incremental
Use or create a file with lighting data on the map. This is a handy debugging option for tweaking map lighting, especially for slow machines with limited system memory. Lighting compilation steps such as BuildVisLeafs, MakeScales and SwapTransfers can be skipped on the second and subsequent runs of hlrad using this option. Using a lighting data file requires simple, straightforward operations:
  • Start hlrad as usual by enabling the option -incremental. The map will be compiled and illuminated normally; in addition, a file with lighting data (up to several tens of megabytes in size) will be created.
  • Point lighting objects (light, light_spot, light_environment) can be changed in any way (moved, changed brightness, color, etc.)
  • Object values ​​are updated to the .bsp file using the hlcsg compiler with the option -onlyents.
  • Run hlrad as usual again with the parameter -incremental. It is necessary to keep exactly the same parameter values -extra, -chop #, -texchop #, -notexscale #. Other parameters can be changed as desired.
-dump
Save patch information for hlrad debugging. This is an option for ZHLT developers to save information about patches created during the blocking phase of the map and checking the correctness of such division.

5. General parameters

-texdata #
Changes the maximum memory size allocated for textures (in KB). Half-life was built with a 2MB texture memory limit, just like Opposing Force. ZHLT utilities have a default limit of 4MB. This amount of memory allocated for textures can be quite large when combined with model textures, on-screen graphics, etc., especially for owners with older video maps like Voodoo 1 and 2.
-chart
Shows bsp statistics. This option causes programs to display bsp statistics before writing to a file. It is most useful to use this option with programs hlrad And hlvis. The ripent utility always displays a statistical chart.
-low / -high
Runs a low/high priority program. Setting the priority to low (-low) is very convenient because you can run several other applications at the same time without compilers significantly impacting system performance. Recommended to use if you have sufficient RAM.
-nolog
Do not create report files. This option disables the automatic generation of report (.log) and error message (.err) files.
-threads #
Manually specify the number of processes. This option is used to specify the number of processes, mainly on non-Windows operating systems when it is not possible to automatically determine the number of processors. On Windows machines, this option allows you to specify fewer processes than the available number of processors.
-estimate
Shows the estimated compilation time. This parameter replaces the standard progress indicator (10...20...) with an indicator with the estimated compilation time, the amount of work completed and the amount remaining to complete. Time prediction is often inaccurate, but in general this indicator is more detailed than the standard one.
-verbose
Compile with additional messages. Most utilities will display "minor" messages and information if you set this option. With the development of utilities version 2.x, such messages related to the operation of the utilities themselves are displayed when the parameter is enabled -dev, while mapping-related messages are displayed when the option is enabled -verbose.
-noinfo
Do not show utility settings. ZHLT 2.1 added the ability to display the current configuration of each utility before starting work. The settings table shows the current value and default value of each parameter. Due to the large amount of text information, this can cause compilation problems in, for example, Worldcraft, as the latter sometimes freezes with a large amount of text scrolling in its compilation window.
-dev #
Compile with developer messages enabled. Internal debug messages in ZHLT utilities are regularly added to the toolkit. This parameter allows you to adjust the degree to which such messages are displayed, and has values ​​ranging from 0 (do not show) to 6 (show even redundant messages). This option is practically not used, except at the request of the developer to diagnose the user's computer.
3.5

How to Compile?

In this article we talk about compiling with a BAT file, compiling in the Hammer editor (Worldcraft), and compiling using the Batch Compiler graphical frontend for ZHLT. We also talk about several types of compilation (test and final).
Contents of the article:

PART 1. Compilation Types

Since the compilation process is quite lengthy, and it is better to view the result of the changes made on the map as often as possible (in order to be able to correct something in time), there is a need to somehow reduce the compilation time. How can you reduce compilation time? You can buy a more powerful computer, or you can "play" with the compilation parameters. In the second case, the card will noticeably lose quality (the lighting will be worse, there will be more brakes, etc.), but this is perfect for test compilation.
The need to reduce compilation time has led to the emergence of test mode compilation. When using the test mode, parameters are specified that significantly reduce compilation time, but at the same time the quality of the final map deteriorates. Also, during test compilation, it is possible to use only two out of four compiler programs.
So, there are 2 types of compilation:
  • Full compilation
  • (maximum map quality, but longer compilation time);
  • Test compilation
  • (compilation time is significantly less, but the quality of the map is an order of magnitude worse).

1.1 Full (final) compilation

If we need to get the highest quality map (the final version) or, if compilation time is not particularly important ("we can wait"), then the full compilation mode is what we need. We recommend a full compilation of the map, not only to finalize the map, but also to check the quality of lighting and determine the speed of map rendering.
Full compilation uses all 4 compilers: HLCSG, HLBSP, HLVIS, HLRAD.
The most resource-saving compilation method is compiling with a BAT file. With this compilation method, a BAT file is created (essentially a simple text file), in which the order and launch parameters of compilers are recorded.
Below are the lines that you need to copy into Notepad and save the file as full.bat (or with any other name, but with the extension *.bat). Then this file must be placed in the directory with compilers, copy the map in MAP format there and run full.bat.
Full compilation (best map quality)
@echo off
set WADROOT=c:\games\half-life
set mapname=karta.map
hlcsg.exe -estimate "%mapname%"
hlbsp.exe -estimate "%mapname%"
hlvis.exe -estimate -full "%mapname%"
hlrad.exe -estimate -chart -extra -dscale 1 -bounce 4 -smooth 100 "%mapname%"
1 line: removes messages from the screen (does not apply to compilation);
2nd line: here write the path to the Half-Life directory (compilers and HL should be on 1 disk);
3rd line: the name of your card (don't forget the extension .map at the end);
4th line: launch the HLCSG compiler;
Line 5: launch the HLBSP compiler;
Line 6: launching the HLVIS compiler with the parameter -full (full map optimization);
Line 7: launching the HLRAD compiler with the parameter -extra (calculation of lighting with the best quality).
You can read more about these and other parameters in the corresponding article from this Chapter.

1.2 Test compilation

Test compilation is used when you don't want to wait a lot of time just to check the correct operation of entity objects (do all the doors close, does the car drive, does the elevator go down, etc.) or just to run around the map, test the gameplay, time the appearance of commands in different places - in this case, the quality of lighting and optimization fade into the background.
During test compilation, only the first two compilers can be launched: HLCSG And HLBSP, that is, you may not optimize the map (HLVIS) and do not calculate lighting (HLRAD). But we still recommend running all four compilers, simply setting the last two "forgiving" parameters (see below).
Below are the lines that you need to copy into Notepad and save the file as fast.bat (or with any other name, but with the extension *.bat). Then this file must be placed in the directory with compilers, copy the map in MAP format there and run fast.bat.
Test compilation (shortest compilation time, but worse quality)
@echo off
set WADROOT=c:\games\half-life
set mapname=karta.map
hlcsg.exe -estimate "%mapname%"
hlbsp.exe -estimate "%mapname%"
hlvis.exe -estimate -fast "%mapname%"
hlrad.exe -estimate -chop 128 "%mapname%"
The difference from the full compilation is observed only in the last two lines.
1 line: removes messages from the screen (does not apply to compilation);
2nd line: here write the path to the Half-Life directory (compilers and HL should be on 1 disk);
3rd line: the name of your card (don't forget the extension .map at the end);
4th line: launch the HLCSG compiler;
Line 5: launch the HLBSP compiler;
Line 6: launching the HLVIS compiler with the parameter -fast (fast map optimization);
Line 7: launching the HLRAD compiler with the parameter -chop 128 (quick, rougher lighting calculation).

PART 2. Compilation Methods

So, maps, as we already know, can be compiled with a BAT file or shell programs for ZHLT (the map editor, by the way, can also be called a shell for ZHLT). You need to understand that in any case, the map is compiled by the ZHLT utilities, and not by a BAT file, map editor or any other program (well, that's true... just in case :)

2.1 Compilation with BAT file

Actually, we already looked at compilation with a BAT file in the first part of the article. You can already create two batch files for fast and complete compilation. But, as popular wisdom says: "Repetition is the mother of learning," so let's dwell on this method a little more.
A BAT file is a text format file that, when launched, executes the commands written in it (for example, copying or deleting files). To create a BAT file, you need to copy the compiler launch commands given in this article into Notepad and save the file under any name with the BAT extension. Or you can save the file as a regular *.TXT, and then change the extension to *.BAT.
When using a BAT file, it must be placed in the directory with compilers, for example, "D:\Hammer\ZHLT". You also need to copy your map in MAP format there.
We recommend creating two BAT files for two different types of compilation (full and test). For convenience, they can be called full.bat And fast.bat, respectively.

Removing unnecessary files after compilation

After compilation, there are quite a lot of unnecessary files left in the folder with compilers that can be deleted. Let's look at which files can be deleted and which may be useful.
	*.BSP — готовая карта (необходимо скопировать в папку "cstrike/maps")
	*.MAP — исходник карты в формате MAP (если есть резервная копия, то можно удалить)
	*.ERR — файл создается, если на карте есть ошибки
	*.LOG — файл с информацией о ходе компиляции (так же в него записываются ошибки)
	*.LIN — файл нужен для нахождения ошибки LEAK, если таковая имеется на карте
	*.PTS — то же, что и выше
	*.P0  — можно удалить
	*.P1  — можно удалить
	*.P2  — можно удалить
	*.P3  — можно удалить
	*.PRT — можно удалить
	*.WIC — можно удалить
		
In order not to delete unnecessary files manually every time, we suggest automating this. You need to add a few lines to the BAT file (we provide an example with a file for full compilation).
Please note: in the line where the name of the card, extension is indicated.map not anymore.
Full compilation with removal of unnecessary files
@echo off
set WADROOT=c:\games\half-life
set mapname=karta
hlcsg.exe -estimate "%mapname%"
hlbsp.exe -estimate "%mapname%"
hlvis.exe -estimate -full "%mapname%"
hlrad.exe -estimate -chart -extra -dscale 1 -bounce 4 -smooth 100 "%mapname%"
copy %mapname%.bsp c:\games\half-life\cstrike\maps
del %mapname%.p0
del %mapname%.p1
del %mapname%.p2
del %mapname%.p3
del %mapname%.prt
del %mapname%.wic
del %mapname%.bsp
Thanks to the team del we delete unnecessary files, and with the command copy copy the finished map to the game folder (correct the path to your own).

2.2 Compilation in Hammer/Worldcraft editor

The Hammer editor allows for both test and full map compilation. To be able to compile from Hammer, you need to connect ZHLT compilers to it. You can read how to do this in the article. "ZHLT compilers".
We would not say that compiling maps in the editor is easier and more convenient than using a BAT file, but many novice mappers persistently ask how to compile maps in the editor :) Fortunately, they all soon switch to compiling with a BAT file, because it is simpler and requires fewer system resources.
If ZHLT compilers are already connected to the editor, you are ready to start.
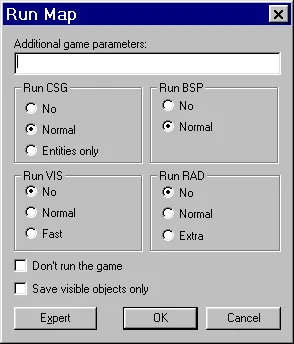
Click F9 in the editor. A small window with compilation parameters appears in front of us.
t3wcomp1 This is the "Normal" mode, in which we can select a minimum of compilation parameters.
Run CSG
No - do not run HLCSG
Normal - process all objects on the map
Entities only - update information about the properties of entity objects
Run BSP
No - do not run HLBSP
Normal - normal mode
Run VIS
No - do not run HLVIS (not for final compilation)
Normal - normal mode
Fast - quick map optimization (not for final compilation)
Run RAD
No - do not run HLRAD (not for final compilation)
Normal - normal mode
Extra - includes the highest quality lighting rendering (recommended)
Don't run the game - do not run the map immediately after compilation
Save visible objects only — process only visible (unhidden) objects
Expert — switching to advanced compilation mode, where parameters are set manually.
2. Expert mode
Now let's look at compilation in "Expert" mode; to do this, click on the button Expert at the bottom of the window.
The following window will appear. At first glance, it's impossible to figure this out. Do you still want to compile in the editor? :) We'll explain everything in detail.
This window uses the settings we specified when installing the editor, namely from the "Tools/Options..." bookmarks "Game Configurations" And "Build Programs" Only here, instead of paths to Half-Life programs and directories, variables starting with a dollar sign are used "$".
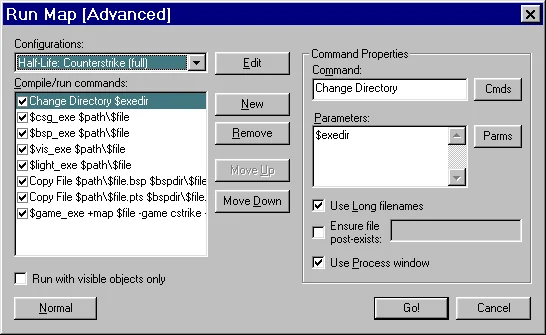
t3wcomp2 In the "Configurations" list, select "Counterstrike (full)".
Now let's look at each line in the "Compile/run commands".
Change Directory $exedir — the directory in which the hl.exe file is located is set here
$csg_exe $path\$file - this line launches the first HLCSG compiler
$bsp_exe $path\$file - this line launches the second HLBSP compiler
$vis_exe $path\$file - this line launches the third HLVIS compiler
$light_exe $path\$file - this line launches the latest HLRAD compiler
Copy File $path\$file.bsp $bspdir\$file.bsp — copies the finished map to the game directory (it is indicated in "Tools/Options.../Build Programs/Place compiled maps...")
Copy File $path\$file.pts $bspdir\$file.pts — copies the *.pts file to the above directory (you don't have to do this)
$game_exe +map $file -game cstrike -dev -console +deathmatch 1 — automatically launches the compiled map with parameters -dev -console +deathmatch 1
Run with visible objects only — process only visible objects (if there are hidden objects on the map, they will not be processed)
You can add other compilation parameters, let's look at an example for full compilation:
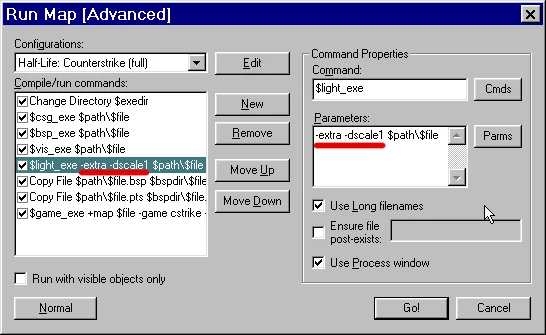
t3wcomp3 Select the line on the left $light_exe. In the windows on the right there will be parameters for launching this compiler (in fact, these are HLRAD , it's just designated that way). By default, the parameters only contain $path\$file, which tells the compiler the path to our map.
Add the following parameters to the "Parameters" field, separated by a space: -extra -dscale 1 you can also add -smooth 100. Now the HLRAD compiler will be launched in the highest quality lighting rendering mode. Parameters for other compilers are also set. Just look in the article "Compiler Parameters" for the necessary parameters and write them in the compiler startup lines.
Compiling in the Hammer editor cannot be called the most successful solution. This compilation method requires more computer resources, because Hammer loads both the map and the textures used into memory, and it itself requires a certain amount of system resources.

Compiling with Batch Compiler

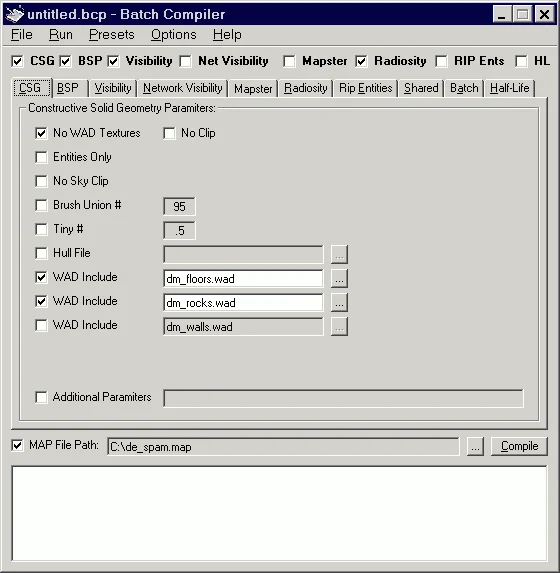
Batch Compiler is a graphical frontend for ZHLT compilers. Using various menus, we set parameters and start compilation.
Batch Compiler is something between compiling with a BAT file and compiling in an editor. The resources consumed are significantly less than when compiling in Hammer, but still more than when using a BAT file. Another disadvantage of shell programs is given in the conclusion of the article; it talks about the constant need to update these programs.
This is what the program interface looks like:
batchcompiler1 In the top line, checkboxes indicate the operations that will be performed. For full compilation it is necessary to note:
  • CSG
    BSP
    Visibility
    Radiosity
The checkbox next to the letters HL will launch Half-Life on the compiled map immediately after compilation.
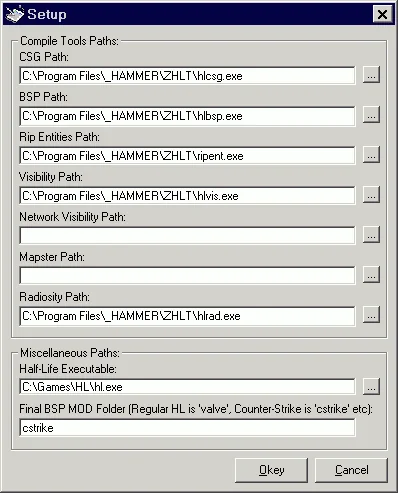
After the first launch of the program, you must specify the paths to the compiler programs, as well as, if necessary, the path to Half-Life. This is done through the menu Options/Setup.
batchcompiler2 Having specified the paths to the compilers, you need to do the same with the map in MAP format - indicate the path to it by checking the box at the very bottom of the program window opposite the inscription "MAP File Path".
Then it's time to set the compilation parameters, this is done in the bookmarks (CSG, BSP, Visibility, etc.). To set the necessary parameters, you need to understand what they mean, so learn :)
To start compilation, click the button Compile.

In conclusion

From our point of view, the fastest and easiest way to compile is to use a BAT file. Usually, to compile a new map, you just need to change the name of the map. There is no need to install additional programs that take up disk space. It's hard to say what percentage of mappers use the BAT file, but judging by the statements in the forums, the BAT file rules! :)
In addition, when using shell programs, like the Batch Compiler discussed above, we are dependent on them. Example: a new version of the ZHLT compilers has been released with some new functions, but the old program, naturally, does not support them. You have to wait for the new version, follow the news, download Nth number of megabytes, install... So isn't it better to use a BAT file?
3.6

Compilation Errors

In this article we take a detailed look at the most common compilation errors, tell you how to avoid them and how to fix them. At the end of the article we provide a summary table of all possible errors, and in the form in which they are issued by the ZHLT Custom Build compilers. With minor changes, these errors are also displayed in the official ZHLT compilers.
So, it is known that not all errors on the map are detected in the map editor when checking for errors using [Alt-P]. Most serious errors are only discovered during compilation.
If there is an error, the ZHLT utilities create a *.ERR file, which records the type of error, the number of the object that caused it, as well as a brief guide to fixing it, but, of course, in English.
Contents of the article:

PART 1. The most common compilation errors

1. Plane with no normal
  • Example:
    Entity 10, Brush 0, Side 4: plane with no normal
    Entity 10, Brush 0, Side 5: plane with no normal
    This error occurs when vertices are manipulated incorrectly. As you know, any plane is defined by 3 points. If one or more points of the plane have the same coordinates, then it will no longer be a plane, but a line or a point.
    How to fix it? Remove the incorrect object and replace it with a new one.
2. Brush with coplanar faces
  • Example:
    Entity 10, Brush 0, Side 5: has a coplanar plane at (-753, -9, 251), texture CA1X_CON1B
    Entity 10, Brush 0, Side 6: has a coplanar plane at (-753, -32, 251), texture CA1X_CON1B
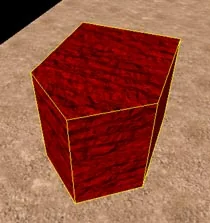
    This error occurs when vertices are manipulated incorrectly. Let's look at a case where such an error occurs. Let's assume that we have such an object on the map (see figure below).
    Example object
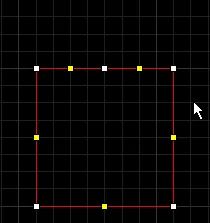
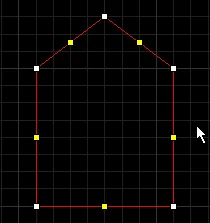
    In the top view (2D top) in the vertex mode, the object will look as shown in the figure below, on the left. Suppose we decide to make a cube out of this object. To do this, lower the top point (vertex) down (see figure below).
    t3comperr2 t3comperr3 You can't do that! Since we get that there are 2 planes on one side of the object, but this should not be the case. This is what this incorrect operation looks like in 3-dimensional form (see figure below).
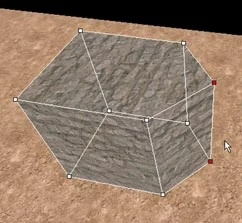
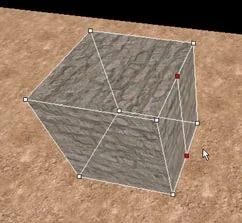
    Incorrect action with vertices (3D view)
    Incorrect action with vertices (3D view)
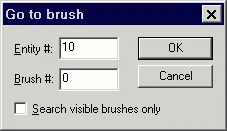
    How to fix it? You can, having found out the number of the incorrect brush or entity object from the ERR file with the error, go to it by clicking [Shift-Ctrl-G] in the editor. In this case, you will see a small window (see figure below), the first line of which allows you to go to a specific entity object,
    the second - to the brush. The number of the incorrect object is indicated in the ERR file in the following form:
    "Entity 10, Brush 0, Side 5....", this means that the 10th entity on side 5 has an error.
    t3comperr9 After finding an incorrect object, you can delete it, or you can try to correct it. In the example above, we need to move the top middle vertex to the right or left, thus we will turn two faces lying in the same plane into one (see figure below).
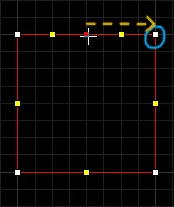
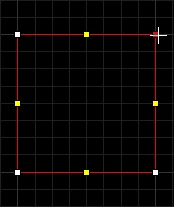
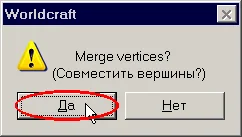
    t3comperr6 t3comperr7 After moving the point you will be asked the question: "Merge Vertices?" ("Merge vertices?"), be sure to answer "Yes."
t3comperr8 3. Leaf portal saw into leaf
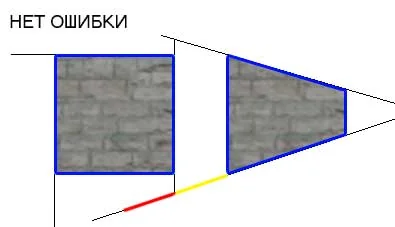
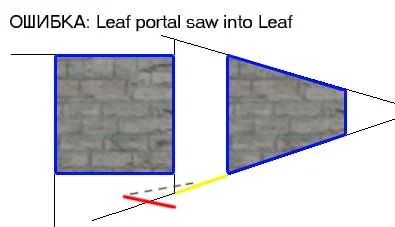
  • This error occurs when the HLVIS compiler tries to compare 2 leaf portals that belong to the same visibility node. Look at the picture below:
    No error: the portals lie on the same straight line
    The red and yellow portals were actually one portal that was split into two. Both portals shown should lie on the same straight line, but given the limited precision of computers when performing floating point operations, these portals may tilt slightly relative to each other (the angle of inclination of the portals is so small that it cannot be seen with the naked eye - only through binoculars :).
    If a situation arises when two portals belong to the same vertex and form a curved line, then the error "Leaf portal saw into leaf" This is what it looks like:
    Error: Leaf portal saw into leaf
    In the figure above, the angle of inclination of one portal to another is greatly exaggerated (for clarity). There are also several other similar situations where this error occurs, all of which are a result of computers' limited precision in performing floating point operations.
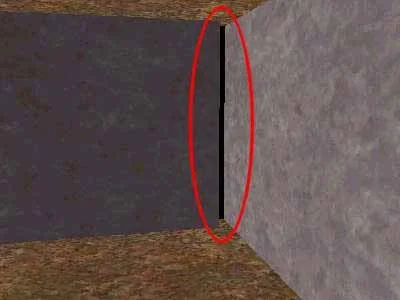
    How to fix it? It is best to load a map with an error and try to find the so-called mirroring effect (hall of mirrors effect). This error can easily be caused by the fact that the coordinates of one of the brush's vertices deviate slightly from the coordinate grid. In this case, the easiest way is to recreate the incorrect brush, but you can also try using the parameter -full for the HLVIS compiler, which helps reduce the number of possible vis errors. Compilation time with the -full option typically increases by 30%. R_speeds (number of polygons) remains approximately the same as with normal vis compilation.
4. Brush 'outside world'
  • Example:
    Entity 10, Brush 0: outside world(+/-4096): (-9000, -64, 216)-(9000,23,283)
    There are several reasons why this error may appear. Firstly, such an error is possible if there is a damaged brush (due to incorrect manipulation of vertices). In this case, you need to carefully look at the coordinates of the damaged object, which are reported in the ERR file describing the error. If any of the coordinates is -9000 or 9000, then such an object must be deleted and replaced with a new one.
    Secondly, such an error may occur due to the fact that the object is located outside the area available for editing or near its border. Objects that are closer than 64 units to the boundary can also cause this error, so make sure that your map does not get too close to the boundaries of the workspace in the editor.
5. Mixed face contents
  • Example:
    Entity 0, Brush 12: mixed face contents
    Texture ROCK_X1 and SKY
    Each individual object in Half-Life can only be painted with one type of texture (for example, only a water texture). For example, an object painted on five sides with a regular texture, but
    with the sixth - water texture, will cause this error.
    There are several types of textures that cannot be applied to an object together with others. These textures include: SKY, CLIP, ORIGIN and water textures. And you can get the most detailed information about the types of textures and their compatibility from the corresponding article: Texture Types in Half-Life and CS.
    How to fix it? Navigate to the object that caused the error by [Shift-Ctrl-G] and paint it on all sides with the same type of texture.
6. === LEAK in hull 0 ===
  • LEAK - a hole in the map. This is the most famous and, perhaps, the most hated mistake. And all because it is difficult to detect and it is easier to prevent it than to spend hours looking for it (literally poetry :)
    And the cause of such an error is a hole (gap) in the level. For example, there are two brushes, between which there is a gap (due to carelessness, you did not dock these brushes closely). These brushes can be, for example, walls or the ground of your map. When compiling, compiler programs, having discovered such a hole, begin to think: "What is behind this hole?" They see a gap, and behind it a terrifying emptiness :) - as a result, an error occurs.
    Below in the picture we show an example of such an error.
    One of the main reasons for the LEAK error is a hole in the level
    But LEAK is not always visible as clearly as in the figure above. Often LEAK has very small sizes, much less than even 1 unit. There are especially many LEAKs in decompiled maps. For example, you decided to change De_Dust a little, of course, decompiled it, then tried to compile it again and received a bunch of LEAK errors.
    The second reason for the LEAK error to appear is the location of a point entity outside the map. For example, you made a map, built a sky around it and accidentally placed some kind of ambient_generic outside the map. As a result, we get LEAK. But this is better than looking for a hole on the map, because... the object is much easier to find.
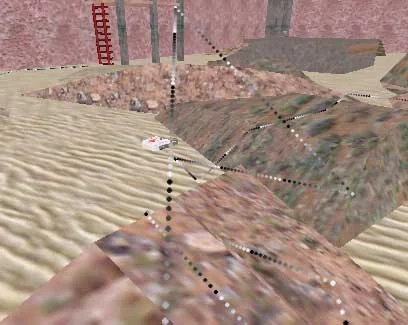
    How to fix it? You can use a special utility LeakMarker. Or you can try to find LEAK using the game itself. To do this, you need to copy the *.PTS file, which is created in the directory with compilers when a LEAK error is detected, to the directory "cstrike/maps", where your uncompiled card is located, which is nevertheless capable of running. Next you need to launch the console and enter: map map_name. After loading the map, write: pointfile.
    After entering these commands, you will notice a thin wriggling line of black and white dots on your map (see figure below).
    Dotted line showing location of LEAK error
    This line is located near the location with the LEAK error. Having remembered the location, open the editor and carefully look at the borders of the brushes to see if they are clearly connected. Try using the Vertex Manipulation tool to align the vertices of suspicious brushes to the coordinate grid.
    If Half-Life crashes when you try to load a pointfile, it means the file is too large. We'll have to use other methods.
    If all else fails and you can't find LEAK, create a box around the sky around the map, i.e. place your entire map in a large "room" painted on all sides with the SKY texture. This will help 100% :)
    By the way, if you suddenly did not notice that the compilers gave an error and thought that the card compiled normally, then you can detect something wrong by the terrible brakes on the card (because HLVIS did not have time to optimize the card), and the lighting on the card will be very light and monotonous (see the figure above). There will be no shadows from objects, because... HLRAD didn't even start working due to an error.
7. Exceeded MAX_PATCHES
  • When the HLRAD compiler starts processing the lighting on the map, it breaks all visible surfaces into small areas called patches. There is a limit on the maximum number of patches - there should not and cannot be more than 65535.
    By default, the size of each patch is 64x64 units. If the scale of the texture is larger or smaller (we are not talking about the size of the texture, but the scale), then this affects the number of patches. This means that a texture with scale 2 will have 4 times fewer patches than a texture with scale 1.
    When you make the sky around the map in the form of a large box to avoid the LEAK error (see above), the HLVIS compiler processes all surfaces outside the map that the player in the game does not see (which means it processes them in vain :). At high levels this can cause this error, because... the number of patches may exceed the threshold of 65535 pieces.
    How to fix it? You can add the "-chop 96" or "-chop 128" parameter to the HLRAD compiler startup line. This parameter sets the minimum patch size in units. Let us remind you that by default the minimum patch size is 64 units. When setting the patch size to more than 96 units, there is a noticeable deterioration in the quality of map lighting, and a "ladder" effect may appear on the shadows cast by objects.
    Also, to reduce the number of patches, you can increase the scale of textures, for example, large textures on rocks or ground. Larger textures create far fewer patches. Well, if your sky is made into a large box around the card, paint all the outer sides and bottom of the card with the SKY texture. When compiled, such surfaces are not calculated for lighting and do not create patches.
8. Reasons why HLVIS is slow
  • The compilation time of the map, namely the calculation of its visual part by the HLVIS compiler, should not be too long. On well-made maps, it should not exceed 40-45 minutes when using a PII-300 class machine.
    The reason why HLVIS takes a long time to work may be that the map is surrounded by the sky in the form of a large box in order to avoid the LEAK error. In this case, HLVIS processes large areas outside the map, which increases its operating time.
    The second reason for the increase in HLVIS compilation time may be the architecture on the card. This is quite difficult to explain, so here are some examples:
    • corridors that do not cross the wall at right angles;
    • brushes rotated at an arbitrary angle;
    • large, tall rooms with walls that are not perpendicular to the ground;
    • a large number of small brushes (not entities) in large, open spaces
The third reason: large open areas that have a large number of passages to various rooms, provided that the engine draws them all.
How to avoid long HLVIS compilation? Just don't do the above: don't create large, open spaces; don't make the sky a box around the map; Turn the corridors 30, 45 or 90°. Yes, these are all serious restrictions, but nothing can be done. You just need to accept it. Half-Life is far from a new game and its engine is not designed for a large number of polygons. Yes, and does the player need all these "beauties"? The main thing is interesting gameplay. 9. Reasons for slow HLRAD (problems with MakeScales)
  • Does the "Make Scales" or "Swap Transfers" operation take a long time to complete? Then read below.
    The HLRAD compiler requires a fairly large amount of RAM. The amount of memory required to process a visual matrix (vismatrix) by the HLRAD compiler depends exponentially on the size of that visual matrix. The formula for calculating the amount of vismatrix memory required is: (number of patches)2/16 = amount of vismatrix memory in bytes. If the number of patches is maximum 65535, then 256 MB of memory will be required.
    But memory is needed not only for calculating the visual matrix. It is also needed to perform the MakeScales operation. The amount of memory required for this operation is approximately equal to half of the vismatrix memory, i.e. for both operations together, in the worst case with 65535 patches, the HLRAD compiler may need 256+128=384 MB of memory.
    When performing a MakeScales operation on large detailed maps, you can often observe the following feature: first MakeScales reaches 90%, say in 20 minutes, and the next 10% is processed over several hours or even days! This occurs when the RAM resource is exhausted, and active access to the paging file begins. This situation can be resolved by adding the parameter -sparse to the HLRAD compiler startup line. This will reduce RAM costs by 10% by increasing the load on the processor. Well, it's best to install additional RAM.
    To speed up HLRAD, the same methods are suitable that are used to eliminate the "Exceeded MAX_PATCHES" error discussed above. Using these techniques, the number of patches can be reduced, thereby reducing HLRAD's memory requirement. You can also use the parameter -bounce 0 for the HLRAD compiler. In this case, only direct lighting will remain on the map, and reflected light will simply not be calculated. But this option can only be used for test compilation. At final compilation the parameter -bounce must always be greater than 0.
    It is also recommended to use the parameter -incremental for the HLRAD compiler. In this case, during the second (but not the first!) compilation, the following stages will be "skipped": BuildVisLeafs, MakeScales, SwapTransfers. Using this option is very simple. The first time you compile the map as usual, but adding the parameter -incremental. This will additionally create a file up to several tens of megabytes in size. When recompiling the map with the same parameter, this file will be used and will allow you to skip the listed operations. Thus, if you have little RAM, then you can suffer only once (during the first compilation), then everything will go much faster. By the way, if you change the properties or location of light sources (objects: light, light_spot and light_environment), then do not forget to update this information in the MAP file using the parameter -onlyents, written in the HLCSG compiler.
10. HLRAD failled to allocate a block of memory
  • The HLRAD (lighting calculation) program could not continue due to insufficient memory. In this case, it is necessary to increase the size of the virtual memory (page file) or (which is much better) install additional RAM on the computer.
    If you don't know where the virtual memory size is changed in Windows, read about it in the article "What is compilation?".
11. Bad Surface Extents
  • Usually this error occurs when applying textures with a too large scale (more than 10, and usually more than 100). This error can also be found in the Hammer editor. There it will be found as "Texture axis perpendicular to face". And sometimes nothing is displayed in the editor, everything seems to be clean. Here you need to try to remember what you did so unusual on your map lately :) Maybe you can find some suspicious object or remember that before there were some problems with the textures of some object. In general, search a little and you will probably find the reason for this error.
12. Missing [ in texturedef
  • There are several possible reasons for this error:
    • One or more surfaces of the object do not have a texture (in the editor such objects are depicted as completely white), or the texture name consists only of spaces.
      Check the map for errors [Alt-P], the editor will show an error like "Invalid texture"
    • The texture name contains spaces (this is unacceptable). Replace such textures.
    • This error occurs when importing maps from WorldCraft 3.3 to WorldCraft 2.1, 2.0
    • This error occurs when importing maps from WorldCraft 3.3 into QuArK
    • The map is saved in *.MAP format, but is missing in the worldspawn field: "mapversion" "220" (very rare)
13. MAX_PORTALS_ON_LEAF
  • Typically, this error occurs due to large rooms with a large number of corridors leading into it. A damaged (incorrect) brush may also be the cause. Such a brush can be found at [Alt-P].
    t3comperr11 The picture above shows the room from above. Pink is the room, blue is its walls. The pink room is one large plane, space (leaf). This room is connected to 32 small rooms (recesses in the walls), so one leaf creates 32 portals.
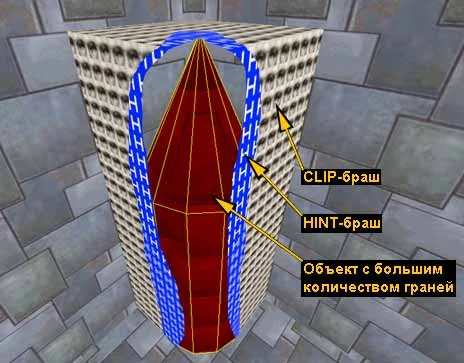
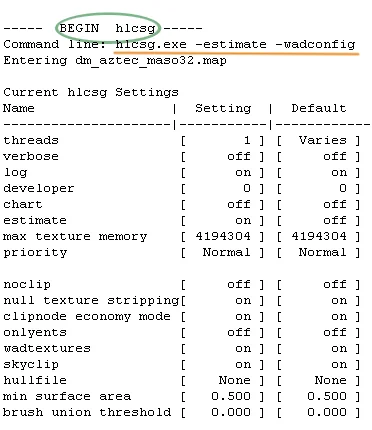
    Since in Half-Life "MAX_PORTALS_ON_LEAF" can be equal to 256, this error most often occurs due to a "broken" brush.
14. MAX_MAP_CLIPNODES
  • Clipnodes are surfaces defined by the game engine as impassable for the player. Each brush on the map (be it a wall, floor or box) is "wrapped" in clipnode surfaces. Thanks to clipnodes, the player does not fall through the ground and cannot pass through walls. Remember the old Halfa cheat "noclip" (walking through walls) - this is it :)
    Too many of these planes may cause an error. In improved ZHLT Custom Build compilers, the mode for saving such planes is enabled by default. This means that when using this version of compilers, the number of clipnode planes will be less than usual, but this does not protect you from this error.
    When you make the sky around the map as a big box to avoid the LEAK error, a large number of clipnodes are created, which can lead to the MAX_MAP_CLIPNODES error, and this will also increase the running time of the HLVIS compiler.
    In the archive with the official version (unimproved) of the ZHLT 2.5.3 utilities there is an example (clipnode.map) that shows how you can save a large number of clipnodes.
    Let's look at the picture from this card:
    Saving example clipnodes
    In this figure, CLIP and HINT brushes are shown in cross-section. They have exactly the same size and are located exactly according to the size of the object. If we had not placed these brushes, then a large number of clipnode planes would have been formed around such an object with a large number of sides, which would have to accurately indicate the shape of the object, which the player cannot pass through. And using this method, we significantly reduce the number of clipnodes, thereby reducing the likelihood of the MAX_MAP_CLIPNODES error occurring and reducing the running time of the HLVIS compiler.
    We conducted an experiment and compiled a map with and without a CLIP brush. And here are the results:
    • Clipnode planes with a CLIP brush (as in the picture): 30
    • Clipnode planes without CLIP brush: 149
    As you can see, the result is more than interesting. It turns out that by using a CLIP brush around objects with a large number of sides, we save a decent number of clipnode planes. Of course, if the map is small and there are about 10,000-15,000 clipnode planes, then there is little point in saving, but this may be useful when creating a large map. By the way, it turned out that the HINT brush does not in any way affect the number of clipnodes; it can be omitted.

PART 2. Review of all compilation errors

Common errors for all compilers
Error Description How to fix
Memory allocation failure The compiler was unable to allocate information to memory. This means that the paging file is exhausted. Increase the SWAP file size or add RAM
NULL Pointer Internal compiler error Report this error to [email protected]
Bad Thread Workcount Internal compiler error Report this error to [email protected]
Unable to create thread Internal compiler error Report this error to [email protected]
Exceeded MAX_MAP_PLANES The maximum number of planes allowed has been exceeded (> 32767) Reduce the map size, make it less detailed
Exceeded MAX_MAP_TEXTURES The maximum allowed number of textures has been exceeded. Reduce the number of textures.
Exceeded MAX_MAP_MIPTEX The maximum allowed amount of memory allocated for textures has been exceeded (> 4194304 bytes) Reduce the number of different textures, reduce the texture size, or set the -texdata parameter (read more about this parameter Here)
Exceeded MAX_MAP_TEXINFO Internal compiler limitation Report this bug to [email protected]
Exceeded MAX_MAP_SIDES Internal compiler limitation Report this bug to [email protected]
Exceeded MAX_MAP_BRUSHES The maximum allowed number of brushes has been exceeded (> 8192) Reduce the number of brushes
Exceeded MAX_MAP_ENTITIES The maximum allowed number of entity objects for compilers has been exceeded (> 1024) Reduce the number of entity objects
Exceeded MAX_ENGINE_ENTITIES The maximum allowed number of entities for the Half-Life engine has been exceeded (> 1024) Reduce the number of entities
Exceeded MAX_MAP_MODELS The maximum allowed number of brush entities has been exceeded (> 400). Reduce the number of brush entities. If possible, combine multiple objects into one
Exceeded MAX_MAP_VERTS Internal compiler limitation Report this bug to [email protected]
Exceeded MAX_MAP_EDGES Internal compiler limitation Report this bug to [email protected]
Exceeded MAX_MAP_CLIPNODES The maximum allowed number of clipnode planes has been exceeded (> 32767) This error is described in the first part of this article
Exceeded MAX_MAP_MARKSURFACES Internal compiler limitation Report this bug to [email protected]
Exceeded MAX_MAP_FACES The maximum allowed number of polygons has been exceeded (> 65535) Increase the scale of textures on large surfaces (ground, walls, mountains, etc.). Your map may be too big. Reduce its size, make it less detailed
Exceeded MAX_MAP_SURFEDGES Internal compiler limitation Report this bug to [email protected]
Exceeded MAX_MAP_NODES Maximum number of sections exceeded (> 32767) Reduce map size, make it less detailed
CompressVis Overflow Internal compiler error Report this error to [email protected]
DecompressVis Overflow Internal compiler error Report this error to [email protected]
Execution Canceled Compiler startup was interrupted by the user or compiler settings  
Internal Error Internal compiler error Report this error to [email protected]
HLCSG compiler errors
Error Description How to fix
Missing '[' in texturedef (U) One or more surfaces on the map do not have textures or are painted with a texture whose name has spaces. This error is described in the first part of this article
plane with no normal Incorrect object shape resulting from manipulation with vertices This error is described in the first part of this article
brush with coplanar faces Incorrect object shape resulting from manipulation with vertices This error is described in the first part of this article
brush outside world Incorrect object shape resulting from manipulation with vertices This error is described in the first part of this article
mixed face contents The object has textures on it that cannot be combined. This error is described in the first part of this article
Brush type not allowed in world Unallowed type of brush entity object Delete the object or replace it with another one
Brush type not allowed in entity Brush type not allowed in entity Delete the object or replace it with another
No visibile brushes There are no visible objects or they are all CLIP and ORIGIN brushes (there must be at least one visible object on the map)  
Entity with ONLY an ORIGIN brush Any entity object must consist of at least one visible brush object. CLIP, HINT and ORIGIN brushes are not visible  
Could not find WAD file Compilers could not find the texture wad file specified in the map Check the presence of all texture libraries connected to the editor or use the -wadconfig parameter (read more about this parameter Here)
Exceeded MAX_TRIANGLES Internal compiler limitation Report this bug to [email protected]
Exceeded MAX_SWITCHED_LIGHTS The maximum allowed number of light sources to be switched on/off (light or light_spot) has been exceeded. Reduce the number of such light sources
Exceeded MAX_TEXFILES Internal compiler limitation Report this bug to [email protected]
HLBSP compiler errors
Error Description How to fix
LEAK in the map There is a "hole" on the map. This error is described in the first part of this article
Exceeded MAX_LEAF_FACES There is a damaged brush on the map or the texture scale is too small (from -1 to 1) Remove the damaged brush (mainly check the prefabs inserted on the map, brushes obtained using Carve or by manipulating vertices). Zoom in on the texture
Exceeded MAX_WEDGES Internal compiler limitation Report this bug to [email protected]
Exceeded MAX_WVERTS Internal compiler limitation Report this bug to [email protected]
Exceeded MAX_SUPERFACEEDGES Internal compiler limitation Report this bug to [email protected]
Empty Solid Entity Brush-based entity object, for example, func_wall does not contain brushes (empty) In the editor, click [Alt-P], go to such an object with the button Go to error, close the error window, make sure the object size is not real (for example -1999998w), click Deleteto delete the object. Repeat all steps for each "empty" object.
HLVIS compiler errors
Error Description How to fix
Leaf portal saw into leaf This error is described in the first part of this article
Exceeded MAX_PORTALS_ON_LEAF The maximum allowed number of portals for one leaf surface has been exceeded or there is a damaged brush on the map (portals > 256). This error is described in the first part of this article
Invalid client/server state Internal compiler error Report this error to [email protected]
HLRAD compiler errors
Error Description How to fix
Exceeded MAX_TEXLIGHTS The maximum allowed number of glowing textures has been exceeded. Reduce the number of glowing textures used on the map.
Exceeded MAX_PATCHES The maximum allowed number of patches has been exceeded (> 65535) This error is described in the first part of this article
Transfer < 0 Internal compiler error Please report this error to [email protected]
Bad Surface Extents Textures with a too large scale were applied to the object (scale greater than 10, but usually greater than 100). This error is described in the first part of this article.
Malformed face normal The applied type of texture alignment on the visible surface of the object is not possible. Check the map for errors by pressing [Alt-P]. Fix all "Texture axis perpindicular to face" errors
No Lights! There are no light sources on the map Add a light source (light, light_environment or light_spot)
Bad Light Type Internal compiler error Report this error to [email protected]
Exceeded MAX_SINGLEMAP Internal compiler limitation Report this bug to [email protected]
3.7

Reading the Compilation LOG File

ZHLT compilers provide good information about the progress of the compilation process. All information is recorded in a log file, which is created in the directory with compilers. In this article, we will look at the basic operations that occur during map compilation.

1. Geometry calculation (HLCSG)

t3log1 The compiler gets to work first HLCSG, which calculates the overall geometry of the map.
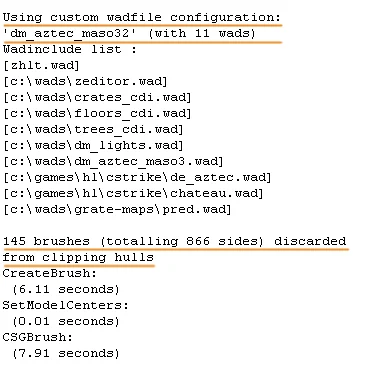
In line Command line: The parameters for this compiler are listed one after another.
When using compilers ZHLT Custom Build it is possible to use the parameter -wadconfig , which specifies the name of the texture configuration.
After the line with parameters there is a table that lists all the possible parameters for the HLCSG compiler, the set values ​​​​of these parameters (Setting column) and their default values ​​(Default column).

Texture information

t3log2 The underlined line tells you that a texture configuration called dm_aztec_maso32 is being used (in our case). This configuration uses 11 wad files.
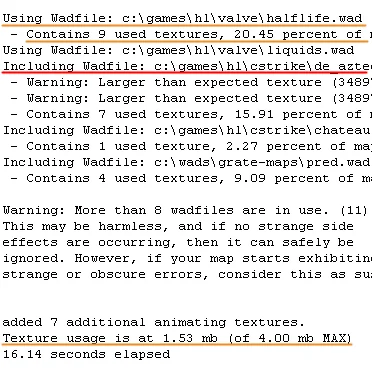
Then comes a listing of all texture files used during compilation.
The next underlined line reports that 145 brushes (and 866 of their sides) have been removed from clipnode planes. This works with the clipnode saving mode, which is included as standard in ZHLT Custom Build.
t3log3 The following displays detailed information about the use of textures.
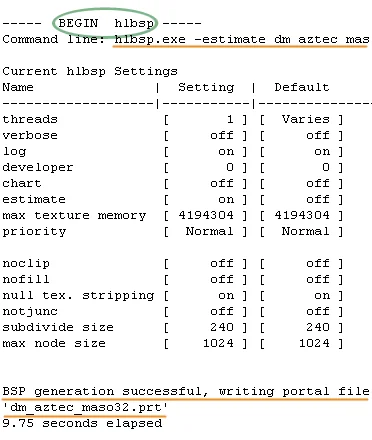
Using Wadfile — means that this wad file is simply connected.
Including Wadfile — means that textures from this wad file are included in the BSP map.
Also here you can see exactly how many textures from the wad file are used on the map, what percentage these textures occupy of the total number of all textures, and how many textures are in each wad file.
Warning - nothing more than just warnings. They tell you that some textures are too large in size and that the number of wad files used is more than 8 (if that is the case).
The bottom underlined line tells you how much memory is being used by the textures.
In this case, it is 1.53 MB out of a maximum of 4.00 MB.

2. Create a BSP file (HLBSP)

t3log4 Now the second compiler gets to work HLBSP, which produces a map tree and a usable bsp file.
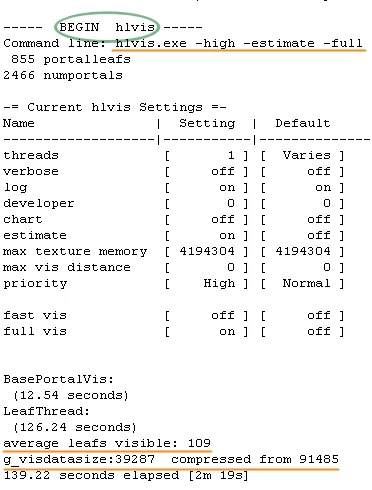
If this operation is successful, then the chance to complete the compilation without problems (if there is a sufficient amount of free RAM) is quite large.
The success of the operation is reported in the line BSP generation successful.

3. Map optimization (HLVIS)

t3log5 It's the turn of the third compiler HLVIS, who creates the visual part and optimizes the map.
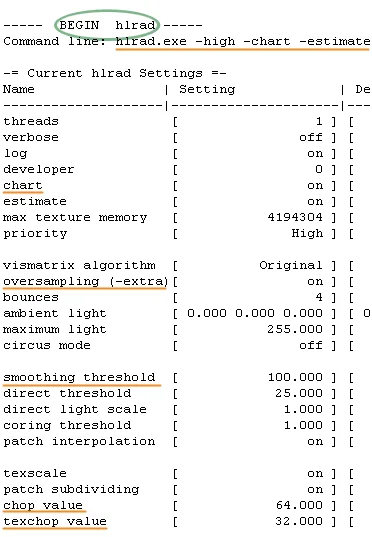
The best result can be achieved by complete rendering, which is enabled by the parameter -full.
The underlined line below tells you the number of leafs (kind of like individual spaces on a map).

4. Lighting calculation (HLRAD)

t3log6 Well, finally, the last compiler gets to work HLRAD, which calculates the lighting on the map.
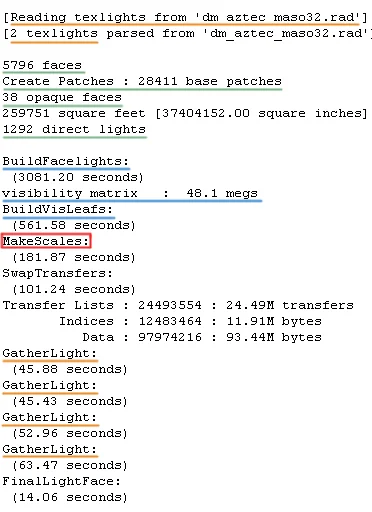
This is the most time-consuming and resource-demanding operation.
It is useful to add such a parameter to the HLRAD parameters as -chart, to display detailed statistical information about the BSP file at the very end of the compilation.
For the highest quality calculation of lighting and creation of realistic shadows, you must also enable the parameter -extra.
It is also useful to increase the parameter -smooth, which defaults to 50 (measured in degrees). This parameter specifies the maximum angle between two surfaces at which lighting is calculated using anti-aliasing technology.
Chop And texchop set the patch size (surface area) into which the surface is divided to calculate lighting. The higher the value of these parameters, the more roughly the lighting is calculated. The default values ​​are set to optimal.
t3log7 This line tells you that the map uses 2 glowing textures.
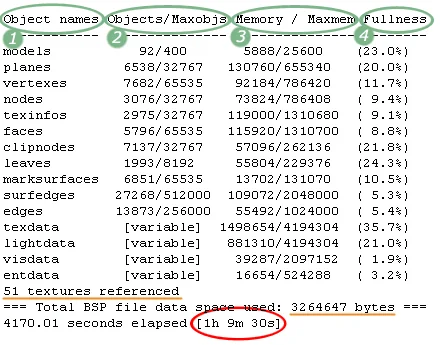
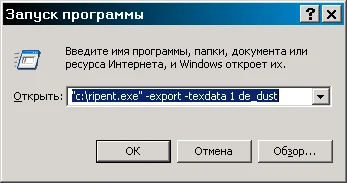
5796 visible sides of objects
28411 patches
38 sides of objects blocking light
1292 light source (such a large value is obtained when using luminous textures)
Basic lighting operation.
The size of visual information, the larger the value, the more RAM is required to perform the operation.
MakeScales - this operation is the same as the next one Swap Transfers, does not take much time if you have free RAM, but if you don't have it, it can take up to several days!
Lighting ends with miscalculation set by the parameter -bounce a given number of light reflections. The higher the number of reflections, the smoother the shadows will be and the more realistic the dark areas on the map will be illuminated. Default parameter value -bounce is 1. It is recommended to increase this parameter to 4 or more.
t3log8

BSP file statistics

When using the parameter -chart with the HLRAD compiler, detailed information about the BSP file is displayed at the end of the compilation.
The first column lists the names of objects, the second - the number of these objects on the map and their maximum allowed number (in Half-Life the number of objects is limited), the third - the used and maximum allowed memory for these objects, and the fourth - the percentage of objects used on the map.
This line tells you that the map uses 51 textures.
Finally, the total compilation time and size of the BSP file are reported.
3.8

Changing a Map Without Recompiling

In this article we will look at a quick and fairly convenient way to make changes to a finished compiled map without running compilation. In this way, you can make changes to any maps, even without having their sources.
First of all, it is necessary that you have the official version of the ZHLT 2.5.3 utilities. We won't need the compilers themselves, but along with them, in the archive, there is a utility Ripent (ripent.exe) which we will use.

In what cases is the Ripent utility useful?

  • If you want to change the transparency of glass, water, or other objects
  • Specify the correct door opening angle
  • Change vehicle speed
  • Make an object invisible
  • Correct or add players' birthplaces
  • Change the name of the sky picture
... and so on, there are a huge number of examples.
Imagine a situation when you compile a map within 2-3 hours, and quite by accident you forgot to indicate the name of the sky image in its properties. This means that the map will use the standard desert sky, instead of the one you wanted to use.
In order not to compile the map again, you can use the Ripent utility and add the name of the sky in the right place.

How does this work?

Information about entity objects in ready-made maps (BSP files) is contained in simple text form. You can verify this yourself by opening any BSP card in a text editor, for example, in the built-in editor of the FAR or TotalCom file manager. After several thousand lines consisting of characters we do not understand, a text description of all entity objects used on the map will begin.
Our task, or more precisely, the task of the Ripent utility, is to remove all text information from the BSP file and re-enter the changed data.
The description of the entities of any map begins like this:
  • "wad" "c:\games\hl\valve\halflife.wad;c:\games\hl\valve\liquids.wad;"
    "mapversion" "220"
    "classname" "worldspawn"
    "MaxRange" "8192"
    "skyname" "dm3hackd_"
    "message" ""
    "classname" "worldspawn"
We talk in more detail about the meaning of these and other parameters at the end of the article.

Using Ripent

Ripent is a command line utility that does not have its own graphical interface.
Extracting text information about entity objects
  1. Copy the finished BSP card to the folder where the Ripent utility is located
  2. Select the command "Start -> Run..." ("Start -> Run...")
  3. By clicking the "Browse" button, specify the path to the Ripent utility
  4. At the end of the path, after the quotation marks, add the following. parameters: -export -texdata 1 map_name
The program launch line for the de_dust map will look like this:
t3ripent1 Literally in a few moments a new file will appear in the directory with the utility and map, in our case it would be de_dust.ent, but in the general case card_name.ent.
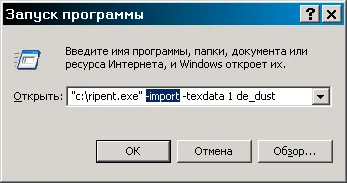
Despite the extension, this is a regular text file that can be edited in any text editor, for example, Notepad. The only thing is, do not forget to save the file with the extension *.ent, and not txt, after making changes.
We enter the changed information back into the BSP card
Let's immediately see how the reverse operation is performed to enter changed data into the card.
We carry out the first 3 points as described above, but now instead of -export we write -import (see picture below).
t3ripent2 In this case, all the information from the file card_name.ent will be included in the compiled BSP map. You will be able to see the changes the next time you load the map. The *.ent file can be deleted.
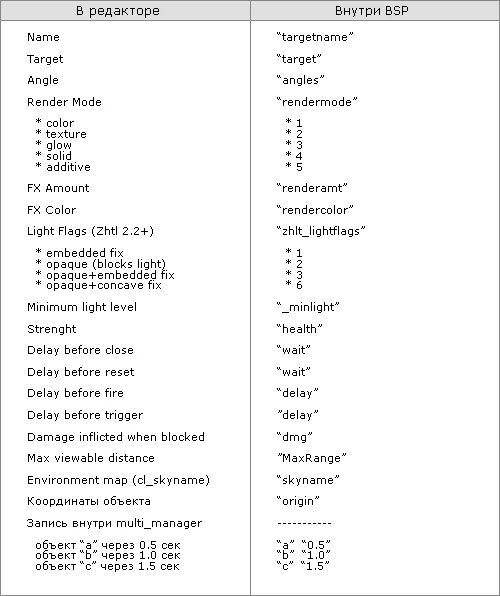
Properties of entity objects inside a BSP file

The appearance of the properties of entity objects inside a BSP file is somewhat different from what we are used to seeing in the editor. For example, instead of the parameter Name the notation used is "targetname", instead of flags (small radius, start on, toggle, etc.), a digital code, etc. is used. In order for you to be able to find and correctly change the necessary information, you need to know the correspondence between these parameters.
Below we provide a table that presents the main properties of entity objects as they are displayed in the editor and inside the BSP map.
t3ripent3 Thus, if we need to change the name of the sky picture, we find in the file *.ent line with the word "skyname" and after this word we also enter the name of the sky in quotation marks.
     For example: "skyname" "desert".
To change the degree of transparency of glass (for example, func_breakable named glass1), you need in the file *.ent find object with "targetname" "glass1" and change the parameter "renderamt" "". All other properties of entity objects change in the same way.
After all the necessary changes have been made, save the *.ent file and run the Ripent utility with the -import parameter.

Disadvantages of Ripent

The advantages of Ripent are obvious - there is no need to repeat hours-long compilation if a minor error is made in the properties of entity objects. But it also has its drawbacks.
When using Ripent, you must remember that the map source in RMF or MAP format is not updated! Only the finished BSP card is updated. Accordingly, if you then recompile the map, the changes made in the properties of entity objects will simply disappear, because The map source does not change! Therefore, either use Ripent to make minor changes (corrections of annoying errors, etc.) to the final version of the map, or write down all the changes made and then edit the source map in the editor.

Some interesting facts

We think you will be interested to know that the list of properties of entity objects is passed to the client every time it connects to the server.
Thanks to Ripent, we can change the properties of entity objects on any BSP map. You can, for example, make the bridge on De_Aztec (from CS 1.5) transparent. To do this, you need to find the func_illusionary object responsible for the image of the bridge and set the parameters: "rendermode" "2" and "renderamt" "0" (in the editor it would look like: Render Mode: "Texture" and FX Amount "0"). The bridge will "disappear." True, it is quite difficult to find the required func_illusionary, which is the bridge, because There are several of these objects (func_illusionary) on Aztec.
Remember one thing - when connecting to a game server with a normal Aztec, your bridge will NOT be transparent, because on the server there is a regular map with unchanged entity objects. You also need to know that it is useless to change parameters such as the color of the light source (light; light_spot; light_environment), because lighting is calculated during compilation. Well, parameters such as the degree of transparency of objects, their display modes (texture; solid; additive, etc.), the speed of the car, the time before the door automatically closes, the list of objects inside the multi_manager, just the names of objects, the target field, the name of the sky and some other parameters can be changed.
So Ripent is quite a fun and useful thing if you know how to use it. Well, you already know :)
3.9

About Map Decompilation

From this article you will learn what map decompilation is, what programs it is carried out, and what errors appear.

What is decompilation?

Decompilation is the reverse process of compilation, i.e. This is a map conversion from BSP format to MAP format. Decompilation is carried out by special programs, which we will consider below.

Purposes of decompilation

Map decompilation is carried out for two purposes:
  1. See the structure of the card, how this or that object is made, find out its properties
  2. Make your own version based on the original map
As for the first point, in this case decompilation is very useful, especially for a novice mapper. There are mappers who find it easier to read an article to find out, for example, how to make a staircase, and there are those who are more interested in seeing the structure and properties of objects themselves. By the way, we believe that self-taught mappers begin to understand what's what in mapping much faster and remember the properties of objects better. Therefore, decompilation from this side is an extremely useful thing.
There are also many who want to create their own card with little effort. They just take decompile de_dust, add boxes everywhere, build new passages and name your map de_dust7500 or de_dust_best_forever... Well, all that remains is to sympathize with such "mappers". It's a pity that they don't have enough of their own thoughts to come up with an interesting map, although there is a desire to create, which means all is not lost :)
We hope that the knowledge gained on our website will help you become a real mapper with your own recognizable style in creating maps; a mapper whose maps will be enjoyed by many people. And when this happens, we will say with you: "Down with plagiarism!" :)

Decompilation programs

We know of two programs for decompiling maps: WinBSPC And BSP2MAP. You can find a description of how to work with them in the "Programs" section. I would just like to note that they work the same way and there is no difference in the quality of the resulting decompiled map (and the quality is very low, more on that below).

Quality of decompiled maps

  • A large number of broken, irregularly shaped brushes
  • LEAK errors, i.e. holes in the map
  • Unaligned textures
  • Lack of original CLIP brushes
  • Various glitches with brush entity objects
All of the above is enough to forever eliminate the desire to decompile maps in order to create new versions of famous hits.

Why are some maps not decompiled?

This question interests many novice mappers. Experienced mappers who create their own maps are, on the contrary, interested in how to protect their creation from the wrong hands, how to make the map non-decompilable?
Unfortunately, or perhaps fortunately, we do not know the answers to these questions. However, it was noticed that large maps were not decompiled. Among the well-known ones that are not decompiled are de_torn and de_survivor, but this did not stop us from learning the structure of an airstrike and a flying bird on these maps (you can find articles about this in the "Advanced Mapping" section). Indeed, if you read an article about how to find out the device of a card without decompiling, you will understand that the card does not have to be decompiled.
3.10

Inspect a Map Without Decompiling

In this article we talk about how you can find out the device of an event on a card that is not decompiled. By event we mean a system of interconnected objects that create a single effect, for example, a flying bird on De_Survivor or an airstrike on De_Torn.
It is no secret to experienced decompilers that some maps are not decompiled :) Perhaps this is due to some limitations within the decompiler programs, because mostly large maps are not decompiled.
We will not decompile the maps, but will find out its structure using a more civil method. Take, for example, the airstrikes on the De_Torn map. How are they made? (If you don't know what kind of airstrikes we are talking about, you can read about it in the article from the "Secrets" section.

Console command: developer 2

We load the map we are interested in and enter in the console: developer 2. Now our screen will display messages about all events on the map (activation of objects, where what was clicked, what sound was played, etc.).
While running around the map, we discovered that a certain object was activated jetmulti. It turned out to be multi_manager. At the same time, a line appeared on the screen:
Found: multi_manager Firing: jetmulti
Then we opened the map (de_torn.bsp) in the built-in editor of the FAR manager (TotalCom can also be used) and, since information about entity objects is stored inside maps in pure form, we can find an object by name jetmulti, which is what we did. In properties multi_manager'and we found the names of all the objects that he activates in the game. These were planes (which turned out to be ordinary doors, which are func_door :), and sounds, and other objects. Next, we drew up a diagram of the operation of the entire airstrike - "who" activates "whom" and when.
In a similar way, you can determine the structure of objects on other maps.
3.11

How to Speed Up Compilation?

Modern speed note. The old advice about RAM and swap files explains why compiles became slow on early-2000s PCs. On current machines, the bigger wins are using 64-bit compilers, keeping VIS-friendly geometry, and running SDHLT with an explicit thread count when appropriate. Extra threads help most on VIS/RAD work, but they do not replace good map structure.
One of the most frequently asked questions by mappers is included in the title of our article. Indeed, not everyone has powerful computers, and sometimes you have to wait several hours for the map to compile. In this article we will try to talk about all possible ways to speed up map compilation.

Computer power

Of course, first of all, compilation time depends on the power of the computer. To be more precise, it depends on the processor frequency and the amount of RAM. The more of both, the better. If there is not enough RAM, then the compilation time begins to depend on the speed characteristics of the hard drive. Indeed, if during compilation the free RAM runs out, then the SWAP file (virtual memory file) begins to be used. And the faster the hard drive transfers data from it, the faster the compilation will take place.
As for specific numbers, according to experience, to compile an average card (average both in size and in the complexity of its internal structure) you need about 256 MB of RAM. 384 MB is better. The word "average" should be understood as a map of the De_Inferno type. Larger memory maps may require even more. In general, the more memory you have installed, the faster the compilation will be.

Compilation slow due to lack of memory

If you have observed the following picture: compilation proceeds quite quickly, reaches 90%, and then each percentage is overcome in almost hours, then this is a sure sign of a lack of RAM. At the same time, you may notice the hard drive light blinking, indicating the use of a SWAP file.
This situation often begins during surgery. MakeScales And SwapTransfers compiler HLRAD. This situation can be corrected by dramatically simplifying the map (reducing its size, changing the internal structure) or installing additional RAM. Choose from these two options according to your capabilities. Or, as a third option, ask a friend to compile your map :)

Compilation stops due to lack of memory

It also happens that compilation ends prematurely due to the complete exhaustion of all types of memory (both RAM and virtual). In this case, ZHLT compilers will produce an error text similar to the following: "HLRAD.EXE failed to allocate a block of memory." A way out of the situation may be to increase the SWAP file or install additional RAM.

Program to compile

Say NO to compiling through Hammer or Worldcraft. If you have a weak computer, use only the batch BAT file for compilation. Additionally, before compiling, remove all programs from startup, increase the size of the SWAP file, reboot and start compiling.

Map complexity

The word "complexity" of a map should be understood as the totality of the dimensions of the map and the complexity of its internal structure. Excellent examples of complex maps are quite well-known maps: De_Volare, De_Laguna, Cs_Shogun, etc. On some PII-400 with 64 MB of memory, these maps can take days to compile!
Vast open spaces, an abundance of inclined surfaces of various shapes (for example, mountains), a large number of light sources - all this noticeably (!) increases compilation time. Moreover, without proper optimization, maps like those listed above will slow down mercilessly on any machine, simply because the old Half-Life engine is not capable of processing levels of such size and complexity.
In order to somehow speed up the compilation of large maps, it is necessary, firstly, to paint over all surfaces invisible to the player (roofs of houses, the backs of map walls, the bottom of the map) with SKY textures, and secondly, try to make the bottom and outer walls of the map flat, without depressions and holes, ideally so that the walls and bottom form a continuous plane. The first tip will help speed up lighting rendering (one of the main operations), because... when compiling, SKY textures are not calculated for lighting; The second tip is useful if you are building the map sky in one large box, in this case there will be no "voids" between the sky and the map, which will speed up map optimization by the HLVIS compiler.

Light sources

A large number of lights collected in one place can cause compilation to slow down. And if they are still blinking or turning off, then the compilation time will increase even more significantly.
The number of glowing textures greatly affects the speed of compilation, i.e. textures that emit light. If you use luminous textures, then when compiled with HLRAD, you will notice a significant increase in the number of light sources (Direct Lights). For example, it may be that your map uses only 20 light bulbs and several glowing textures, however, the number Direct Lights will be about 1000 or even more. Of course, this will significantly slow down compilation on computers with little RAM, since luminous textures use several times more memory than regular light sources (light, light_spot and light_environment).
Conclusion: don't get carried away with luminous textures and don't place too many different (both in color and light power, and in status: flashing, normal, switched off) light bulbs in one place on the map.

Speed ​​up lighting rendering

As you probably already know from the previous articles of the Tutorial, compilation can be done in two ways: fast with gentle parameters and full with settings for maximum quality. We won't repeat ourselves. Let us only recall that during test compilation you can specify the HLRAD parameter for the compiler -chop 128 and at the same time remove the parameter -extra. This will significantly speed up compilation on large maps. You can also completely abandon the calculation of lighting (HLRAD) and map optimization (HLVIS), if the compilation is truly test and serves only to check the functionality of entity objects and map timings, i.e. checking the meeting times of teams in different places.
The parameter can be very useful -incremental for the same HLRAD compiler. During the first compilation and, accordingly, during the first lighting calculation, this parameter creates a file with information about the map's lighting. The file size will depend on the size of the card, but usually it takes several tens of megabytes (up to 100-150). When recompiled with the same option, the ZHLT utilities will find the previously generated file and skip some resource-intensive lighting operations. This method allows you to significantly reduce the time for complete (highest quality) compilation of large maps.

NetVIS: or compile with a friend

Carrying out an operation to optimize the map together with a friend will help speed up the compilation a little more. If you want to use this feature, then instead of the HLVIS compiler you should run NetVIS. Then one of the computers (let's say yours) will be the server, and your friend's computer will be the client. If you have a very large (complex) map, compilation time can be significantly reduced.

Not everyone is using ZHLT yet!

Unfortunately, this is so... Not all mappers know about Zoner's Half-Life Tools compilers and continue to use standard outdated compilers. This is all the more surprising since ZHLT is constantly mentioned on the Internet and on our website as the best compilers.

As a conclusion

Of course, map compilation time greatly depends on the power of the computer, but even on weak computers it is quite possible to create very high-quality maps. Remember what computers were like in the fall of 1999, when De_Dust was created, or in the spring of 2001, when De_Dust2 appeared. Is it really necessary to make a huge map, wait hours for it to compile, and then be disappointed that no one plays the map? :)