Chapter XXI. Map Release.

Preparing your map for release: required files, description text, README, RES file, bot waypoints, and map overview image.

21.1

Files to Include in Your Map Release

In this article we will talk about the "filling" of your map, which you post on the Internet as the final version.
So, the archive should contain:
  • Map in BSP format
  • All necessary WAD files with textures
  • TXT file with a mission for each team (available for viewing in the game)
  • Creating a Readme file for the map (number of players, installation, etc.)
  • RES file with a description of all non-standard files that are used on your card (sounds, models, etc.)
  • Waypoints for POD bot (PWF and PXP files)
  • BMP image with a top view (overview) with a descriptive TXT file
  • Necessary sky pictures (if the sky is non-standard)
  • All custom sounds, models and sprites
So, let's start in order. Map in BSP format. Well, everything is clear here, the main thing is not to forget to put the latest version of the map in the archive. We recommend using a ZIP archive, because... it is more reliable than RAR (RAR is often broken).
All necessary WAD files with textures
If you compile with the -wadinclude parameter, then there are no worries, because all the textures are already inside the BSP file. Otherwise, you need to look in the map editor to see what non-standard textures you used when creating the map.
In Hammer, this can be done in the "Map/Show Information" menu. Then you will need to include all these WAD files in the archive or create one WAD file using the Wally program, into which you will copy all the non-standard textures. Naturally, you will need to reconnect the textures to the editor and compile the map again.
TXT file with a mission for each team (available for viewing in the game)
Information from this file is shown when logging into the server. The name of this file should be the same as that of your map, for example, if the map is called DE_COOLMAP, then the file will be DE_COOLMAP.TXT.
This file contains information about the author of the map (you can specify an e-mail and website address), as well as a brief task for both teams.
Creating a Readme file for the card
In this file you can write additional information about the map, such as the maximum number of players, a list of non-standard sounds, textures, models, compilation time, average r_speeds and much more.
RES file with a description of all non-standard files
This is a very important file, which, unfortunately, not everyone knows about yet. When loading a map, the server reads a list of all non-standard files that are used on your map from this file. When a player who does not have your card connects to the server, it automatically begins downloading all the files described in the RES file.
This way, you can be absolutely sure that the player will see your map exactly in the form in which it was created. For example, you used non-standard pictures of the sky. If you do not create a RES file and write the names of these pictures in it, then the player will see a standard desert sky on the map, which may not suit the design of your map.
Waypoints for POD bot (PWF and PXP files)
Waypoints are needed to play with bots. Today, POD bots have become widespread, so it makes sense to make waypoints for them.
You can include both a PWF and a PXP file in the archive with the map. The first is the actual record of the placed waypoints, and the second is the so-called expierence, i.e. skill, experience that bots have accumulated while playing on your map.
Don't forget to write the paths and names of these files in the RES file.
BMP image with a top view (overview) with a descriptive TXT file
Starting with CS 1.4, players had the opportunity to watch the battle from above in spectator mode. This function is carried out using two files, one of which is a picture in BMP format (resolution 1024x768 and 256 colors), and the second is a regular text file in which the display parameters of this picture are recorded.
Don't forget to write the name of the picture and description file in the RES file.
Necessary sky pictures (if the sky is non-standard)
If you use a non-standard sky on your map, then all six pictures must be archived. Also, do not forget to write the names of the pictures (along with the paths where they need to be copied) into the RES file.
All custom sounds, models and sprites
Well, by analogy with all non-standard files, you must include all sounds, models and sprites in the archive, if any are used on your card. The sounds should go to the sound/ambience folder, models - models, sprites - sprites.
We recommend organizing all the files in the archive into folders to avoid confusion. Imagine, you unpack an archive with a map and see 27 files :-[ ] What should I put where?!..
Create separate folders with standard names such as: cstrike, maps, models, sound, sprites, overviews, etc.
As a result, the archive structure should look like this:
| cstrike
|           de_coolmap.wad
|----maps
|           de_coolmap.bsp
|           de_coolmap.txt
|           de_coolmap.res
|           de_coolmap_info.txt
|----gfx/env
| sky pictures.tga
|----overviews
|           de_coolmap.bmp
| de_coolmap.txt (txt with overview parameters)
|----PODBot/WPTDefault
|           de_coolmap.pwf
|           de_coolmap.pxp
|----models
| all non-standard models.mdl
|----sound/ambience
| all non-standard sounds.wav
|----sprites
| all non-standard sprites.spr
21.2

Creating the Map Description TXT File

In this article we will talk about creating a file with a description of your card. Information from this file is shown at the beginning of the map (unless the player has this feature disabled), and is also available by pressing the "I" button (default).
Requirements for the description file:
  • If the map is called de_dust, the file should be called de_dust.txt
  • The file must be in the directory with the map (cstrike/maps)
  • The lines inside the file should not be too long

What information should I write in the description?

Most mappers follow an established standard in writing descriptions.
Example of a DE card description file:
  • Dust - Bomb/Defuse
    by DaveJ ([email protected])
    textures by Macman ([email protected])
    Counter-Terrorists: Prevent Terrorists
    from bombing chemical weapon crates.
    Team members must defuse any bombs
    that threaten targeted areas.
    Terrorists: The Terrorist carrying the
    C4 must destroy one of the chemical
    weapon stashes.
    Other Notes: There are 2 chemical
    weapon stashes in the mission.
    (Press FIRE to continue)
First, write the name of the map and its type (Bomb/Defuse, Hostage Rescue, Escape or Assassination).
Next, write down the name of the map author (you can indicate the e-mail and website address in brackets).
Then you can list the authors of textures, models, sprites, if any.
After all this there is a short task for the counters and then for the terrorists. Each map has its own task, but the difference is small. For example, on de_dust, terrorists blow up boxes with chemical weapons, and the counters try to prevent this. There may be another task on your map.
In the "Other Notes" line you can specify the number of bomb installation points or the number of hostages.
Well, the file usually ends with the line (Press FIRE to continue).
As you understand, all this is very conditional. No one is stopping you from using a different recording format, the main thing is not to write too long lines, because they will be cut off in the game. Use lines of 39-40 characters.
Example of a CS card description file:
  • Canyon Siege - Hostage Rescue
    by N0TH1NG ([email protected])
    Counter-Terrorists: Enter the POW
    stronghold and rescue the hostages.
    Take out the Terrorists without
    jeopardizing the hostages.
    Terrorists: Prevent Counter-Terrorist
    force from rescuing the hostages.
    Other Notes: There are 4 hostages in
    the mission.
    (Press FIRE to continue)
21.3

Creating the README File

In this article we will look at an example file with the technical data of your card. You can call this file whatever you want (for example, de_map_readme.txt or de_map_info.txt) and place it anywhere (in any folder inside the archive), because this file simply describes your map, how it was created, what programs, etc.
There is a standard type of such files that most mappers use. Naturally, no one can stop you from writing the Readme the way you want :)

English version

=======================================================
Ka_100x100 for Counter-Strike a Half-Life Modification
Russia                              September 15, 2002
=======================================================
------General Information--------------------------------
Title            : Ka_100x100
Filename(s)      : ka_100x100.bsp & other
Version          : Final
Author           : Dmitry "Dmitrich!" Cherkashin
E-mail           : [email protected]
Home page        : www.any-server.ru
ICQ              : 139039487
Description      : A Knife Arena map with plenty HE-grenades, healthkits & kevlars
Other maps       : De_Asche, Dm_Aztec_maso, Dm_Aztec_maso2, Dm_Aztec_maso3, De_Miracle
Notes            : This is my 4th released map after over one year of mapping
------Play Information-----------------------------------
Deathmatch       : No
Single Player    : No
Cooperative      : Yes
Mod              : Counter-Strike
Max # of players : 20
------Map information-------------------------------------
Base             : None
Editor(s) used   : Valve Hammer Editor 3.4
Other Programms  : ZHLT 2.5.3-1.6.1, Wally 1.55b, Photoshop 7.0, GoldWave 4.26, PakExplorer
Prefabs used     : No
Known Bugs       : No
Build Time       : two months
Compile Machine  : PIII-533 / 128 Mb
Compile Time     : 2h:47m
Average R_Speeds : 600 wpoly
------Copyright-Permissions------------------------------
If you enjoy playing this level, please send me an e-mail
Authors MAY NOT use this level as a base to build additional levels.
You MUST NOT distribute this level UNLESS you INCLUDE THIS FILE WITH
NO MODIFICATIONS!!! If you don't co-operate, then DON'T DISTRIBUTE
IT IN ANY FORM!!!
This BSP may be distributed ONLY over the Internet and/or BBS systems.
You are NOT authorized to put this BSP on any CD or distribute it in
any way without my permission.
(c) Copyright 2002 Dmitry "Dmitrich!" Cherkashin

Russian version

=======================================================
Ka_100x100 для Counter-Strike a Half-Life Modification
Россия                               Сентябрь 15, 2002
=======================================================
------Общая информация-----------------------------
Название           : Ka_100x100
Файл(ы)            : ka_100x100.bsp и другие
Версия             : Окончательная
Автор              : Дмитрий "Dmitrich!" Черкашин
E-mail             : [email protected]
Сайт               : www.any-server.ru
ICQ                : 139039487
Описание           : Карта на ножах с большим количеством гранат, броников и пр.
Другие карты       : De_Asche, Dm_Aztec_maso, Dm_Aztec_maso2, Dm_Aztec_maso3, De_Miracle
ЗЫ                 : Это моя 4-я законченная карта за год маппинга
------Игровая информация---------------------------
Десматч            : Нет
Сингл              : Нет
Командная          : Да
Мод                : Counter-Strike
Макс число игроков : 20
------Информация о создании карты------------------
На чем основана    : сделана с нуля :)
Редактор           : Valve Hammer Editor 3.4
Другой софт        : ZHLT 2.5.3-1.6.1, Wally 1.55b, Photoshop 7.0, GoldWave 4.26, PakExplorer
Префабы            : Нет
Известные баги     : Нет
Время создания     : 2 месяца
Компьютер          : PIII-533 / 128 Mb
Время компиляции   : 2ч:47мин
Средний R_Speeds   : 600 wpoly
------Авторские права------------------------------
Напишите здесь что-нибудь о правах на свою карту, о том какой Вы злой человек и что Вы не дадите декомпилировать карту никому. А если это не дай Бог произойдет, то будете преследовать нарушителя по закону, а когда догоните, то накажите, чтоб больше не хотелось :)
21.4

Creating a RES File with ResGen

In this article we will talk about creating a file with a list of all non-standard resources of your card.

What is the RES file for?

The RES file is needed for players, namely for those players who connect to the server with your card for the first time. The server reads information from the RES file and transfers to the player all the files recorded in it. This way the player will have all the files used by your card.
RES file requirements:
  • If the map is called de_dust, the file should be called de_dust.res
  • The file must be in the directory with the map (cstrike/maps)
  • The file must list all non-standard files of your card
The RES file is a regular TXT file, so you can edit it, for example, with Notepad.
The original RES file can be obtained from the ResGen program (www.unitedadmins.com).

Working with the ResGen program

The ResGen program compiles a list of files used by your card and writes it to a RES file.
The main difference between version 2.0 (beta 3) and 1.1 is that the program is completely rewritten in C++ (instead of C), which should have a better effect on the speed of work (although it was a sin to complain :) There is also a parameter -e [path to the folder with the mod], which allows you to check the presence of all the resources needed by the map directly in the game folder.
The program runs from the command line with the following parameters:
-f [имя_карты] — создать RES-файл для данной карты (можно использовать несколько раз)
-d [директория] — создать RES-файлы для карт из данной директории
-r [директория] — тоже самое, что и -d, только обрабатываются еще и поддиректории

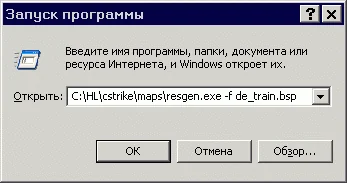
For example, to create a RES file for the de_train map, you need to copy the program to the map folder (cstrike/maps) and run the following command ("Start/Run..."):
resgen.exe -f de_train.bsp
t21resgen The remaining parameters are not so important, but we still list them:
-h — помощь
-c — авторы
-w — copyright
-v — не показывать информацию по ходу создания файла
-s — не показывать строку статуса
-i — не показывать текущий каталог, пока ищутся карты
-j — не показывать найденные ресурсы во время составления листа ресурсов
-x [map] — не обрабатывать эту карту (используйте вместе с: -d или -r)
-o — перезаписывать файлы с одинаковыми именами
-l — не конвертировать записи внутри файла в маленькие символы
-e [путь к моду] — проверять НАЛИЧИЕ ресурсов
-p — не проверять наличие ресурсов в PAK-файлах
-a [filename] — добавить в RES-файл информацию из RFA-файла
-k — не требует нажатия кнопки между составлением нескольких RES-файлов

Editing the created RES file

ResGen analyzes the BSP file of the map, so it cannot add some necessary files (waypoints for bots, an overview picture) to the list (because it simply does not know about them). We will write these files ourselves.
This is what a typical RES file looks like:
  • // dm_aztec_maso2.res - created with RESGen v1.10
    // RESGen is made by Jeroen "ShadowLord" Bogers
    // URL: http://www.unitedadmins.com/mapRESGEN.asp
    // E-MAIL: [email protected]
    // Res creation date, GMT timezone (dd-mm-yyyy): 10-05-2002
    // .res entries:
    halflife.wad
    decals.wad
    liquids.wad
    gfx/env/trainyardup.tga
    gfx/env/trainyarddn.tga
    gfx/env/trainyardlf.tga
    gfx/env/trainyardrt.tga
    gfx/env/trainyardft.tga
    gfx/env/trainyardbk.tga
    sound/ambience/crickets.wav
    sound/ambience/flies.wav
    sound/ambience/waterfall1.wav
Anything that starts with // a double slash is spam :) This can be deleted, or you can leave it.
After the line // .res entries The enumeration of WAD files used by the card begins. ResGen writes here all the textures it finds, even the standard ones that everyone has. There is nothing wrong with this, because... the server itself determines whether the player has, for example, the standard halflife.wad and will not upload it. But in principle, these records are not needed and can be deleted. Another thing is your (non-standard) WAD files - you need to register them here.
Next comes a list of sky pictures (note, along with the paths where the server will copy them to the client machine). If the sky is standard, as in the example above (trainyard), then there is no need to specify it.
Next, all sounds, models and sprites are listed (again with paths). Among them, there will probably be many standard ones. You can remove them, or you can leave them - no big deal.
Modified RES file (new in bold)
  • // dm_aztec_maso2.res - created with RESGen v1.10
    // RESGen is made by Jeroen "ShadowLord" Bogers
    // URL: http://www.unitedadmins.com/mapRESGEN.asp
    // E-MAIL: [email protected]
    // Res creation date, GMT timezone (dd-mm-yyyy): 10-05-2002
    // .res entries:
    halflife.wad
    decals.wad
    liquids.wad
    gfx/env/trainyardup.tga
    gfx/env/trainyarddn.tga
    gfx/env/trainyardlf.tga
    gfx/env/trainyardrt.tga
    gfx/env/trainyardft.tga
    gfx/env/trainyardbk.tga
    sound/ambience/crickets.wav
    sound/ambience/flies.wav
    sound/ambience/waterfall1.wav
    overviews/dm_aztec_maso2.bmp
    overviews/dm_aztec_maso2.txt
    PODBot/WPTDefault/dm_aztec_maso2.pwf
    PODBot/WPTDefault/dm_aztec_maso2.pxp
    maps/dm_aztec_maso2.res


First, we added 2 entries regarding the overview image, which needs to be uploaded to the overviews folder of the same name. Then we specified the paths to the files with waypoints (the standard path for POD bots).
And finally, we specified the path to the RES file itself so that it would be transferred to the client. In case the player then creates a server on your map, and players who do not have one will also connect to it.
21.5

Bot Waypoints for PODBot

In this article we will try to explain in clear language and, as briefly as possible, how waypoints are created for bots, namely for the most popular CS bot PODBot.

What are waypoints?

First, let's define what "waypoints" are?
Waypoints (from the English waypoints) - these are some vertical multi-colored sticks placed on the map. As soon as they are not called: both VINpoint and VENTpoint, but the coolest thing I've ever heard is WHITEPOINT :))))))) ...white point, huh. Now you know exactly the correct name.
So these same sticks are used by bots to navigate (move) on the map. When you play at home with bots, these sticks are not visible, but they exist :) Without waypoints, bots would run into walls like blind kittens and crawl along them, not knowing what to do.
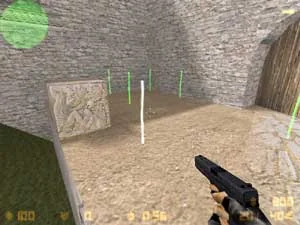
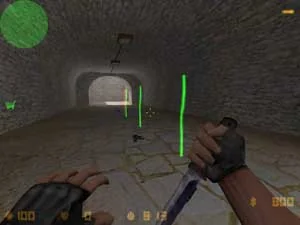
There are several types of "sticks", which differ in color and effect on the bot. Let's see what a regular waypoint for PODBot looks like:
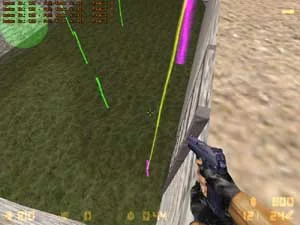
Image of a regular waypoint (color: bright green)
Regular waypoint (bright green)
A regular waypoint is painted bright green. It is a simple pointer for the bot. When a bot runs up to such a waypoint, it begins to look for the next waypoint, and when it finds it, it runs towards it, thus the bot moves around the map.
It follows from this that regular waypoints must be placed in almost all accessible places on the map (i.e. in all passages, rooms, on the street, etc.). Waypoints must be placed quite close to each other (approximately as shown in the figure above).
Creating the first waypoint
So, you installed PODBot and created your server on some map for which there are no waypoints yet. Pull out the console and write in it:
  • waypoint on
    waypoint add
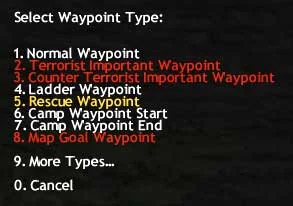
The following menu will appear on the screen:
Selecting a waypoint type
Press the number 1to create a simple bright green waypoint. At the moment of creation, you will hear a characteristic sound. The first waypoint has been created, and it was created exactly in the place where you were at the moment you entered the command.
However, just individual waypoints will not work. They need to be connected to each other so that the bot knows the exact direction to the next waypoint. For now, ignore the blue stripes, we'll talk about that a little later.
Types of connections between waypoints
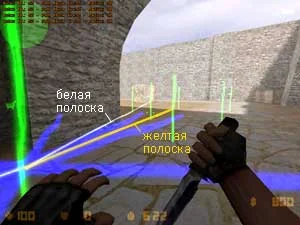
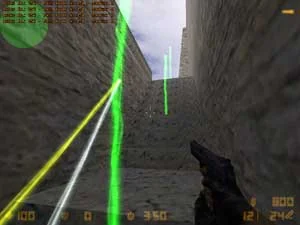
The connection between waypoints can be single or double. A single connection is indicated by a white stripe that stretches from one waypoint to another. A single connection means that the bot will be able to go from waypoint-A to waypoint-B, but will not be able to go in the opposite direction (since there is no feedback).
A double (two-way) connection is indicated by a yellow stripe. With such a connection, the bot can freely travel from one waypoint to another and back. Typically, sequential waypoints are connected by a two-way connection (yellow stripe), and white is used only in exceptional cases.
Waypoint information
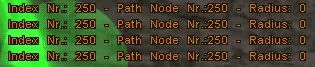
If you get close enough to the waypoint, you will see running numbers in the upper left corner of the screen. Here they are:
Information about the current waypoint
Here the main parameter is the serial number of the waypoint. In the figure this is number 250, i.e. The waypoint next to which you are now standing has a serial number of 250.
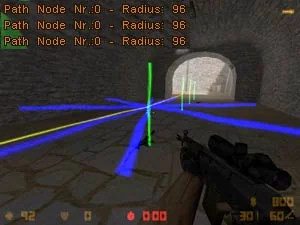
The waypoint radius is written at the end of the line, after the word Radius. The picture below shows a regular green waypoint with a radius of 96 units (the radius is measured in units - a virtual value that characterizes the size of an object in the game).
Waypoints have range
As you can see, the radius of the waypoint is clearly depicted in the form of bright blue sticks coming from the center of the waypoint and located in a circle.
The longer these sticks, the greater the radius (range of action) of the waypoint. It is recommended to increase the waypoint radius in open spaces and significantly reduce it in doorways, narrow corridors and corners. If all waypoints are given a radius of 0, then the bots' movements will be quite "angular", i.e. the bots will clearly run from stick to stick, bumping into each other.
*** So, let's summarize a little. We know that:
  • waypoints are inserted onto the map with the command waypoint add
    regular waypoints must be placed in all passages, rooms, etc.
    adjacent waypoints must be connected by a yellow stripe
    After placing waypoints, you need to choose the right radii
Several useful console commands
autowaypoint on | off — turns on/off the automatic placement of waypoints when you just run around the map. This is a very useful function, which, however, must be used quite carefully (more on this below).
pathwaypoint on | off — turns on/off the display of connecting stripes (white and yellow), radii, flags. It is recommended to always put this command in on.
Other types of waypoints
Unfortunately, you won't be able to get by with just simple waypoints. The bots are so stupid that they cannot determine for themselves where to plant a bomb, where to take hostages, what places to camp, where to use a vertical ladder, etc.
For all these cases, special waypoints are provided, which we will now consider.
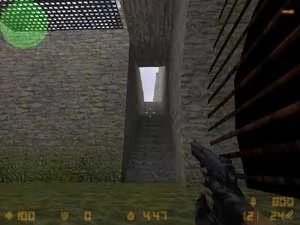
Waypoints for vertical stairs (Ladder Waypoint)
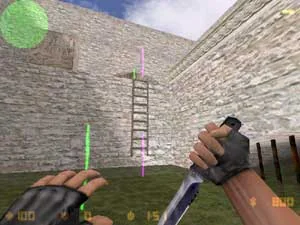
Waypoints for vertical stairs, such as in the picture below, always need to be created manually and at the same time set the command autowaypoint off.
Stairway waypoint image (color: purple)
Waypoint for vertical stairs (violet)
The "staircase" waypoint is purple. One of the waypoints must be placed at the very beginning of the stairs, the second at its end. If the ladder is quite long (for example, like on cs_assault), then additional (intermediate) "staircase" waypoints may be needed.
"Staircase" waypoints are inserted via the command waypoint add. From the menu we are already familiar with, we need to select the item 4: Ladder Waypoint.
Since the autowaypoint command is set to off (and this must be done when creating such waypoints), there will be no connection between waypoints. It must be created manually. To do this:
  • go to one of the waypoints and remember its serial number, for example, 30
    go to another ladder waypoint and also remember its number, for example 31
    now, standing at waypoint 31, enter the command pathwaypoint add 30
    go back to waypoint 30 and enter pathwaypoint add 31
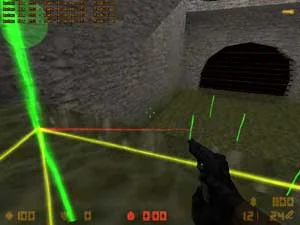
This will create a double connection between the two staircase waypoints (yellow bar, see picture below), meaning that bots will be able to crawl up the stairs in both directions. Naturally, do not forget to connect the staircase waypoints with the regular waypoints located nearby so that the bots can reach the stairs.
The connection between stairway waypoints is created manually
Camper Waypoint
The camper waypoint is also inserted onto the map with the command waypoint add, select the item in the menu 6: Camp Waypoint Start
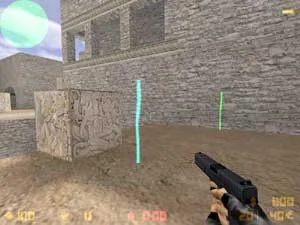
Picture of a camper waypoint (color: light blue)
Kemper Waypoint (light blue)
We think it's clear why this type of waypoint is needed - to indicate to bots places where they need to stay for a while and camp.
There is some subtlety here. There are two items in the menu, namely 6: Camp Waypoint Start And 7: Camp Waypoint End. So, how should you properly place a camper waypoint? You get into the camping position and turn to the starting position where the camping bot should be facing at the beginning. Select item 6. Then turn and stop the sight in the final camper position and this time select item 7.
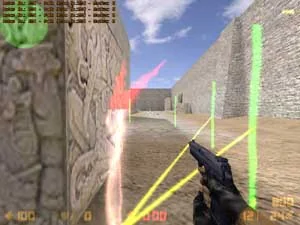
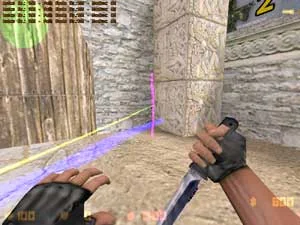
Thus, up close, the camper waypoint will look like a stick with two red stripes placed at a certain angle. These stripes indicate the direction the bot is looking when camping in this place.
Camper waypoint direction
Camper waypoint direction (red stripes)
It should be noted that it is possible to specify which team can use each specific camper waypoint. For example, you can make one camper waypoint used only by counters, and the other only by terrorists. This is set by flags (more on this later). You can distinguish between terrorist and counter camper waypoints by color. A regular camper waypoint (which can be used by bots from both teams) is colored light blue.
If you want the bot to squat while camping, just squat while creating a waypoint. As a result, the waypoint will have half its normal height. The same rule can be applied when creating other types of waypoints.
Jump Waypoint
The bots are able to climb onto low obstacles (small sides) on their own. For higher obstacles, it is necessary to create a special "jumping" waypoint. Let's see how it's done.
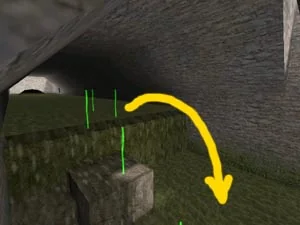
Suppose we would like the bots to immediately jump into the water in the following place (see figure):
Jump direction
The direction of the jump is shown by the arrow
To do this, you need to create a "jumping" waypoint. We stand on the upper platform (where the yellow arrow begins) and enter the command waypoint add, select the item 9: More Types..., then item 1: Jump Waypoint.
We stand on the upper platform and select a jumping waypoint
Selecting a jump waypoint
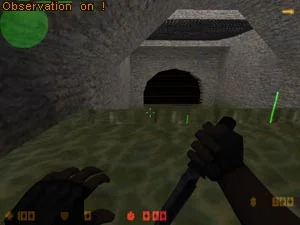
The following message will appear on the screen: Observation on! (see picture above). This means that the player's actions are currently being tracked. We run up and jump down into the water. In the place from where we took off and where we arrived, one waypoint will be created. In this case, a thin red stripe will stretch from the top to the bottom, meaning that there is a jumping waypoint in this place. Note that the red stripe connects waypoints in only one direction (in this case, top to bottom).
The jumping type of waypoint is indicated by a red connecting stripe
The red bar indicates the jumping type of waypoint
In this way, waypoints are created for jumping on boxes, jumping over sides, etc. If you need the bot to crouch during a jump (i.e. perform a longer jump), crouch down while jumping.
Key (strategic) waypoints
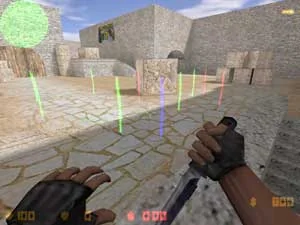
The figure below shows the key waypoints for terrorists (red) and counters (blue). These are called waypoints Terrorist Important Waypoint And Counter Terrorist Important Waypoint.
Key (strategic) waypoints for both teams
Key (strategic) waypoints
They are inserted in the same way as all other waypoints - through the command waypoint add.
These waypoints must be placed near strategic places on the map (i.e. near bomb sites and hostage locations). Moreover, on DE maps, at bomb placement points, it is recommended to install more Kontrovsky (blue) waypoints, and on CS maps near the locations hostages - more strategic waypoints for terrorists. For example, on a DE map, at the bomb planting point, you can place 4-5 counter and 2 terrorist waypoints.
Goal waypoints
Goal is translated as "goal, task." Without this type of waypoint, bots will not be able to plant a bomb or take away hostages, so on each map it is necessary to create from one to several Goal waypoints.
Goal waypoint
Goal waypoint (violet)
Place several Goal waypoints at each bomb site. If there are two points, then you can set, for example, 3 waypoints for each. On Goal CS maps, waypoints must be placed in the places where the hostages are located.
Waypoints for hostage rescue sites (Rescue Waypoint)
Waypoints for hostage rescue sites
Waypoints for hostage rescue sites (white)
This type of waypoint is installed in places where bots must take rescued hostages. Usually one waypoint is enough for one rescue site. For example, on cs_italy there is only one place for rescuing hostages - at the control base, so it is enough to place one Rescue Waypoint.

Useful tips

Now I would like to give you some useful tips so that you make fewer mistakes when creating waypoints.
The first tip is about the team. autowaypoint on. Let me remind you that this command enables the automatic placement of waypoints when you simply run around the map. So, I advise you to disable this function when creating waypoints on vertical stairs (this was already mentioned above), on steep descents and ascents (see the figure below).
Creating waypoints on steep stairs
Suppose we have a rather steep staircase on the map along which one of the bots' paths passes. After you walk up such stairs with the command enabled autowaypoint on, don't be lazy and check whether all connecting lines are yellow (i.e., whether there is two-way communication everywhere). If there is no connection in some places (and this is quite possible), add it.
The picture below shows a very common case when some waypoints are connected by a double bond, some by a single (white) bond, and some are not connected at all! All these are consequences of using autowaypoint on on steep, too steep :) stairs. There is only one way out - you need to manually add the missing connections.
Lack of communication between waypoints - consequences of using autowaypoint on
Lack of communication between waypoints
It is also not recommended to jump while automatically placing waypoints, i.e. you need to move around the map without leaving the ground (in general, make it a habit not to press the space bar when the autowaypoint on command is enabled). If you need to create a jumping waypoint, first type autowaypoint off.
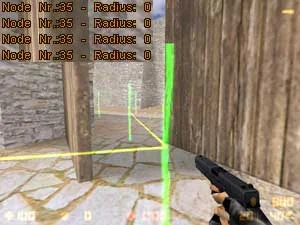
Let's return to waypoint radii. When making a path through narrow doorways, window frames, gates, corridors, etc. it is necessary to manually adjust the radii of waypoints.
The radius for each specific waypoint is set by the command waypoint setradius x, where x is the numerical value of the radius in units. The picture below shows a fairly narrow passage between the gate leaves, so the radius of nearby waypoints is set to 0.
Setting a zero radius for waypoints in narrow passages
The radius of corner waypoints should also be smaller so that bots don't get stuck.
Well, in conclusion, I'll briefly talk about flags and saving waypoints.
Flags are installed for camper waypoints. The flag is selected from the menu by command waypoint addflag. Using other commands (see list below) you can view the flags installed on each waypoint or delete them.
Waypoints are saved by the command waypoint save. In this case, all placed waypoints will be checked for errors. If there are none, the waypoints will be saved to the CSTRIKE/PODBot/WPTDefault directory under the name of your map, for example, de_dust.pwf. If there are errors (for example, a waypoint not connected to any other causes an error), then the waypoints will not be saved until all errors are eliminated.
If you just can't fix all the errors, so as not to waste your efforts in vain, enter the command to save waypoints without checking for errors waypoint save nocheck.

Console commands for creating waypoints

waypoint on | off — turns on/off the display of waypoints on the map
waypoint on noclip — when creating waypoints you can run through walls
waypoint add — add a waypoint to the place where the player is standing (a menu will appear)
waypoint delete — remove the waypoint on which the player is standing
waypoint find x | -1 — shows/disables the path to a specific waypoint (x — waypoint number)
waypoint addflag — add a flag to waypoint
waypoint showflags — shows the flags installed on this waypoint
waypoint delflag — removes a flag from a waypoint
waypoint setradius x - manually set the range of the waypoint (x - value)
waypoint stats — shows the total number of waypoints installed on the map
waypoint check — error checking (automatically done when saving)
wayzone calcall — sets the range of action for all waypoints (not used, because all this is done automatically when the waypoint is created)
waypoint save — saves waypoints to a PWF file (if there are no errors)
waypoint save nocheck — saves waypoints in any case (even with errors)
waypoint load — loads a PWF file with waypoints
autowaypoint on | off — enable/disable automatic placement of waypoints when the player runs around the map in the right places
pathwaypoint on | off — enable/disable the display of connecting lines between waypoints
pathwaypoint add x — connects a line between the waypoint the player is standing on and waypoint x (where x is the number of another waypoint)
pathwaypoint delete x — removes the line connecting waypoints (reverse to the previous one)
debuggoal x — forces bots to use waypoint x as their preferred one for further movement
21.6

Creating a Map Overview (Top-Down View)

In this article we will tell you how to create images with a top view of the map.

What is Overview?

Starting with CS 1.4, players had the opportunity to watch the battle from above in spectator mode. This function is carried out using two files, one of which is a picture in BMP format (resolution 1024x768 and 256 colors), and the second is a regular text file in which the display parameters of this picture are recorded.
Both the image and the text file are stored in the cstrike/overviews directory, and they have the name of the map, i.e. for example de_coolmap.bmp and de_coolmap.txt. If there is no overview for the map, then players see only a black space with green stripes.
All we need to do is take a photo of the map from above and create a small file with a description. There are special console commands for this.

Launching a dedicated server and HLTV

  1. We launch CS and create a server on the required map. Only the server needs to be dedicated. To do this, in the server creation window, at the bottom you need to check the "dedicated" checkbox. The dedicated server will start.
  2. Launch HLTV (hltv.exe is located in the Half-Life folder). He should automatically join the newly created dedicated server. If this does not happen, write in the HLTV window: connect localhost, you can also specify the port, i.e. connect localhost:27015.
  3. After HLTV joins the dedicated server, launch Counter-Strike again with a resolution of 1024x768 (check in the shortcut properties that you have the console enabled, i.e. the launch line looks like this: hl.exe -game cstrike -console) and go to "Play On LAN". We find HLTV in the list of servers and join it, i.e. Click "View Game".
  4. Having joined the game, pull out the console (the ~ button, you know :) and write developer 1, hud_draw 0 and dev_overview 1. After entering these commands, a picture with a top view of the map should appear on your screen, and numbers should appear at the top of the screen.
developer 1 — turns on developer mode, i.e. shows additional inscriptions on the screen
hud_draw 0 — removes all icons from the screen so that nothing interferes with taking a screenshot
dev_overview 1 - includes top view

Taking a photo of the card

Take a screenshot of the map (default F5). But before you take a screenshot, it is advisable to zoom in on the map, as close as possible and position it in the center of the screen. You can move the map as usual using the keyboard, and zoom in and out with the mouse.
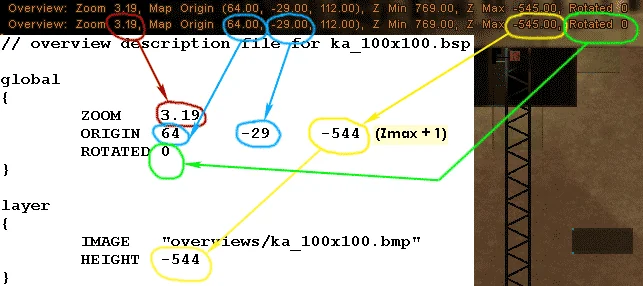
Having established the best position, write down all the parameters from the creeping lines on a piece of paper (or take a screenshot). You should have something like this (see picture below).
t21overview0 We should stop here and tell you a little more. The fact is that some parts of your map may be closed and not visible in the top view. For example, on a "multi-story" map like de_aztec, it is impossible to show both the top floor and the water in one screenshot. You have to take several screenshots and then combine them into 1 picture.
We will gradually move the camera deeper into the map, i.e. take cross-sectional pictures of the map. There are special buttons to move the camera along the map in height / And '. Press these buttons and at the same time pay attention to the Zmin parameter in the running numbers at the top of the screen - it will change. If you hold any button longer, then some parts of the map, starting with the roofs of houses, rocks, fences, etc. will gradually disappear, i.e. the map will be shown in section.
Before you take a screenshot, write 0 in the developer console to remove the running numbers from the screen. By changing the Zmin parameter, take the required number of screenshots (usually 2-4 is enough) so that most of the closed rooms are shown.

Editing screenshots

When all the necessary screenshots have been taken, you can exit CS and close the dedicated server along with HLTV. Screenshots are located in the Half-Life root directory. Now you need to open them in a graphics editor (Photoshop, PaintShop) and adjust the palette. For the green parts in the picture to be transparent when viewed in game, they must be green in the format R=0 G=255 B=0. Those. You need to paint all invisible parts green, this is especially important at the borders of the map. We recommend using a pencil instead of a brush for painting, because... he paints with a strictly defined color and leaves no shades.
With "multi-level" maps it's a little more complicated. You will need to be able to cut out parts of an image and paste them into another image. Select some picture as the main one (background) and insert into it parts of other pictures that depict the "insides" of rooms, caves, tunnels, etc.
When the picture is ready, it must be converted to 256 colors. Menu "Image/Mode/Indexed color/Local (Selective)" specify 256 colors. Then save the image as de_coolmap.bmp (with the name of your map, of course). Place this image in the cstrike/overviews folder. We are done with the image, now we need to make a file describing its display.

Creating a text file with a description

Open any file from the cstrike/overviews directory in Notepad. In this file you need to enter the parameters that you wrote down on a piece of paper or took a screenshot. The figure below shows which parameters should be entered where.
t21overview1 ORIGIN is the coordinates of the image's rotation axis. Note that the third digit (circled in yellow) must be one greater than the Zmax parameter. The same number must be written in the HEIGHT line. With this value, circles representing players will be displayed correctly. Otherwise, the yellow leg indicating the height at which the player is located may be too short, in which case the circle will merge with the picture, which in itself is bad.
Also don't forget to change the name of the picture to your own. Save a file with the name of your map, for example de_coolmap.txt in the cstrike/overviews directory.
That's all. Launch CS and enjoy the picture above.