Chapter XX. Advanced Mapping.

Advanced effects and mechanics: explosions, weather, animals, conveyors, pendulums, scoreboards, and more.

20.1

Airstrike Effect (de_torn Style)

In this article we will talk about how an airstrike works on the de_torn map. Don't you know that there is an airstrike on de_torn? Then hurry up and read about it in the "Secrets" section. To create such an airstrike, we will need the following entity objects: This is what an airstrike would look like:
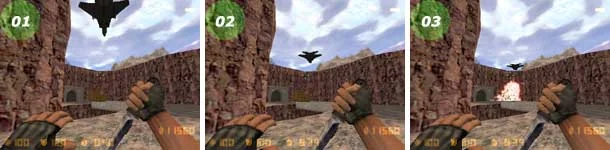
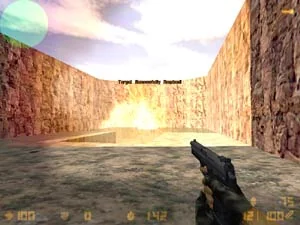
This is what an airstrike will look like in the game
The airstrike action plan will be as follows:
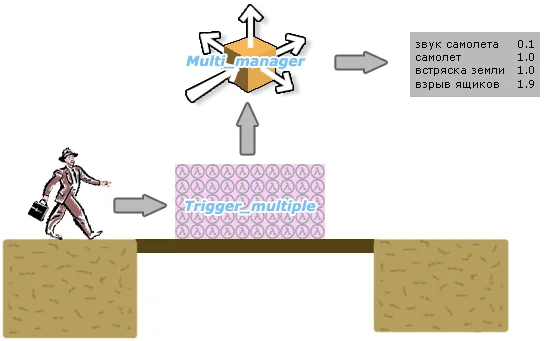
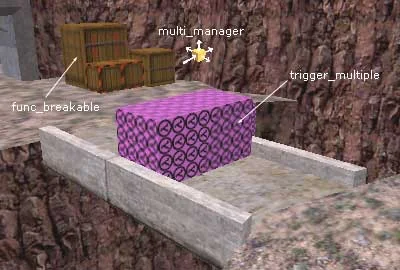
  1. The player passes through trigger_multiple located on the bridge
  2. Trigger_multiple activates multi_manager
  3. Multi_manager activates all objects that create the airstrike effect
t24torn2

1. Trigger_multiple

So, let's start by creating a trigger_multiple object. We will place it in the middle of the bridge (see figure below). When the player passes through this trigger, the multi_manager located just above will be activated.
Create trigger_multiple
Trigger_multiple (activates the multi_manager object)
Target: jet_multi (here we wrote the name of multi_manager)
Delay before trigger: 5 (time before object activation, in seconds)
Delay before reset: 360 (time during which the trigger cannot be activated again)

2. Multi_manager

Multi_manager, as can be seen from the diagram presented above, activates 4 objects: first the sound of the plane, then it starts the plane itself, after that it "starts" shaking the ground and, in the end, it "blows up" the destructible boxes.
The multi_manager properties look like this:
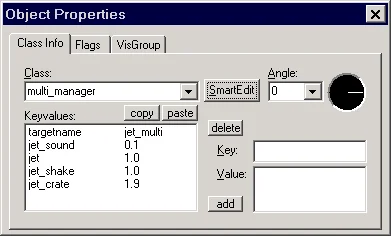
t24torn4 "Targetname" with the "Smart Edit" button pressed means the name of the multi_manager object, i.e. jet_multi . Below the name we see jet_sound sound activation after 0.1 sec, jet activation after 1.0 sec, jet_shake shake activation after 1.0 sec and jet_crate crate explosion activation after 1.9 sec. The activation time of all these objects is calculated taking into account the speed of the aircraft (after all, it is necessary to explode the boxes when the aircraft flies over them).
3. Airplane sound Ambient_generic
The very first object activated after 0.1 seconds is the sound of an airplane. Naturally, this will be an ambient_generic object. This is what its properties and flags look like:
Ambient_generic (airplane sound)
Name: jet_sound (sound name)
Path: ambience/jetflyby1.wav (path to sound, this is the standard airplane sound)
Volume: 10 (sound volume, maximum)
Flags:
Play Everywhere: play all over the map
Start Silent: at the beginning of the round the sound is silent
Not Toggled: plays 1 time (then it must be activated again)

4. Launching the plane Func_door

For an experienced mapper, entity objects are nothing more than just objects that have a certain set of properties. Indeed, you shouldn't think that the func_door object can only be a door based on its name. If we paint the door with suitable textures and place it horizontally, we can very well get a platform or a simple elevator.
So in our case, the door will perform a function different from its direct purpose - it will be an airplane :) In our test map, we used airplane textures from the de_torn map.
In the picture below you can see that our plane will be a flat rectangular brush (and subsequently a func_door object), rotated at an angle of 45° in the direction of its movement.
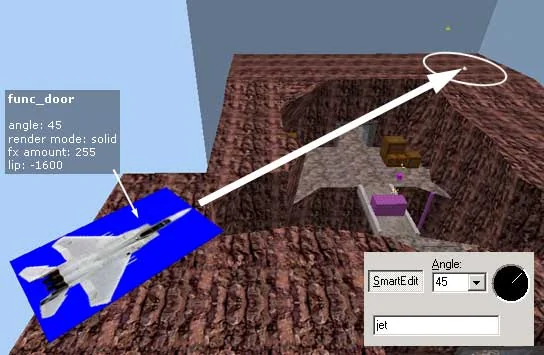
We create an airplane from func_door and determine the direction of its flight
Having painted the brush with an airplane texture, unfold it in the top view (2D-top). We recommend using flat values: 30°, 45°, 60°, etc.
Turn the brush into a func_door object and set the "Angle" parameter to exactly the same angle that the plane was turned to. In our case, the plane is rotated at an angle of 45°, which is why we specified 45° in the "Angle" parameter. It is also important to set the parameter Delay before close: -1, so that the plane can fly only once per round, i.e. Having reached the end point, he will remain there until the end of the round.
To make the blue parts of the texture transparent in the game, you need to set the following modes:
Render Mode: Solid, FX Amount: 255.
The next important parameter of the aircraft (func_door) is "Lip", which determines the distance the aircraft will move. By default, the plane will move a distance equal to its length (width). The distance when using the "Lip" parameter is calculated as follows: distance = plane length - Lip.
The distance is determined in the 2D top view. Since the angle at which our plane flies is 45°, the distance can be easily calculated along the diagonal of the coordinate grid. If our grid is divided into squares of 128x128 units, then according to the Pythagorean theorem (you remember it? :) the length of the diagonal is equal to ~180 units. As you of course understand, the Pythagorean theorem applies to any right triangle, regardless of whether legs A and B are the same or not.
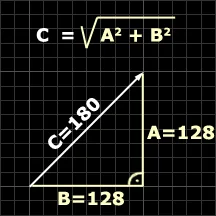
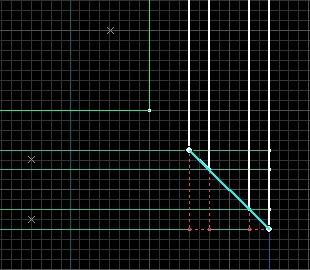
t24torn6 We count the number of squares with a size of 128x128 units from the initial to the final position of the aircraft. We got 9 squares, which means the distance is ~1600 units. That is why we wrote the value "-1600" ("minus") into the "Lip" parameter, since a negative value increases the flight distance. Indeed, in the formula: distance = plane length - Lip there is a minus in front of the "Lip" parameter, and a minus on a minus gives a plus).
Func_door (aircraft)
Angle: 45° (aircraft flight direction, determined from the 2D top view)
Name: jet (aircraft name)
Render mode: Solid (together with fx amount: 255 makes the blue parts of the plane transparent)
FX Amount: 255
Speed: 1600 (aircraft speed)
Lip: -1600 (additional distance the plane flies; the value has nothing to do with speed, the numbers just match)
Wait before close: -1 (stays at the end point until the end of the round, then returns to its place)

5. Shake Env_shake

This special effect is not present on the de_torn map, but we decided to slightly enhance the perception of a low-flying jet, so we added a small earthquake using an object env_shake.
Env_shake (object that causes the map to shake)
Name: jet_shake
Amplitude 0-16: 2 (oscillation amplitude, small)
Duration (seconds): 3 (shake duration in seconds)
0.1 jerk, 255.0 = rumble: 2 (shock frequency; the higher the value, the more often it shakes)
Flags:
GlobalShake: earthquake affects the entire map

6. Explosion of boxes Func_breakable

Near the final point of the plane's flight, we will create several boxes and turn them into func_breakable. On de_torn, instead of boxes, the roof of one of the houses is used. The plane flies over the roof - there is an explosion and part of the roof is destroyed.
The activation time of func_breakable crates is calculated taking into account the speed of the aircraft and the distance it is from the crates at the beginning of the round. Oh, by the way, if you don't know, func_breakable objects are destroyed when activated, and by setting the "Explode magnitude" value we add an explosion of a certain force to the simple destruction. Outwardly, everything looks as if a plane dropped bombs on the boxes.
Func_breakable (exploding boxes)
Strenght: 1 (strength, can be left as default)
Material type: Wood (material type, wood)
Explode magnitude: 170 (explosion force, quite large)
Flags:
Only Trigger: explodes only upon activation (the player cannot destroy the boxes)

Conclusion

When creating an airplane, it is advisable to place it so that it is not visible from the ground, otherwise it may turn out that the airplane will hang motionless over some house and wait to be "called" :) On our map, the airplane is located very low above the mountains, so it is invisible from the ground. The player thinks that the plane is taking off from behind the mountains.
It is also necessary to take into account the following feature of the func_door object (airplane): at the beginning of the next round, func_door always returns to its original position, i.e. You can see the plane flying backwards to its starting position. Knowing this feature, do not place the players' birthplaces under the plane's flight path if you do not want them to see this rather strange maneuver :)
torn_airplane.zip [193Kb] - in the archive there is an example map in BSP and RMF formats.
20.2

Object Activation on Player Kill / Spawn / Join / Leave

From this article you will learn how you can activate objects every time a player dies/is born, joins or leaves the game.
As an example we will use the map KA_100x100, because This card features a very large number of interesting special effects. There is a scoreboard with frag counts, the sounds of applause for each kill, the beating of drums, howling sirens, spotlights, etc. - all this is implemented using one little-known property of objects.
Let's start with a simple example with a door and a button. So, let's say we have a door somewhere on the map (func_door), and next to it is a button (func_button), which opens this door. In order for the player to open the door by pressing a button, the door must be given a name (Name), For example, Door1. Then this name must be entered into the "Target" parameter of the button. Everything is fine - the player presses the button, and the door with the name Door1 opens.
Now let's talk about how to make the door open when someone kills someone. There are 5 special names for objects, here they are:
  • game_playerdie
    game_playerkill
    game_playerjoin
    game_playerspawn
    game_playerleave
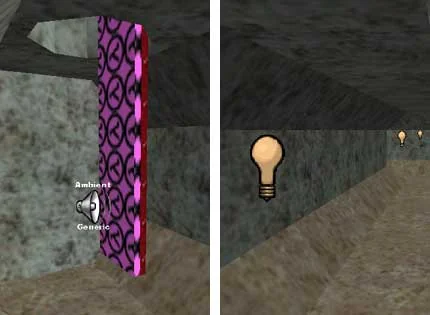
Let's look at the first 2 special names game_playerdie And game_playerkill. If you give a door (a light bulb, a sound, or any other object in general) a name game_playerdie or game_playerkill, then every time someone kills someone, the door will open and close! If you give any of these names to a light bulb (light), then with each frag it will light up and go out with the next frag!
This trick works on all objects that can be named. You can assign a name game_playerkill, for example, an object multi_manager, which, recall, can activate up to 16 different objects at specified time intervals. This multi_manager we can record, first, the activation of the light after 3 seconds, then the sound after 5 seconds, and finally the two doors after 10 seconds. Well, this is all for example, but you can activate whatever you want.

Other names mean the following:

game_playerjoin — object activation when a player joins a team
game_playerspawn - object activation when the player is born (i.e. at the beginning of each round)
game_playerleave — object activation when the player leaves the game
By showing your imagination, you can realize the most incredible special effects.
20.3

Fan / Wind Turbine

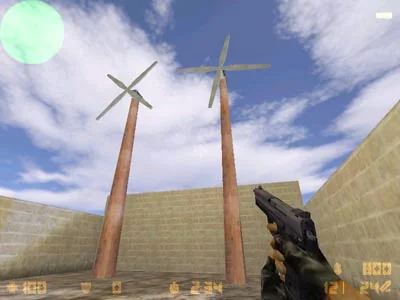
In this article we will tell you how fans are created. To do this, we need only 2 objects (sound and the fan itself): We decided not to make a regular fan. Instead, we will create a pair of windmills, which differ from the fan only in appearance.
So, in the end our windmills will look like this:
This is what windmills will look like in the game
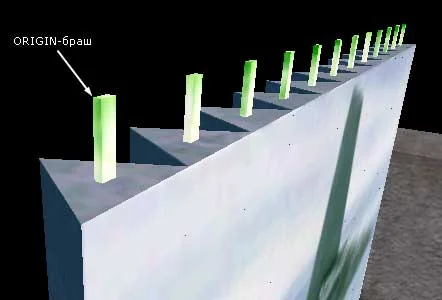
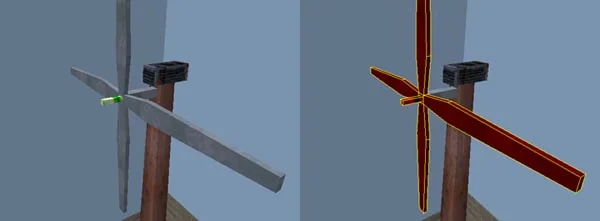
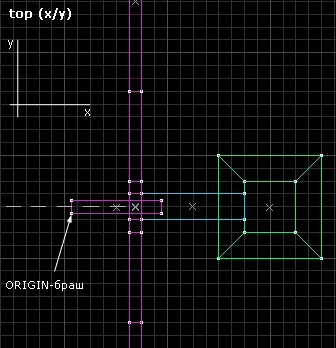
First, let's make a couple of these fans. Because our object is rotating, then let's not forget about ORIGIN brush, which we place exactly in the center, between the four blades.
Create 2 fans with ORIGIN brushes
Now select all 4 blades along with the ORIGIN brush (as shown in the picture above on the right) and turn them into an object func_rotating.
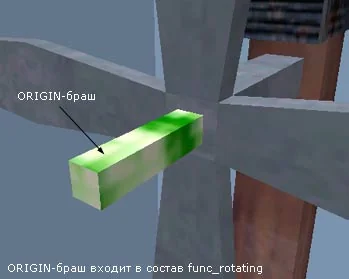
The figure below shows how the ORIGIN brush is located in relation to the fan blades.
This is how we placed the ORIGIN brush
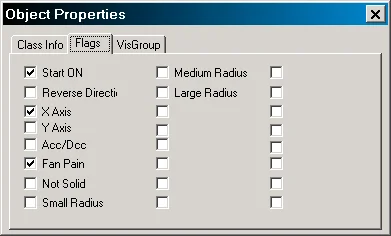
Because the blades of our mills rotate along the horizontal axes X or Y (now we will define this), and not along the vertical axis Z, then in the properties func_rotating, namely in the flags, you need to set or X Axis, or Y Axis.
To determine the axis along which the rotation occurs, set the editor to a top view, then the Y axis will be directed upwards, and the X axis will be directed horizontally (see the figure below).
t24fan4 It can be seen from the figure that the fan rotation axis specified by the ORIGIN brush coincides with the X axis. Therefore, it is necessary to note in the flags X Axis.
Here are the flags we also noted for each of the two fans:
t24fan5 Start On — so that the fan automatically starts spinning at the beginning of the round.
Fan Pain - to cause damage to the player who touches the blades.
Explanations for other flags can be found in the section "Entity".
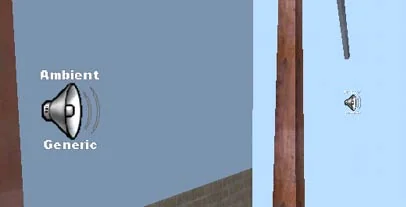
All that's left to do is add a couple of objects ambient_generic. We could also specify the fan sound in the properties func_rotating (they provide such an option), but we were never able to get the fan to work with sound. Therefore, we decided to simply insert one object near the mills ambient_generic (see picture below).
Place one ambient_generic object near the mills
In the object properties, specify the path to the file with the sound of a rotating fan.
That's all. Our two simple mills are ready.
fan.zip [30Kb] - in the archive there is an example map in BSP and RMF formats.
20.4

Explosions, Mines, and Tripwires

This article will focus on creating various explosions. First we'll create a mine, then a tripwire, and finish with a chain of explosions. We will use the following entities:

1. Making a mine

Let's start with the simplest thing - creating a mine. Our mines will be anti-personnel, i.e. those that explode from a small weight, for example, the weight of the player :) The player steps on a mine and an explosion is heard.
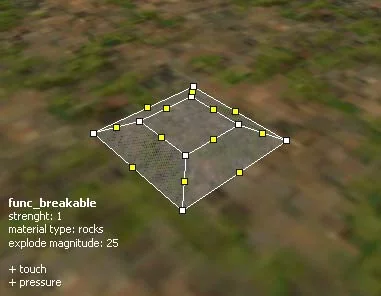
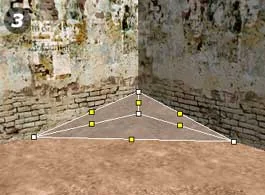
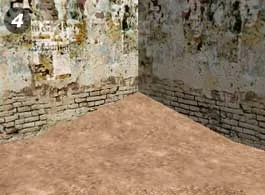
We will depict the mine as a small mound, equal in width and length to 32 units. We will make the edges of the rectangular brush oblique using the tool Vertex Tool (see picture below).
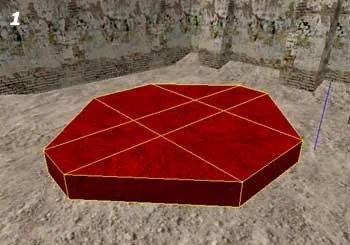
This is what the mine will look like
After the mound is ready, select it and turn it into func_breakable.
Let's set the following properties and flags for this object:
Func_breakable (mine)
Strenght: 1 (strength)
Material type: Rocks (type of material, pebbles)
Explode magnitude: 25 (explosion force, small)
Flags:
Touch - explodes on contact
Pressure - explodes under pressure
In our example map, we created 3 of these mines, thus creating a small minefield.

2. Creating a stretch

Stretching is a little more complicated. To create it, 3 entity objects are used.
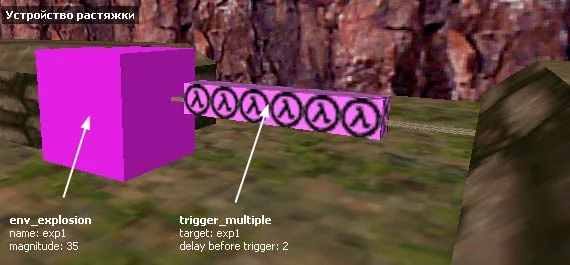
The picture below shows exactly which objects we used.
Stretching device
1. First object - func_illusionary, which depicts a thin wire (rope). The rope is stretched between sandbags; in cross-section, the rope has dimensions of 1x1 unit. Painted with rope texture.
2. Second object - env_explosion, i.e. explosives. This is a point entity object, depicted in the editor as a purple cube. We place the explosives next to the rope.
Env_explosion (explosives)
Name: exp1
Magnitude: 35 (explosion force, small)
Flags:
Repeatable - so that you can explode many times
3. Third object - trigger_multiple. This trigger will activate the explosive. We place the trigger on top of the rope, as shown in the figure.
Trigger_multiple (activates explosives)
Target: exp1
Delay before trigger: 2 (time before explosive activation, in seconds)
So, the player passes through the rope, touches trigger_multiple, which after 2 seconds activates env_explosion and... an explosion follows.
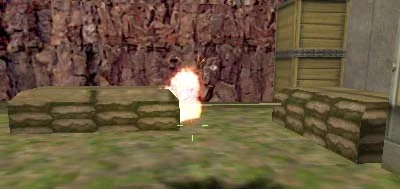
Explosion after passing through a tripwire
If you want explosives to trigger only once per game, then use trigger_once instead of trigger_multiple.

3. Creating a chain of explosions

And for a snack, let's decorate the usual bomb explosion a little. And we will decorate it by detonating additional warheads env_explosion and more.
The point is this: when a bomb explodes, a box of explosives explodes, as well as 2 additional warheads located nearby.
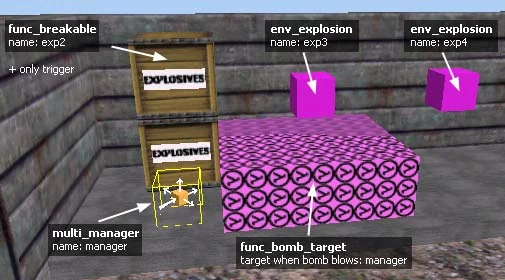
The picture below shows a crate with explosives, 2 env_explosion objects, a bomb planting zone (func_bomb_target) and a multi_manager.
Creating a chain of explosions
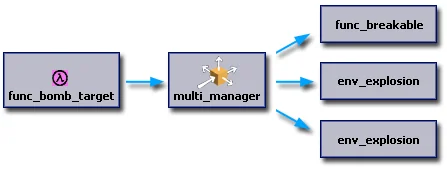
The operating diagram of this "device" looks like this:
  1. The player plants a bomb in the area func_bomb_target
  2. When the bomb explodes, it activates multi_manager
  3. Multi_manager activates 3 objects in turn (boxes + 2 explosions)
t24explosion1 So, what needs to be written in the properties:
Func_bomb_target (area for planting a bomb)
Target when bomb blows: manager (name of the object that is activated when the bomb explodes, i.e. multi_manager name)
Multi_manager (object that activates detonation of a box and 2 explosives)
In the multi_manger properties, with the Smart Edit button pressed, we write down the names of the box and two explosives in turn.
Name: manager (manager's name)
exp2 — 0.2 (object named exp2 is activated after 0.2 seconds)
exp3 — 0.7 (object named exp3 is activated after 0.7 seconds)
exp4 - 1.2 (object named exp4 is activated after 1.2 seconds)
Now all that remains is to assign names to the box (exp2), the first explosive (exp3) and a second explosive (exp4).
env_explosion.zip [28Kb] - in the archive there is an example map in BSP and RMF formats.
20.5

Gib Shooter

This article is intended for all meat lovers :) We will create a pipe from which bones, bloody pieces of meat and other offal will fly out. We will use the following objects: Original article taken from the site: http://halflife.ru/demi/. Thanks to the author!
Let's see what we end up with:
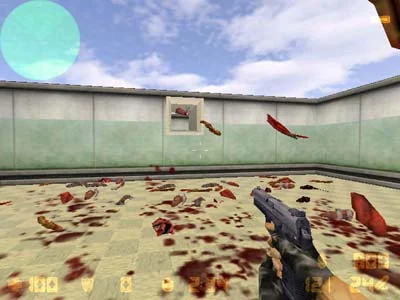
Pieces of meat flying out of the pipe
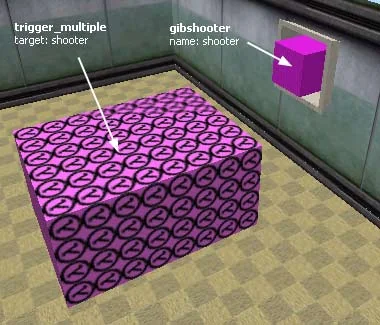
The device is very simple. A point object is placed in the pipe gibshooter.
Created near the pipe trigger_multiple, which will cause the release of meat.
This is what it looks like in the editor:
View in editor
Now let's talk about the properties of these two objects.
1. Gibshooter (throws out pieces of meat)
Name: shooter
Angle: 180° (angle determining the direction of ejection of pieces)
Number of Gibs: 7 (number of pieces of meat thrown away at one time)
Delay between shots: 0 (time between chunk ejections)
Gib Velocity: 800 (piece ejection speed, high)
Course Variance: 0.15 (the parameter determines how much the flying pieces will deviate from the straight trajectory)
Gib Life: 5 (lifetime of the pieces, then they disappear)
Flags:
Repeatable - so that gibshooter can be activated multiple times
It is worthwhile to dwell in more detail on the parameter Angle (angle in degrees).
The angle determines the side where the pieces of meat will be thrown. To correctly determine this angle, set the view from above. On our test map, the pieces are thrown to the left in the top view, which is 180°.
2. Trigger_multiple (activates gibshooter)
Target: shooter
Delay before reset: 0
gibshooter.zip [18Kb] - in the archive there is an example map in BSP and RMF formats.
20.6

Thunder Effect (de_aztec Style)

In this article we will reveal the secret of thunder on the de_aztec map.
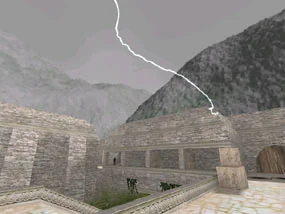
This effect is implemented using the following entity objects: The picture below captures the moment lightning appears:
Lightning on the De_Aztec map
Let's remember the sequence of natural phenomena during a thunderstorm. First we see lightning, along with it a bright flash, and then we hear thunder. On de_aztec everything happens in exactly the same sequence.
  1. The player goes through a trigger trigger_multiple (there are a total of 4 such triggers on the map)
  2. Trigger_multiple activates multi_manager
  3. Multi_manager after 3 seconds turns on the lightning (env_laser) and light bulbs (light)
  4. Multi_manager after 3.5 seconds it turns off the lightning (env_laser) and light bulbs (light)
  5. Multi_manager after 4.3 seconds the sound of thunder starts
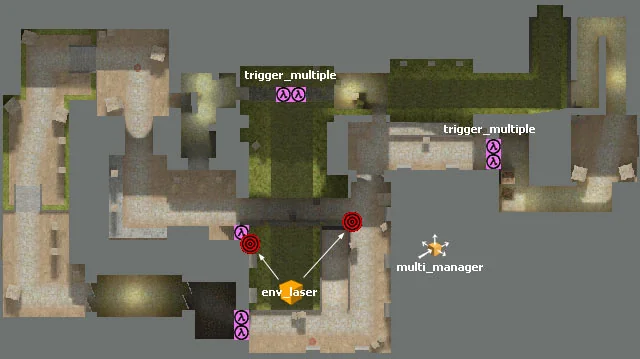
Location of objects on the De_Aztec map
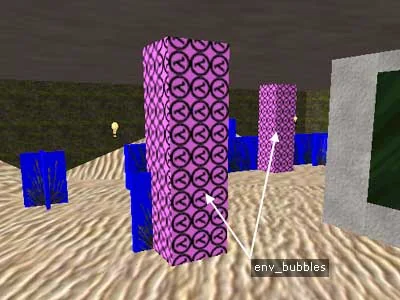
The figure above shows the location of these entity objects. Pay attention to the purple rectangles with the black letter "lambda" - these are triggers trigger_multiple.
These triggers are located in four places on the map (in the middle of the bridge, rising from the water near the counters, exiting the terrorist base and the "cardboard box" near the counters).
These triggers have one task - to activate multi_manager, which then activates in turn all the objects that create the effect of thunder and lightning.
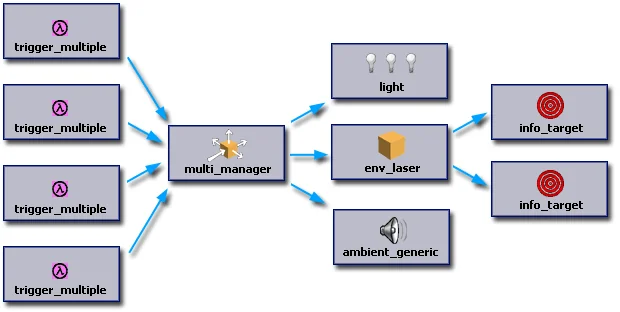
Here's how thunder and lightning work:
t24aztec1 As can be seen from the diagram, multi_manager turns on the light bulbs (they are located almost throughout the map, but are turned off at the beginning of the round). When they turn on, they create the effect of a bright flash of lightning. At the same moment the lightning itself turns on (object env_laser).
After 0.5 seconds both the light bulbs and lightning turn off in the same way multi_manager'om (it turns out that lightning flashes for 0.5 seconds).
After another 0.8 seconds, the sound of thunder starts (object ambient_generic).
All objects (light bulbs, lightning and sound) are activated in 4.3 seconds.
Properties of entity objects:
1.1-1.4 Trigger_multiple (4 triggers activating multi_manager)
Target: thunder (this is the name of multi_manager)
Delay before trigger: 0 (triggered without delay, i.e. after 0 seconds)
Delay before reset: 20 (next time will work in 20 seconds)
2. Multi_manager (activates lightning, light bulbs and thunder sound)
Name: thunder
ouch — 3 (lightning named ouch turns on after 3 seconds)
flash — 3 (lights named flash turn on after 3 seconds, along with lightning)
ouch#1 — 3.5 (lightning named ouch turns off after 3.5 seconds)
flash#1 — 3.5 (lights called flash turn off after 3.5 seconds, along with lightning)
boom — 4.3 (the sound of thunder called boom starts after 4.3 seconds)
3. Env_laser (lightning shooting rays at info_target objects)
Name: ouch
Target of laser: bob (names of two info_target objects that are the endpoints for the beam)
Brightness: 255 (beam brightness)
Beam color: 255 255 255 (beam color in RGB format - red, green, blue)
Width of beam: 80 (beam width from 0 to 255)
Ammount of noise: 100 (degree of beam curvature, values ​​from 0 to 255)
Sprite name: sprites/lgtning.spr (path to the sprite that will be the ray)
Texture scroll rate: 1 (sprite texture movement speed)
Damage/second: 100 (damage when a player is hit by the beam)
Flags:
End Sparks — sparks will fly from the place where the beam ends
4.1-4.2 Info_target (2 objects that are struck by lightning in turn)
Name: bob
5. Light (numerous light bulbs creating a short flash from lightning)
Name: flash (names of all the bulbs used to create the flash)
Brightness: 255 255 255 255 (color of light and brightness of bulbs)
Flags:
Initially dark — at the beginning of the round the lights are turned off (they turn on only when activated)
6. Ambient_generic (thunder sound)
Name: boom
Path: ambience/thunder_clap.wav (path to thunder sound)
Volume: 10 (volume, maximum)
Flags:
Play Everywhere - sounds all over the map
Start Silent — initially (at the beginning of the round) the sound is silent
Not Toggled - plays 1 time (then it must be activated again)
env_laser.zip [31Kb] - in the archive there is an example map in BSP and RMF formats.
20.7

Rain Effect

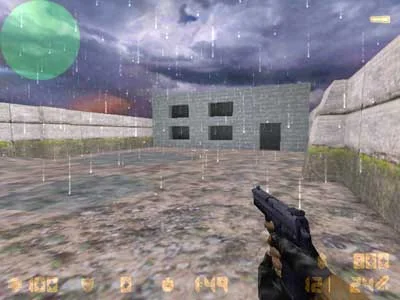
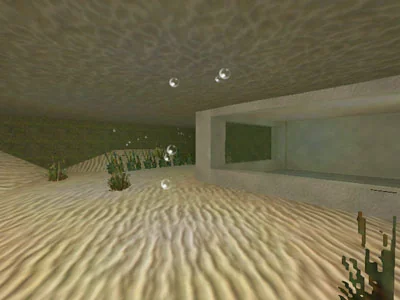
In this article we will talk about making rain. The following entity objects will be useful to us: This is what rain will look like in the game:
This is what rain will look like in the game
What does it take to create a rainy atmosphere?
  1. Dark sky with clouds
  2. The rain itself, which we will depict in sprites
  3. Sound of rain
  4. Puddles on the ground

1. Dark sky with clouds

Let's set a dark stormy sky. Of the standard pictures, it seems to us that the sky by name is most suitable blue. Enter this name into the parameter environment map, which is available in the menu
Map/Map properties....

2. Rain

Rain, as we have already said, will be implemented using sprites. We will insert sprites using objects env_sprite.
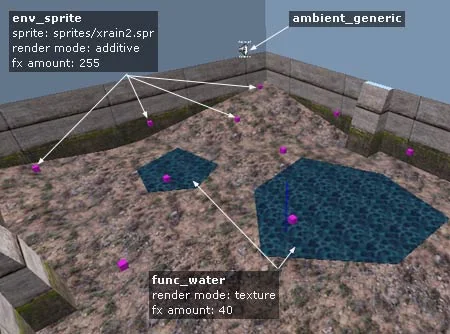
In the figure below you can see that point objects env_sprite located randomly at a certain height above the ground (96-128 units). The distance between objects must be chosen according to the size of the rain sprite. We used a sprite with a size of 256x256 pixels. And the distance between objects was made about 128-140 units, so that the rain seemed stronger and more saturated.
Location of objects on the rain map
All objects env_sprite have the same properties, so it is enough to create just one such object, specify properties for it, and then simply multiply it to the required number of objects.
Object Properties env_sprite:
Env_sprite (rain sprites)
Render Mode: additive (this mode removes the black background from the sprite)
FX Amount: 255
FX Color: 220 220 235 (sprite color in RGB format, i.e. red, green, blue)
Framerate: 20 (sprite frame rate per second)
Sprite Name: sprites/xrain2.spr (path to the rain sprite file)
Scale: 1 (sprite scale)
Flags:
Start on — so that the sprite is played from the very beginning of the round

3. Sound of rain

Sound (object ambient_generic) we placed it in the middle of the map and set a flag for it "Play Everywhere", so that the rain can be heard throughout the map.
It should be noted that the sound must be played endlessly, and for this it must contain a special mark (in English cue point). You can learn how to create such tags from the article Creating Looping Sounds.
Sound properties:
Ambient_generic (rain sound)
Path: ambience/waterfall_med.wav (path to sound)
Volume: 8 (volume)
Flags:
Play Everywhere - plays all over the map

4. Puddles on the ground

We will create puddles from objects func_water. The thickness of such objects will be 1 unit. The shape for puddles can be set using either a tool Clip, or Vertex Manipulation. On our test map, the puddles are polygons of arbitrary shape.
Object Properties func_water:
Func_water (puddles on the ground)
Render Mode: texture (this mode makes the object transparent)
FX Amount: 40 (degree of transparency, closer to 0 - a more transparent object)
rain.zip [440Kb] - in the archive there is an example map in BSP and RMF formats, as well as the necessary sound and sprite.
20.8

Earthquake

In this article we will teach you how to create a real earthquake on your map. We will use the following objects: Of course, the most important object of all listed is env_shake, because it is he who provides the "shake-up" of the card.
We also need the sound of an earthquake, which we will insert naturally through ambient_generic. Shake and sound must be activated simultaneously, well, or almost simultaneously. For this purpose we will use multi_manager, in which we will include the intervals of sound activation and earthquakes. Well, multi_manager itself will be activated by the player via a trigger trigger_multiple.
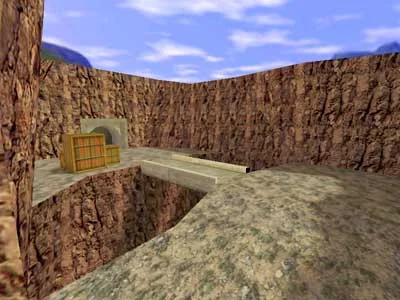
Well, the task is clear. Let's go! We need a map with mountains, for example, like this:
Mountain map

1. Trigger_multiple

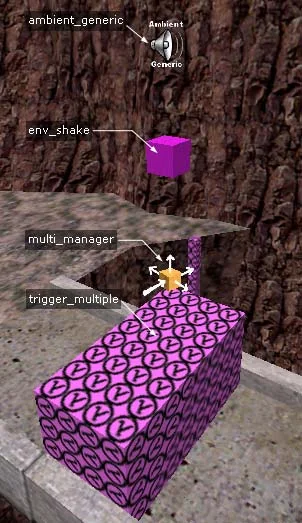
We will make the earthquake start when the player passes through the middle of the bridge. We post it there trigger_multiple (see picture below).
This is how we placed all four objects
1. Trigger_multiple (activates multi_manager)
Target: manager1
Delay before reset: 10 (default)

2. Multi_manager

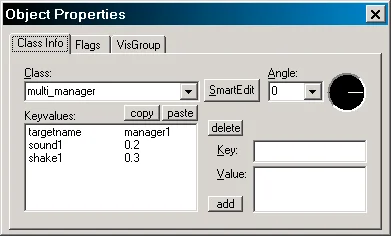
Multi_manager with a given time interval activates two objects: sound (after 0.2 seconds) and earthquake (after 0.3 seconds). This is what the properties of this object look like: t24quake3

3. Env_shake

Env_shake, as the main element, we placed it a little higher than the other objects (just for convenience).
3. Env_shake (object that causes an earthquake)
Name: shake1
Amplitude 0-16: 4 (oscillation amplitude)
Effect radius: 500 (default)
Duration (seconds): 7 (shake duration)
0.1 jerk, 255.0 = rumble: 15 (shock frequency; the higher the value, the more often)
Flags:
GlobalShake — earthquake affects the entire map
Since we set the flag GlobalShake, then the "effect radius" parameter, which determines the radius of the earthquake in units, is not needed. We just leave it as default.
The duration of the earthquake, equal to 7 seconds, is specially selected for the duration of the sound, which is about 8 seconds.

4. Ambient_generic

And finally, the last object is sound.
4. Ambient_generic (earthquake sound)
Name: sound1
Volume: 8 (sound volume; selected experimentally)
Flags:
Play everywhere - play all over the map
Start silent - do not play at the beginning of the round
Not toggled — the sound is played once after each activation
That's the whole device. In the game, the earthquake looks quite convincing, both thanks to the well-chosen frequency and strength of the tremors, and the realistic sound. You can check all this yourself by downloading our example map.
earthquake.zip [412Kb] - in the archive there is an example map in BSP and RMF formats, as well as the required sound file.
20.9

Stripping / Giving Weapons to Players

From this article you will learn how to take away weapons from players, equip them with a certain type, for example, pistols, and how to prohibit purchases at the beginning of the round.
The following entities can be used to control player weapons:

1. Selecting weapons

So, in order to take away weapons from players at the beginning of the round, you need to place a point entity object anywhere on the map player_weaponstrip. Then in its properties in the "Name" parameter you need to enter a special name: game_playerspawn.
In the article Activating Objects on Player Spawn/Death more details are given about the use of special names (one of which, in particular, is game_playerspawn) to activate objects.

2. We issue a certain type of weapon

We have taken away the weapons, now at birth the player will be completely deprived of weapons (even a knife). Moreover, the action of the object player_weaponstrip thanks to the special name, it applies to all players of both teams.
Now, perhaps you want to give a certain type of weapon to all players. For example, you make a map only on knives or pistols and want to give each player a knife and a pistol. To do this, you need to insert another point object game_player_equip. For convenience, we recommend inserting it next to the object player_weaponstrip.
Immediately give this object a special name: game_playerspawn, so that it is activated immediately after the player is born.
Properties game_player_equip very simple. They list all available types of weapons, as well as grenades, armor, mine clearing tongs, and other equipment. All you need to do is set the value "Yes" or "No" next to the selected type of weapon.
For example, to give out knives to players, select "Give Knife" and set the value to "Yes" in the list on the right. If you want to give away Kalash, select "Give Ak47 (762nato Caliber)". Then you need to give the Kalash cartridges. Select the item "Give 7.62mm Nato Ammo" and in the list on the right, indicate how many magazines you need to give (1 Clip; 2 Clips; 3 Clips) - respectively: 1, 2, 3 magazines of cartridges.
Pistols, snipers, shotguns, grenades, flash drives (you can choose 2 of them), etc. are also distributed in the same way.

3. We prohibit the purchase

If you are making a card with a certain type of weapon, then select it (the weapon) with an object player_weaponstrip not enough. It is also necessary to prohibit the purchase of weapons.
This is done using the object info_map_parameters. Insert this object anywhere on your map. Open properties.
In the properties, select "Weapon Buying" and then in the list on the right, select "Neither CT's or T's can buy guns". Now, when the player presses the "B" button, a message will be displayed on the screen that says, "It's okay, but you can't buy weapons on this map."
Naturally, if purchasing is prohibited, then there is no need to create objects func_buyzone on team bases, recall that this brush entity object determines the place where teams are purchased.

4. Lay out weapons on the map

There are maps where weapons are lying on the ground, for example: fy_iceworld, dm_aztec_maso2, dm_aztec_maso3, cs_pf_dust etc. Usually it is laid out at team respawns. Here's how it's done.
Insert an object in the place where the weapon should appear armoury_entity. Place it slightly above ground level. In the properties, select the "Item" item and then in the list on the right, indicate which gun (type of grenade or armor) you want to put. In the "Count" parameter, specify the number of guns.
For example, in the first paragraph you selected "weapon_ak47" and you want there to be 5 Kalash guns. To do this, in "Count" we write the number 5. In the game, the Kalash rifles will lie as if in each other, i.e. Having taken 1 Kalash from the ground, there will be another one in its place. When you take the fifth Kalash, the freebie will end :)
If you are making a map using sniper rifles, you can place 10 objects each armoury_entity near the bases of both teams, set "Item": weapon_awp and "Count": 1. But remember that weapons greatly increase the parameter epoly (abbreviated from entity polygons, you can read more in the section about r_speeds). It is not advisable that epoly exceeded the value 4500-6000 (then the map starts to slow down), so either place your weapons in different parts of the map or reduce their number.
Thus, using these four objects, you can make a card on any type of weapon, you can give it to players at birth, or you can lay it out on the map so that players can pick it up themselves.
20.10

Bomb Underwater

In this article we will tell you about one small trick that will allow you to make an underwater bomb place!
First of all, it is necessary to note the fact that a bomb installed in water does not explode - it clicks until the very end, and then disappears without a trace, of course there is no explosion.
If you test our example map, you will see that this glitch is not there.
The bomb is not only installed...
Underwater bomb
...but also explodes beautifully:
Explosion of a bomb placed under water
We will talk about the explosion a little lower, but for now we will reveal this secret.
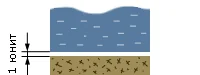
In order for a bomb to explode in water, it is necessary to raise the water slightly above the ground. It is enough to leave a gap of 1 unit between the ground and water. This is shown schematically in the figure below.
t24bombwater3 In this case, the bomb falls through the water and touches the ground, this is enough for it to explode.
Disadvantage of the method

Everything would be fine if not for one "BUT". We all know very well what is dangerous about an exploding bomb - the shock wave. In our case with an underwater bomb, the explosion extends only to water, i.e. if we stand on land (even at a very close distance from the bomb), we will not receive damage! But once we get into the water...
But this is the only negative, which, by the way, can be corrected by installing objects near the water env_explosion, which can be activated when a bomb explodes. But this is a topic for a separate article. Explosions, Mines, and Tripwires.
bomb_under_water.zip [27Kb] - in the archive there is an example map in BSP and RMF formats.
20.11

Sewer / Tunnel

In this article we will introduce you to the technique of creating sewers :) Remember the underground passage on cs_militia? Now we will teach you how to create such a tunnel.
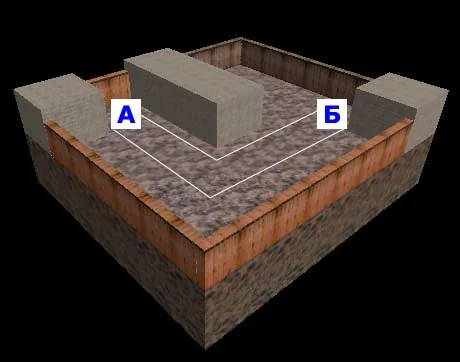
The picture below shows that the sewer will run from point A to B and will have one 90 degree bend.
Sewer plan
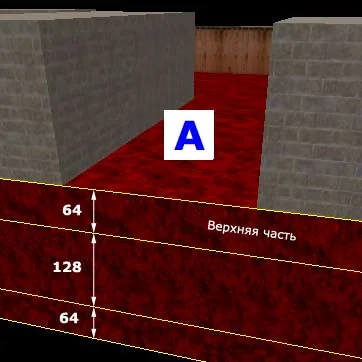
To build a sewer, we need a fairly thick layer of earth under the map. A normal course is considered to be 128 units high and wide, therefore the thickness of the ground should be slightly larger. On our test map, the thickness of the earth's layer is 256 units.
We cut the earth into 3 horizontal layers. Upper – 64 units (it will be above the player's head),
the middle one is 128 units (we will cut an underground tunnel in it) and the bottom one is 64 units (the player will walk along it).
Cut the earth into 3 parts
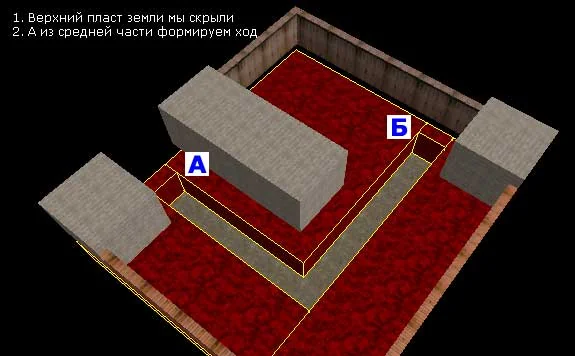
Now let's hide the top layer of earth (so that it doesn't interfere with our passage), leaving the two lower ones.
We divide the middle layer into several brushes to create a passage from point A to point B. The width and height of the passage are 128 units. Naturally, we do not cut the bottom layer; the player will walk on it.
In the middle layer we cut out a passage from point A to point B
The passage is almost ready. All that remains is to make it less square, add light bulbs, make hatches and ladders to climb from the street.
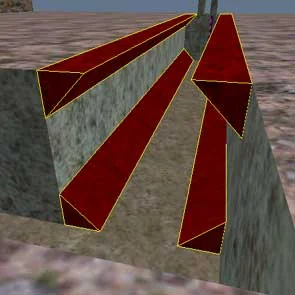
We will round the tunnel using these triangular brushes (see figure below), located at the corners of the passage.
Round the passage at the corners with triangular brushes
You can make more than 4 rounding brushes, but to simplify the article, we made a minimum of four.
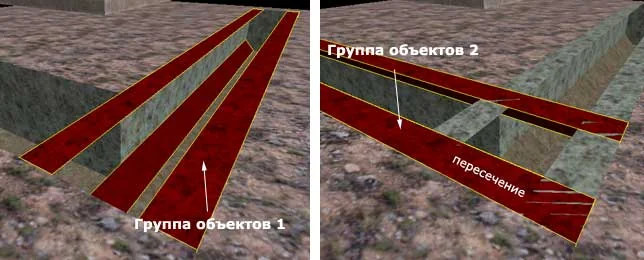
Next, we extend the brushes along the entire length of the passage (see the figure below), and also copy all four brushes and paste them into the second "branch" of the tunnel. In this case, we will get the intersection of two groups of rounding brushes (see figure below).
Intersection of two groups of fillet brushes
To remove unnecessary parts of intersecting brushes, select the first group of objects, place a 2D view on top and use the tool Clip Let's cut a group of objects at an angle of 45° (see figure below).
t24sewer5 We do the same with the second group of brushes. And now both groups intersect perfectly at an angle of 45° and you don't need to adjust anything with the tool to work with vertices!
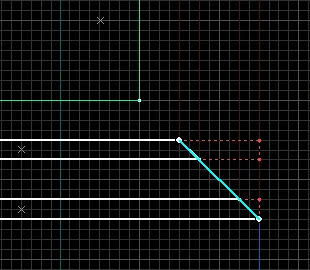
t24sewer6 As a result, both groups in the top view should look like this:
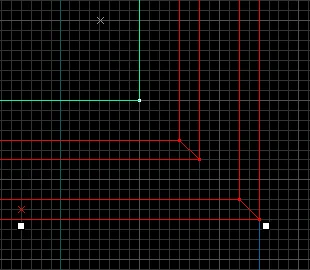
t24sewer7 And this is how the intersection now looks in 3D view:
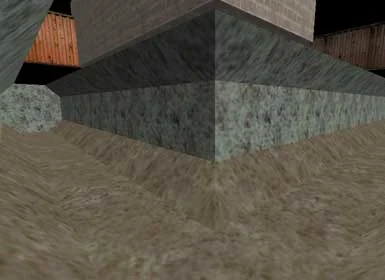
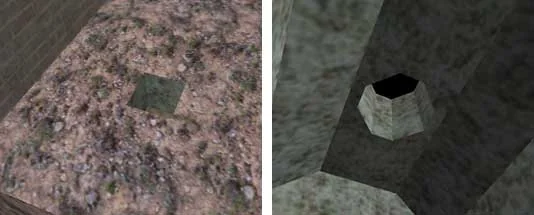
This is what the intersection of two groups of brushes looks like in 3D view
It's time to remember about the upper layer of the earth. Let's turn it on.
Now we need to cut through the hatches so that we can go down into the sewer. The easiest way to do this is with a tool Creating Holes with Carve. To do this, create a brush with a length and width of 48 units (the minimum width should be 33 units so that the player can fit into the hole). The height of the brush must be greater than 64 units (remember, the thickness of the upper layer of the earth is 64 units), so that it protrudes both in the tunnel and on the surface of the earth. Next we apply the function to the brush Carve.
The hatch is ready. You can also round it with four triangular brushes, like we did in the sewer.
We cut through the hatch. Rounding with triangular brushes
We make a ladder at the hatch, you can insert sound (ambient_generic) with falling drops of water (path to sound: ambience/drips.wav) and add light bulbs along the length of the tunnel (light). For the light bulbs, we set the brightness to 140 units, and as a result the tunnel turned out to be quite bright.
Create a ladder near the hatch, add the sound of falling water drops and insert a few light bulbs
Naturally, we do the same with the end of the tunnel: the same hatch, sound and stairs.
All.
sewer.zip [40Kb] - in the archive there is an example map in BSP and RMF formats.
20.12

Catapult (de_rats3 Style)

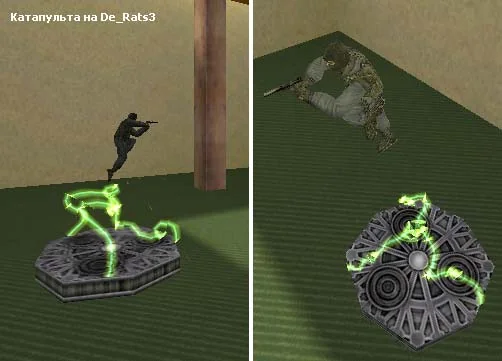
Everyone knows the series of maps DE_RATS and in particular the map DE_RATS3, which has a catapult. In this article we will tell you how it works. To create a catapult you will need the following entities: For those who don't remember what a catapult looks like on DE_RATS3, and what effects are created when jumping from it, let us remind you:
Catapult on De_Rats3
To create a complete copy of such a catapult, you need 23 entity objects! However, we hasten to reassure you right away that the lion's share, namely 18 out of 23 objects, is used to implement effects with rays. If you don't need such effects, just don't create these 18 objects, but limit yourself to 5.
We'll first look at creating a catapult without any effects. And in the second part of the article we will figure out how the effect with rays works.

1. Making a catapult

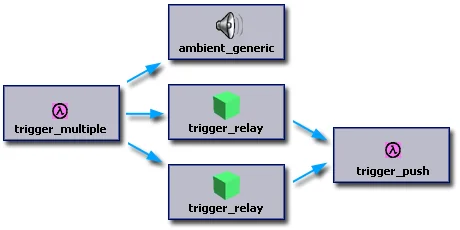
The operation of the catapult is ensured by 5 objects (see diagram below).
  1. The player hits trigger_multiple
  2. Trigger_multiple activates the player's rise sound (ambient_generic), as well as 2 trigger_relay triggers
  3. Triggers trigger_relay turn on and after 1.5 seconds turn off the pusher (trigger_push)
  4. Trigger_push pushes the player up
t24rats30 Now let's see how this is implemented in the editor.
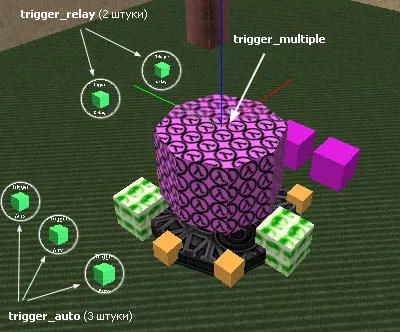
We have a platform painted with a black texture (see picture below). In the picture it is hidden by numerous objects. This is a simple brush representing a pushing area.
Don't pay attention to other objects for now, so as not to get confused.
So, first of all, create a brush over this trigger_multiple (shown by arrow).
Trigger_multiple and 2 trigger_relay
Now inside trigger_multiple (i.e. just above the push brush) we create the sound of the player rising up (ambient_generic). The object in the picture ambient_generic hidden by the trigger, but it is there :) and this will be visible in the penultimate picture of the article.
Next we create two triggers trigger_relay (see picture above, at the top). One of these triggers will turn the pusher on, and the other will turn it off after 1.5 seconds.
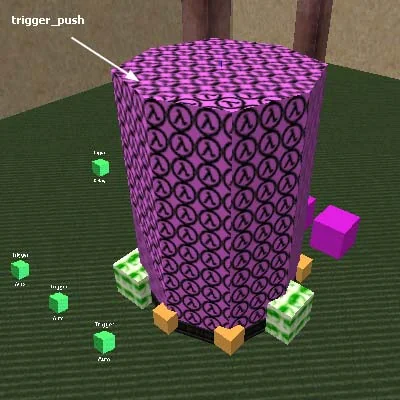
Now look at the picture below. The object is shown there trigger_push, which covers the one we have already created trigger_multiple. Let's repeat, don't pay any attention to the rest of the objects for now.
Trigger_push and there is an object pushing upward. The shape of this trigger follows the shape of the black brush, i.e. is an 8-sided prism.
Trigger_push
That's all that concerns the catapult itself. It will already work, well, of course, after setting all the properties of the entity objects.
Properties of the objects that make up the catapult.
1. Trigger_multiple (activates sound and 2 triggers)
Target: sponge_jump (these are the names of the sound and two trigger_relays)
Delay before trigger: 0 (triggered without delay, i.e. after 0 seconds)
Delay before reset: 2 (next time it will work in 2 seconds)
2. Ambient_generic (jump sound)
Name: sponge_jump
Path: weapons/electro5.wav (path to sound)
Volume: 5 (volume)
Flags:
Medium Radius - average radius of sound propagation
Start Silent — initially (at the beginning of the round) the sound is silent
Not Toggled - plays 1 time (then it must be activated again)
3. Trigger_relay (includes pusher)
Name: sponge_jump
Target: sponge_push (Includes pusher)
Delay before trigger: 0 (turns on the pusher instantly, i.e. after 0 seconds)
Trigger state: On (here it is indicated that the trigger only works on ON)
4. Trigger_relay (turns off the pusher after 1.5 seconds)
Name: sponge_jump
Target: sponge_push (Turns off the pusher after 1.5 seconds)
Delay before trigger: 1.5 (time before the pusher turns off)
Trigger state: Off (this indicates that the trigger only works on OFF)
5. Trigger_push (pusher)
Name: sponge_push
Angle: Up (player pushing direction, up)
Delay before trigger: 0
Speed of push: 3000 (player pushing speed)
Flags:
Start Off — initially (at the beginning of the round) the pusher is turned off

2. Creating effects from rays

Now let's look at the complex part of the catapult - the effect of "curved" laser beams (see the very first picture).
The work flow looks like this:
  1. At the beginning of the game, 3 triggers (trigger_auto) set in motion 3 invisible trains (func_train)
  2. These 3 trains (func_train) begin to travel in a circle of 8 path_corner objects
  3. When the player starts jumping, all three beam sources are activated (env_beam)
  4. Laser beams begin to shoot from a central point (info_target) at trains traveling in a circle
The cleverness of this effect is that it uses 3 objects env_beam, which emit laser beams. In order to understand the rays, you need to have a good understanding of the work of this object.
Operating principle env_beam is as follows: the object itself is created env_beam, then the starting point for the ray is created (some entity object) and then the end point where the ray will hit (the second entity object).
The whole joke is that the first (starting) point is fixed, but the second (final) point is movable! The movement occurs in a circle, i.e. rays are emitted from a stationary central point and strike points moving in a circle. This can be clearly seen in the very first picture.
Now let's see how this is implemented in the editor.
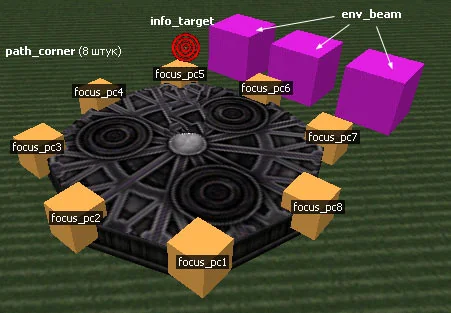
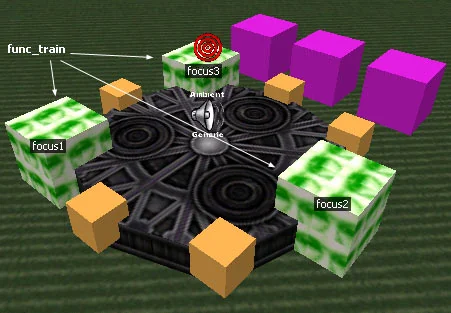
In the picture below, pay attention to the 3 purple cubes (at the top) - these are 3 env_beam (laser beam emitters). The rays will not be emitted from these objects, but from the starting points to the ending points!
Creating the effect of laser beams when a player jumps from a catapult (Fig. 1)
Yellow 8 objects are path_corner, i.e. points along which uncontrolled trains move func_train.
In the picture below, 3 trains have already been created (func_train), green. These 3 trains take turns moving along all 8 yellow points of the trajectory.
Creating the effect of laser beams when a player jumps from a catapult (Fig. 2)
Remember that for everyone func_train necessary ORIGIN brush, because it is a rotating object. We simplified the "trains" as much as possible and made them from ORIGIN brushes. Those. ORIGIN brushes turned into func_train.
Now comes the fun part. These 3 trains (invisible and intangible in the game) will be the end points that the laser beams will hit! This is called using trains for other purposes :)
IMPORTANT! In the center, slightly above the black brush, create a starting point for all the rays. This will be a point object info_target (red target in the picture above).
Lastly, trains must be automatically set in motion at the start of the round. Let's do this using 3 triggers trigger_auto. Let's go back to the third picture of the article and see where we placed them.
Trigger_multiple and 2 trigger_relay
Triggers trigger_auto, let us remind you, automatically activate the object at the beginning of the game, and this will be useful to us for activating trains.
Properties of objects that create the effect of laser beams.
6.1 Trigger_auto (starts the 1st train)
Target: focus1 (first train func_train is activated)
Delay before trigger: 0 (triggered without delay, i.e. after 0 seconds)
Delay before reset: 2 (next time it will work in 2 seconds)
Trigger state: On (here it is indicated that the trigger only works on ON)
6.2 Trigger_auto (starts the 2nd train)
Target: focus2 (second train func_train is activated)
Delay before trigger: 0
Delay before reset: 2
Trigger state: On
6.3 Trigger_auto (starts the 3rd train)
Target: focus3 (third train func_train is activated)
Delay before trigger: 0
Delay before reset: 2
Trigger state: On
7.1 Func_train (1st train)
Name: focus1
Render mode: Texture (makes the train invisible)
FX Amount: 0 (makes the train invisible)
First stop target: focus_pc1 (name of the starting point of the trajectory for the first train)
Speed: 128 (train speed)
Flags:
Not Solid - intangible in the game
Other 2 objects func_train They differ only in a few parameters. We will consider them.
7.2 Func_train (2nd train)
Name: focus2
First stop target: focus_pc3 (name of the starting point of the trajectory for the second train)
7.3 Func_train (3rd train)
Name: focus3
First stop target: focus_pc6 (name of the starting point of the trajectory for the third train)
8.1-8.8 Path_corner (8 trajectory points for all 3 trains)
Name: focus_pc1
Next stop target: focus_pc2 (name of the next point in the train path)
Name: focus_pc2
Next stop target: focus_pc3 (name of the next point in the train path)
...........
...........
...........
Name: focus_pc8
Next stop target: focus_pc1 (name of the next point in the train path)
9. Info_target (starting point from where laser beams hit)
Name: arc_centre
10.1 Env_beam (object emitting 1st laser beam)
Name: sponge_push
Start entity: arc_centre (name of the starting point from which all 3 rays are emitted)
Ending entity: focus1 (name of the endpoint where the 1st ray will hit)
Brightness: 192 (beam brightness)
Beam color: 128 255 255 (beam color in RGB format - red, green, blue)
Radius: 256 (radius)
Life: 1 (time during which the beam is visible; 0 - so that the beam does not disappear)
Width of beam: 64 (beam width from 0 to 255)
Ammount of noise: 255 (degree of beam curvature, values ​​from 0 to 255)
Sprite name: sprites/zbeam1.spr (path to the sprite that will be the beam)
Texture scroll rate: 35 (sprite texture movement speed)
Frames per 10 seconds: 0 (beam animation speed)
Strike again time: 1 (frequency of beam appearance, works if Life > 0)
Damage: 0 (damage when a player is hit by the beam, 0 - no damage)
Flags:
Toggle - the beam can be turned on and off
Start Sparks — sparks will fly from the place where the beam appears
End Sparks — sparks will fly from the place where the beam ends
Shade Start — the beginning of the beam will be shaded
Shade End — the end of the beam will be shaded
Other 2 objects env_beam they differ only in one parameter (endpoint name).
10.2 Env_beam (object emitting 2nd laser beam)
Ending entity: focus2 (name of the endpoint where the 2nd ray will hit)
10.3 Env_beam (object emitting 3rd laser beam)
Ending entity: focus3 (name of the endpoint where the 3rd ray will hit)
That's all for the simple device of a catapult :) If you have reached the end of this article and at the same time understood everything - our congratulations! You are a real professional mapper!
trigger_push.zip [32Kb] - in the archive there is an example map in BSP and RMF formats.
20.13

Conveyor Belt

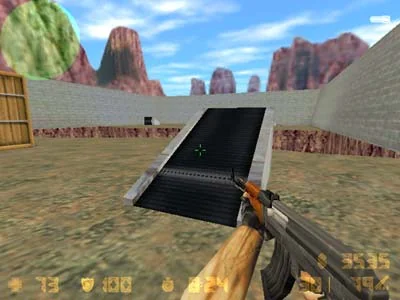
In this article we will tell you about creating pipelines. We will use the following entity objects: We will create not an ordinary conveyor, like in a school cafeteria for collecting dishes :), but a springboard conveyor. Similar jumps are on the map Ka_100x100. And this is what they look like (screenshot from the test card):
This is what the conveyor belt will look like in the game
The conveyor itself is very simple to create. We build an inclined brush similar to the one shown in the figure above. We paint it with a texture whose name contains the word SCROLL. This is necessary to create the effect of the conveyor belt scrolling. Turning a brush into an object func_conveyor.
Let's make our springboard a little more interesting - add a sound that will be heard when the player jumps.
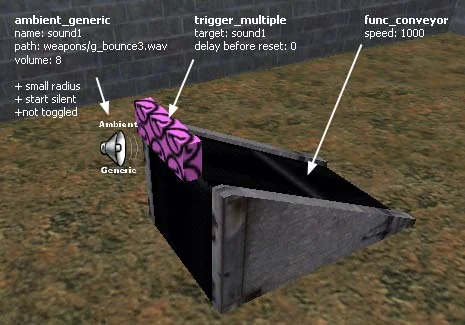
The picture below shows how this is implemented.
Conveyor device
We create a trigger at the edge of the springboard trigger_multiplewhich will activate the jump sound ambient_generic, located right there.
Thus, it turns out that the player runs onto the springboard, and it pushes him. The player walks through a trigger that activates a sound.
Here are the properties we set for these objects:
1. Func_conveyor (springboard conveyor)
Angle: 0° (the angle that determines the direction in which the player is pushed by the conveyor)
Speed: 1000 (pushing speed, high)
The angle is set in the top view. For example, if the player must fly from above to the left, then we set the angle to 180°.
2. Trigger_multiple (activates the jump sound)
Target: sound1 (sound name)
Delay before reset: 0 (time after which the trigger will be able to activate the sound again)
3. Ambient_generic (jump sound)
Name: sound1
Path: weapons/g_bounce3.wav (path to sound)
Volume: 8 (volume)
Flags:
Small Radius — small radius of sound propagation
Start Silent — initially (at the beginning of the round) the sound is silent
Not Toggled - plays 1 time (then it must be activated again)
On our test map we created 4 trampolines with different directions for the player to push.
func_conveyor.zip [65Kb] - in the archive there is an example map in BSP and RMF formats.
20.14

Chicken on cs_italy

In this article we will tell you how to make chicken on a card CS_ITALY.
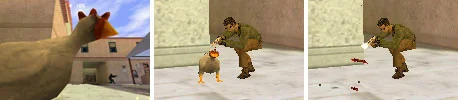
To create it, the following entity objects are required: Let's look at everyone's favorite chicken on CS_ITALY:
Chicken on Cs_Italy
Note: we will talk about the "structure" of the chicken as it is, i.e. just like it is on the map CS_ITALY. This method has several disadvantages, which we will discuss at the end of the article.

1. Creating a chicken (as on cs_italy)

Chicken on cs_italy is a model (file *.mdl). Models are inserted onto the map using an object cycler. Previously, when this object did not exist, models were inserted through the object cycler_sprite, which is actually intended for inserting sprites. We decided to make the chicken "as is", so we will use cycler_sprite.
The problem with a chicken is killing it :) When a chicken is sent to another world, it must disappear, make a dying sound and release a couple of feathers - the model cannot do all of this. The model just stands on the map, it cannot be shot, it cannot release feathers, it cannot make sounds.
This is how killing a chicken works
The player doesn't actually kill the chicken (hello GreenPeace :). He shoots at an invisible breakable object func_breakable. This object is located in the same place as the chicken.
From the destruction of the invisible func_breakable 3 entity objects are activated at once, because they all have the same name.
  1. Activated env_render, which makes the model chicken invisible
  2. Activated env_shooterwho throws out feathers (also models)
  3. Activated ambient_generic (i.e. the dying cry of a chicken is heard)
Rebirth of the chicken
When a new round starts, the chicken will not become visible again! It must be made visible using another object env_render. On CS_ITALY this second one env_render activated by a trigger located on the control base. When born at the beginning of the round, the counters run through the trigger, and the chicken "comes to life" (becomes visible) again.
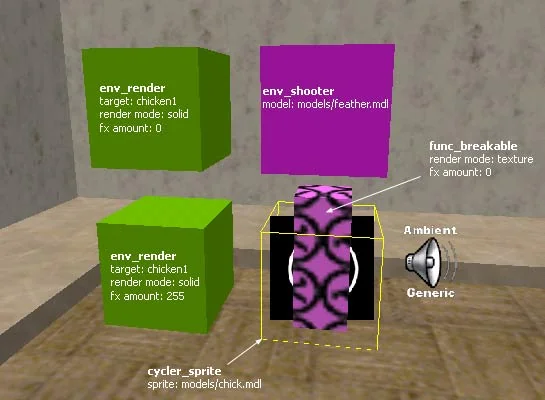
Location of objects
The figure below shows the location of the objects.
Location of objects on the Cs_Italy map
The black cube highlighted with a yellow frame is a chicken. Inside the chicken there is a breakable object that is invisible in the game (CS_ITALY).
On top of the chicken is env_shooter. This object throws out chicken feathers. There is a sound at the bottom right (CS_ITALY), which is heard when killing a chicken.
There are 2 objects to the left of the chicken env_render. One of them makes the chicken invisible, the other makes it visible.
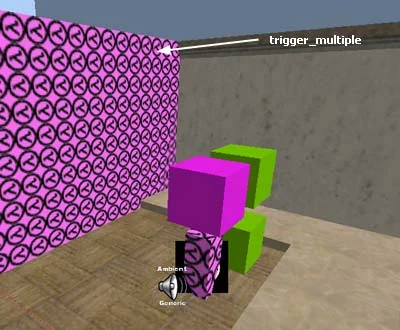
On our test card the same as on CS_ITALY, there is one more object - this trigger_multiple. This trigger, when activated by players, launches the second env_render, which makes the chicken visible.
Trigger_multiple activates env_render which makes the chicken visible
Properties of entity objects:
1. Cycler_sprite (used to insert a chicken model)
Name: chicken1 (chicken name)
Angle: an angle that can be used to turn the chicken in the desired direction
Sprite: models/chick.mdl (path to the file with the chicken model)
Frames per second: 1 (animation playback speed, i.e. 1 movement per second)
Render mode: Solid
FX Amount: 255 (with a value of 0, the model will be completely invisible)
2. Func_breakable (invisible breakable object located in the chicken's place)
Target on break: chicken1kill (names of three objects activated when this func_breakable is destroyed)
Strenght: 1 (strength)
Material type: flesh (type of material, pieces of meat)
Gibs Direction: Relative to attack (pieces fly in the direction of attack)
Render mode: Texture
FX Amount: 0 (makes this object invisible)
3.1 Env_render (makes the chicken invisible after killing it)
Name: chicken1kill
Target: chicken1
Render mode: Solid
FX Amount: 0 (makes the chicken invisible)
3.2 Env_render (makes the chicken visible at the start of the round)
Name: chicken1respawn
Target: chicken1
Render mode: Solid
FX Amount: 255 (makes the chicken visible)
4. Env_shooter (throws feathers from a "killed" chicken)
Name: chicken1kill
Number of gibs: 15 (number of ejected models, i.e. feathers)
Gib velocity: 100 (feather falling speed)
Cource variance: 5 (the parameter determines how much flying feathers will deviate from a straight path)
Gib life: 4 (lifetime of feathers, then they disappear)
Model: models/feather.mdl (path to the file with the feather model)
Flags:
Repeatable - allows you to activate env_shooter multiple times
5. Ambient_generic (sound when killing a chicken)
Name: chicken1kill
Path: misc/killChicken.wav (path to sound)
Volume: 10 (volume, maximum)
Flags:
Medium Radius - average radius of sound propagation
Not Toggled - plays 1 time (then it must be activated again)
6. Trigger_multiple (activates env_render, which makes the chicken visible)
Target: chicken1respawn
Delay before reset: 180 (next time it will work only after 180 seconds)

2. Disadvantages of the method

Under some circumstances, the chicken may not appear at the start of the round, or it may become unkillable!
It's all about the trigger trigger_multiple, which has a reset time of 180 seconds.
The author of the map calculated that the average round lasts 3 minutes or 180 seconds.
But everyone knows that a round can be 30 seconds, or it can last more than 3 minutes.
If you kill a chicken and the round ends before 3 minutes, then there will be no chicken in the next round!
  1. The player kills a chicken
  2. The round ends faster than 3 minutes, therefore, the trigger does not have time to reset (180 seconds have not expired)
  3. In the next round, players run through the trigger, but it doesn't work yet, hence the chicken remains invisible!
If you kill a chicken, then 3 minutes pass and you run through the counter base trigger again, the chicken will become unkillable!
  1. The player kills a chicken
  2. 3 minutes pass, the trigger can activate the chicken appearance again
  3. The player runs through the trigger, the chicken becomes visible
  4. But since the func_breakable object has already been broken, the chicken becomes unkillable until the end of the round!
italy_chicken.zip [17Kb] - in the archive there is an example map in BSP and RMF formats.
20.15

Flying Bird (de_survivor Style)

In this article we will tell you how to make a flying bird on a map DE_SURVIVOR.
For those who don't remember this bird, take a look:
Flying bird on De_Survivor
In order to make such a bird, we need a texture with its image. This will be a texture with a mask, like this:
t24survivor5 And now about how the bird works. This animal will be our object func_tracktrain, which will constantly move around objects path_track. These path_track, as is known, determine the trajectory of movement for func_tracktrain.
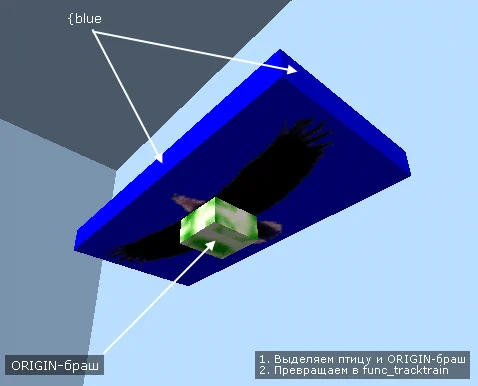
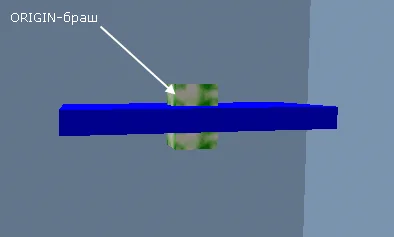
1. Making a bird

Let's start with making the bird. Let's create a small brush, in our case it will be a brush with dimensions of 96x48x8 units.
Create a small brush and paint its lower side with the bird texture
We'll paint the bottom side of the brush with a bird texture. All other sides will be painted with texture. {BLUE. We will do this so that they are transparent in the game.
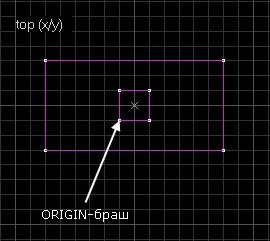
Object func_tracktrain, which will be a bird, must contain ORIGIN brush. We will place the ORIGIN brush in the center of the bird.
t24survivor3 The top view clearly shows how the ORIGIN brush is placed:
t24survivor4 Next, select the bird along with the ORIGIN brush and turn it into an object func_tracktrain.
Let's set the properties and flags for this object.
Func_tracktrain (bird)
Render Mode: Solid (display mode in which the blue parts of the texture will be transparent)
FX Amount: 255
First stop target: 1 (name of the first route point, i.e. the first path_track object)
Distance between the wheels: 100 (affects the smoothness of the bird's turn; more -> smoother)
Initial speed: 240 (initial flight speed of the bird)
Speed: 240 (maximum bird speed)
Flags:
No User Control - so that the player cannot control the bird
Passable — so that the bird is intangible (players can "pass" through it)
All other properties can be left as default.
One last thing about the bird. Make sure the bird's head is facing left in the top view. Those. You simply put a 2D top view in the editor and turn the bird with its head to the left. This is necessary so that the game knows which side the object is facing func_tracktrain must move forward. Otherwise, the bird may fly forward with its tail :)

2. Determine the bird's trajectory

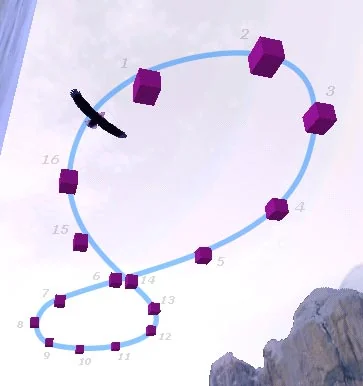
Now we will create 16 objects path_track. We will arrange them in a figure eight, approximately as it is done on the map DE_SURVIVOR.
Using path_track objects we determine the trajectory of the bird's movement
The more path_track You create, the smoother the bird's flight path will be. Although there is a lot that can be done path_track, but the trajectory will still be angular :) It all depends on your eye.
Properties of all objects path_track similar. The only difference is in the name of the objects and in the name of the next point on the trajectory.
Path_track (16 points making up the bird's flight path)
Name: 1
Next stop target: 2 (name of the next path_track object in the trajectory)
Name: 2
Next stop target: 3
...........
...........
...........
Name: 16
Next stop target: 1
From the above properties it is clear that each object DE_SURVIVOR in the parameter Next stop target the name of the next one is written DE_SURVIVOR in the trajectory.
For the very last - sixteenth - object, this parameter contains the name of the initial - first - point of the trajectory. Thus, the bird will fly endlessly in a figure eight pattern.
The bird can be placed anywhere on the map. But for convenience, place it near some object DE_SURVIVOR. And don't forget to point the bird's head to the left in the top view.
To make the bird scream something else, you can make an object DE_SURVIVOR, in which indicate a sound file with a bird cry. It can be activated by an object DE_SURVIVOR.
If something is not clear to you, you can download our example map.
func_tracktrain.zip [28Kb] - in the archive there is an example map in BSP and RMF formats, as well as the necessary texture file.
20.16

Pendulum

In this article we will look at creating a pendulum. We will need two objects (sound and the pendulum itself): Let's think about how often clocks with a pendulum are found on CS maps and are they even needed? The answer is quite obvious. But we know that objects in Half-Life are not specific objects. For example, HL does not have a washing machine (func_clotheswasher :), however we can depict it using other objects. So in our case we will use func_pendulum not for its intended purpose.
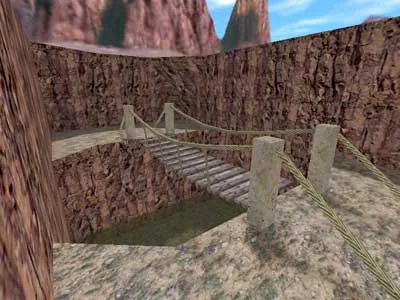
We will create a suspension bridge that swings from side to side. Agree that in some way such a bridge is also a pendulum. This is what it will look like:
This is what the bridge will look like in the game
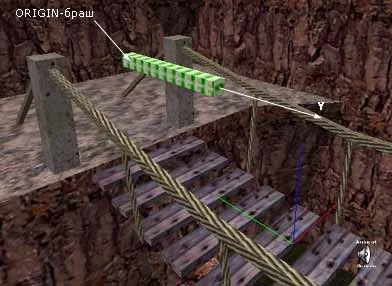
We will not dwell in detail on the creation of the bridge itself, because... Everyone has the right to independently decide which bridge will look better on their map. We think it's more important to talk about the location ORIGIN brush, which you must have func_pendulum, because it is a rotating object.
The picture below shows how it is located ORIGIN brush in relation to the bridge. Form ORIGIN brush it doesn't matter, the main thing is the location of its center. For clarity, we have extended ORIGIN brush along the Y axis (rotation axis).
This is how we placed the ORIGIN brush
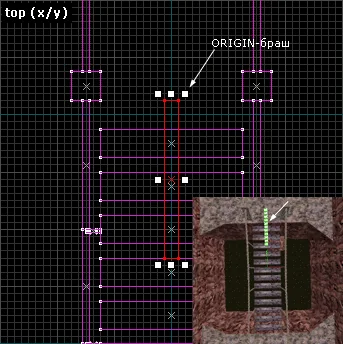
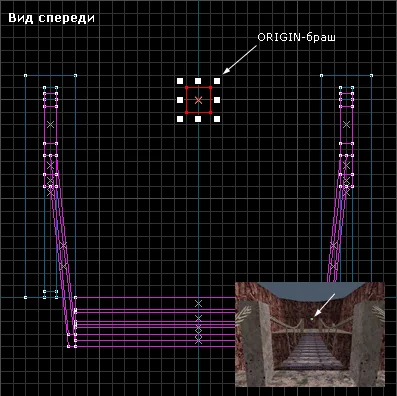
In the next two pictures you can see more clearly how the ORIGIN brush in top and front views. For greater clarity, at the bottom of each picture we have placed a 3-dimensional view (ORIGIN brush marked with a white arrow).

t24pendulum2 t24pendulum3 So, select all the brushes that make up the bridge (these are both boards and ropes) and the ORIGIN brush, and turn them into func_pendulum . Now everything that is selected (see the figure below) will rotate (swing) around the ORIGIN brush.
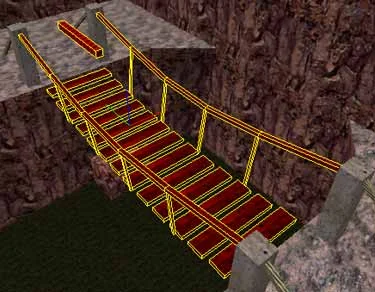
Select all the brushes that make up the bridge (boards, ropes and ORIGIN brush)
Now you need to set the properties and flags for func_pendulum.
Func_pendulum (swinging bridge)
Speed: 3 (bridge swing speed; very slow)
Distance (deg): 2 (axle sway angle)
Damping (0-1000): 0 (deceleration when swinging to a stop)
Damage inflicted when blocked: 0 (damage to player; disabled by default)
Flags:
Start ON - swing at the beginning of the round
Y Axis — rotation along the Y axis

Defining the axis of rotation

The bridge swings along one of the horizontal axes (X or Y), so the flags must be marked or X Axis, or Y Axis.
The axis is determined in the top view (see fig.3). In the top view, the axis along which the bridge swings is vertical, which means it is the Y axis. Therefore, in the flags we mark Y Axis.

Insert sound

To make it more realistic, insert sound near the middle of the bridge ambient_generic. The sound of the bridge swinging (the creaking of tensioned ropes) will be played constantly, as if repeating the movements of the bridge from left to right and back.
Since the sound will repeat endlessly, it must contain a cue point (cue point), which tells the Half-Life engine where to start repeating. You can read more about creating endlessly playing sounds Creating Looping Sounds.
Properties ambient_generic we won't give them, because you know them very well :) This object has been used several times in our other lessons.
func_pendulum.zip [74Kb] - in the archive there is an example map in BSP and RMF formats, as well as the required sound file.
20.17

Frag Scoreboard

In this article we will talk about creating a scoreboard with frag counting. You could see such a board on the map Ka_100x100. Each time a player is killed, the counter increases by one. The counter has 3 digits: units, tens, hundreds, i.e. The maximum number of frags is 999, then resets to zero.
We will be making heavy use of the following entity objects: Get ready to create 94 objects and displaying their properties :) There's nothing wrong with it, the whole system is built as if from repeating links. Each link consists of 3-4 objects whose properties are very similar.
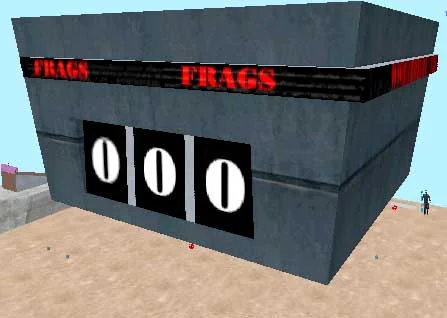
So, let's see what the scoreboard will look like:
This is what the frag counting board will look like in the game
The zeroes and other numbers that will appear with each frag are not just pictures, they are objects func_button with numbers printed on them. When a player is killed, the button with the number "0" will rise up, and the button with the number "1" will go down from above. At the next frag, the button with the number "1" will rise up, and the button with the number "2" will go down on top, etc.
The average number changes only with every tenth frag. The left digit (hundreds place) changes only with every hundredth frag.
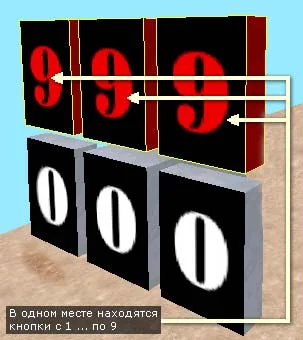
Initially, the button with the number "0" must be placed so that it is visible on the display. The remaining buttons with numbers from 1 to 9 must be placed above the 0 button so that they are hidden in the "scoreboard design". In total you need to create 30 buttons (10 each for the units, tens and hundreds places). Of these 30 buttons, only 3 will be immediately visible - these are the initial zeros, the remaining 27 will be hidden in the display.
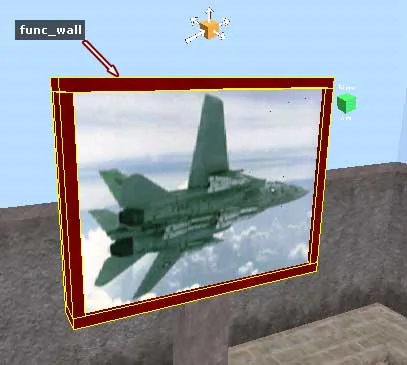
By the way, we recommend turning the design of the scoreboard (i.e. everything that surrounds the buttons) into func_wall, so that during compilation, light can penetrate through the structure (as you know, entity objects transmit light) and illuminate the textures of the numbers (otherwise the textures will turn out dark).
Below are buttons 0, at the top are buttons 1 to 9 (located in the same place)

About frag counting

Now let's talk about how frags will be counted.
We have a wonderful entity object game_counter, which counts its activations and upon reaching a certain value activates another object.
We will create 3 such objects:
  • The first one will count individual frags (it will switch unit buttons)
  • The second one will count up to 10 frags (it will switch the tens buttons)
  • The third one will count up to 100 frags (it will toggle the hundreds buttons)
We need all 3 counters to increase their value by 1 with each frag. To do this, we will use the object multi_manager, in which we will record the activation of all 3 counters. The name for multi_manager should be set as game_playerkill. This is one of five special names that allows an object to be activated when the player is killed. Thus, now with each frag we will automatically activate multi_manager, which in turn activates 3 counters.
Multi_manager (this object is activated on every frag)
Name: game_playerkill (the name should be exactly like that!)
1counter — 0 (activation of the units counter named 1counter after 0 seconds)
10counter — 0 (activation of the tens counter named 10counter after 0 seconds)
100counter — 0 (activation of the hundreds counter named 100counter after 0 seconds)
Counters game_counter with names: 1counter, 10counter, 100counter activate buttons with numbers. For example, someone scored 1 frag. multi_manager is triggered. Immediately, all three counters increase their value by 1. The very first counter counts individual frags, which means it must switch unit buttons each time it is activated.
We need to make sure that by activating the first button, the next time the counter activates the second button, then the third, etc., that is, it is necessary that the "Target" parameter of the counter changes in a circle from 0 to 9 of the button. This can be done using an object trigger_changetarget.
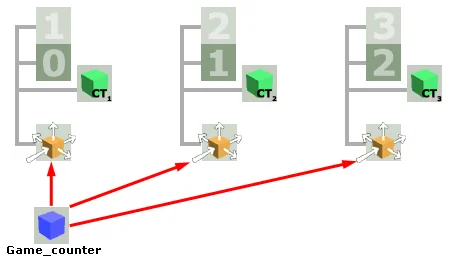
Below is a diagram of the operation of one of the counters.
t24frag o matic1 Let's assume that someone scored a frag. In this case, the following chain of actions arises:
  1. The game_counter counter increases its value by 1
  2. Then it activates the first multi_manager (left red arrow in the diagram)
  3. Multi_manager raises the "0" button
  4. Multi_manager lowers button "1" to where button "0" just was
  5. Multi_manager launches the first trigger_changetarget object (in the CT1 diagram)
  6. Trigger_changetarget redirects the counter from the first multi_manager to the second
Further actions develop along the second red arrow in the diagram (all actions are similar).
  1. The game_counter counter increases its value by 1
  2. Activates the second multi_manager (second red arrow)
  3. Multi_manager raises button "1"
  4. Multi_manager lowers button "2" to where button "1" just was
  5. Multi_manager launches the second trigger_changetarget object (in the CT2 diagram)
  6. Trigger_changetarget redirects the counter from the second multi_manager to the third
The same thing happens when changing button "2" to button "3", etc. to the "9" button. Thus, to rank units, it is necessary to create 10 similar links from a multi_manager, two buttons and a trigger_changetarget (total: 30 objects).
For the tens section, everything is the same (you need to create 30 more objects, counting the tens buttons), the only difference is in the properties of the counter - it activates the buttons every 10 frags, and not every frag. For hundreds - another 30 objects. And the hundreds counter activates buttons every hundred frags, i.e. quite rare.
We recommend placing units, tens and hundreds counters next to the corresponding multi_managers and other objects (to avoid confusion). You can see how this is done on our test card.

Unit Counter Object Properties

Below we present the properties of the very first link of objects (in the diagram, the left red arrow leads to this link).
Game_counter (units counter)
Name: 1counter (unit counter name)
Target: m0 (here you need to write the name of the very first multi_manager object, see the diagram above)
Initial Value: 0 (initial counter value is 0)
Limit Value: 1 (the final value, upon reaching which the counter will begin to activate the buttons; since this is a unit counter, it is necessary to set the value to 1)
Flags:
Reset on fire: This flag must be checked so that the counter is reset to 0 (zeroed) when the "Limit Value" is reached
Multi_manager (this object lowers/raises buttons, activates other objects)
Name: m0 (name of this object)
btn0 — 0 (raises the "0" button)
btn1 — 0 (lowers the "1" button)
ct0 - 0 (runs the trigger_changetarget object)
Func_button (button "0", units digit)
Name: btn0 (name of the "0" button from the ones place)
Angle: Up (direction of movement up)
Speed: 200 (travel speed)
Lip: -8 (this parameter controls the distance the button moves; a negative value increases the distance, a positive value decreases it)
Delay before reset: 0 (time after which the button can be activated again)
Flags:
Toggle: this flag leaves the button pressed until the next time it is activated
Func_button (button "1", units digit)
Name: btn1 (button name "1" from the ones place)
Angle: Down (the direction of movement is downward, since the button is initially located above the scoreboard)
Speed: 200 (travel speed)
Lip: -8 (this parameter controls the distance the button moves; a negative value increases the distance, a positive value decreases it)
Delay before reset: 0 (time after which the button can be activated again)
Flags:
Toggle: this flag leaves the button pressed until the next time it is activated
Trigger_changetarget (changes the "Target" parameter of the units counter)
Name: ct0 (name of this object)
Target: 1counter (the name of the units counter is indicated here)
New Target: m1 (means that next time the counter will activate an object named m1, i.e. the next multi_manager from the second link)
This is the first link of objects that change the number 0 to number 1. As you understand, it is necessary to make 9 more such links.

Object Properties for the Tens Counter

Below we present the properties of the first link of objects for the tens counter.
Game_counter (tens counter)
Name: 10counter (tens counter name)
Target: m00 (here you need to write the name of the very first multi_manager object in the tens chain)
Initial Value: 0 (initial counter value is 0)
Limit Value: 10 (the final value, upon reaching which the counter will begin to activate the buttons; since this is a tens counter, you must set the value to 10)
Flags:
Reset on fire: This flag must be checked so that the counter is reset to 0 (zeroed) when the "Limit Value" is reached
Multi_manager (this object lowers/raises buttons, activates other objects)
Name: m00 (name of this object)
btn00 — 0 (raises the "0" button in the tens place)
btn11 — 0 (lowers the "1" button in the tens place)
ct00 - 0 (runs the trigger_changetarget object)
Func_button (button "0", tens place)
Name: btn00 (name of the "0" button from the tens place)
Angle: Up (direction of movement up)
Speed: 200 (travel speed)
Lip: -8 (this parameter controls the distance the button moves; a negative value increases the distance, a positive value decreases it)
Delay before reset: 0 (time after which the button can be activated again)
Flags:
Toggle: this flag leaves the button pressed until the next time it is activated
Func_button (button "1", tens place)
Name: btn11 (button name "1" from the tens place)
Angle: Down (the direction of movement is downward, since the button is initially located above the scoreboard)
Speed: 200 (travel speed)
Lip: -8 (this parameter controls the distance the button moves; a negative value increases the distance, a positive value decreases it)
Delay before reset: 0 (time after which the button can be activated again)
Flags:
Toggle: this flag leaves the button pressed until the next time it is activated
Trigger_changetarget (changes the "Target" parameter of the tens counter)
Name: ct00 (name of this object)
Target: 10counter (the name of the tens counter is indicated here)
New Target: m11 (means that next time the counter will activate an object named m11, i.e. the next multi_manager from the second link)
This is the first link of objects that change the number 0 to the number 1 in the tens place. Next you need to create 9 more such links.

Object Properties for Hundreds Counter

Below we present the properties of the first link of objects for the hundreds counter.
Game_counter (hundreds counter)
Name: 100counter (hundreds counter name)
Target: m000 (here you need to write the name of the very first multi_manager object in the hundreds chain)
Initial Value: 0 (initial counter value is 0)
Limit Value: 100 (the final value, upon reaching which the counter will begin to activate the buttons; since this is a hundreds counter, you must set the value to 100)
Flags:
Reset on fire: This flag must be checked so that the counter is reset to 0 (zeroed) when the "Limit Value" is reached
Multi_manager (this object lowers/raises buttons, activates other objects)
Name: m000 (name of this object)
btn000 — 0 (raises the "0" button in the hundreds place)
btn111 — 0 (omit the "1" button in the hundreds place)
ct000 - 0 (runs the trigger_changetarget object)
Func_button (button "0", hundreds place)
Name: btn000 (button name "0" from the hundreds place)
Angle: Up (direction of movement up)
Speed: 200 (travel speed)
Lip: -8 (this parameter controls the distance the button moves; a negative value increases the distance, a positive value decreases it)
Delay before reset: 0 (time after which the button can be activated again)
Flags:
Toggle: this flag leaves the button pressed until the next time it is activated
Func_button (button "1", hundreds place)
Name: btn111 (button name "1" from the hundreds place)
Angle: Down (the direction of movement is downward, since the button is initially located above the scoreboard)
Speed: 200 (travel speed)
Lip: -8 (this parameter controls the distance the button moves; a negative value increases the distance, a positive value decreases it)
Delay before reset: 0 (time after which the button can be activated again)
Flags:
Toggle: this flag leaves the button pressed until the next time it is activated
Trigger_changetarget (changes the "Target" parameter of the hundreds counter)
Name: ct000 (name of this object)
Target: 100counter (the name of the hundreds counter is indicated here)
New Target: m111 (means that the next time the counter will activate an object named m111, i.e. the next multi_manager from the second link)
This is the first link of objects that change the digit 0 to the digit 1 in the hundreds place. Next you need to create 9 more such links.
That's all for the simple frag counter device :) It seems that few mappers will read this article to the end, but believe me, it's very difficult to come up with something like this, and even to describe it clearly. In any case, you can download our example map and copy the counter to your card. Use it for your health!
frag-o-matic.zip [93Kb] - in the archive there is an example map in BSP and RMF formats.
20.18

Bubbles

In this article we will tell you how air bubbles are created that rise from the bottom to the surface of the water.
An entity object is used to create bubbles env_bubbles. To create such an object, you need to select a texture AAATrigger, build a brush of arbitrary size and then turn it into env_bubbles.
Look at the picture below, in it we see 2 objects env_bubblespainted texture AAATrigger.
This is how the bubbles look in the editor
Bubbles will rise from the bottom env_bubbles to the top. Height of objects env_bubbles on our test map is 176 units, which means that the bubbles will rise exactly this distance.
U env_bubbles There are several parameters that determine the number of bubbles, the speed of their ascent and the frequency of appearance.
Env_bubbles (bubbles)
Name — if you give the bubbles a name, they can be turned on/off, for example, with a button
Bubble Density - number of bubbles
Bubble Frequency — frequency of bubbles
Speed of Current - the larger this value, the more bubbles will adhere to a straight direction
Flags:
Start Off - if checked, bubbles will not appear until they are activated
Where to use such bubbles is up to you.
For example, we created this marine aquarium :)
This is what the bubbles look like in the game
The example map, as always, will help you if you don't understand something.
env_bubbles.zip [66Kb] - in the archive there is an example map in BSP and RMF formats.
20.19

Machine Gun Turret

In this article we will tell you how guided machine guns are created. We will need the following entity objects: This is what the machine gun will look like in the game:
This is what the machine gun will look like in the game
You can give the machine gun any shape you want, you can make it small or huge - it doesn't matter. When creating a machine gun, you need to orient the muzzle to the right in the top view, this is necessary so that the game can determine where the bullets should fly from :) If you want the machine gun to be pointed in a certain direction at the beginning of the round, set the direction with the "Angle" angle.
The most important part of a machine gun (and this is an object func_tank) is ORIGIN brush. ORIGIN brush the point around which the machine gun will rotate is specified. Size ORIGIN brush does not matter, the location of its center is important (however, you have known this for a long time :)
What else should you know about the ORIGIN brush in a machine gun? The position of its center determines what parameters you will need to set in the properties of the machine gun, for example, you will need to specify the length of the barrel, the distance from the center of the barrel to the ORIGIN brush - all these parameters are measured from the center of the ORIGIN brush.
So, the shape of the machine gun is determined. We create ORIGIN brush and place it somewhere in the center of the machine gun. Then select all the brushes that make up the machine gun, also select the ORIGIN brush and turn this into func_tank.
Creating a machine gun and firing sound
Just above the machine gun you can see the object ambient_generic — this is the sound of a machine gun firing (on our test card we used our own sound, which we placed in the "cstrike/sound/ambience.." folder).
Func_tank (machine gun)
Name: gun (machine gun name)
Target: gun_sound (name of the ambient_generic object - the sound of gunfire)
Yaw rate: 60 (horizontal machine gun speed)
Yaw range: 150 (horizontal rotation angle in degrees)
Pitch rate: 15 (machine gun vertical speed)
Pitch range: 45 (vertical rotation angle in degrees)
Barrel Length: 66 (distance in units from the center of the ORIGIN brush to the end of the barrel)
Barrel Horizontal: 0 (distance in units from the center of the ORIGIN brush to the horizontal center of the trunk)
Barrel Vertical: 0 (distance in units from the center of the ORIGIN brush to the vertical center of the barrel)
Rate of Fire: 20 (rate of fire, rounds per second)
Damage Per Bullet: 10 (killing power of bullets)
Bullet accuracy: small cone (shot accuracy, slight deviation)
Bullets: 12mm (bullet caliber)
Flags:
Controllable: It should be noted that the player can control the machine gun
The shooting sound properties look like this:
Ambient_generic (shooting sound)
Path: ambience/dm_gun.wav (path to the sound, in this case it is our own file)
Volume: 10 (volume, maximum)
Flags:
Small radius: small radius of spread
Start silent: "silent" at the beginning of the round
Not toggled: does not repeat endlessly (sounds only when activated)
And last but not least important object: func_tankcontrols - the area from where the player controls the machine gun.
How is this area created? First we make a regular brush (size, say, 64x64x32 units). We paint it on all sides with a special texture AAAtrigger and turn it into func_tankcontrols.
Creating a machine gun control area
If, when testing the operation of a machine gun, you cannot find the control area, it means you placed it in the wrong place.
Func_tankcontrols (the area where the player controls the machine gun)
Tank entity name: gun (enter the name of the machine gun here)
If something is not clear, download the example map. On it, by the way, you can shoot with a machine gun at breakable boxes 8]
pulemet.zip [72Kb] - in the archive there is an example map in BSP and RMF formats, as well as the necessary sound.
20.20

Rocks / Rocky Terrain

In this article we will introduce you to the rock creation technique that was used by the N0TH1NG mapper when creating the map CS_SIEGE.
The picture below shows what the rocks will look like:
This is what the rocks will look like in the game
The method for creating such rocks can be called the "triangle method", because... the rocks will have triangular edges.
So, at the very beginning, near a simple, steep rock, we create a brush of equal height. Let's choose the thickness arbitrarily, for example, 64 units. In the picture below the brush is shown in the mode of working with vertices, because Now we need to combine some of the vertices.
Step 1. Making a simple brush
Having switched the brush to the mode of working with vertices, select the right (top and bottom) vertices and combine them with other vertices, as shown in the figure below (it is convenient to select vertices in the 3D view, and combine/transfer them in the 2D view).
When merging vertices, the question "Merge vertices?" will be asked. ("Combine the vertices?"), answer - Yes.
Step 2. Combine the right vertices
Move the lower left vertex:
Step 3. Move the lower left vertex
And we finish by combining the right vertex with the left:
Step 4. Combine the right and left vertices
Now you can copy the resulting triangular brush and paste a copy of it next to it, as shown in the figure below. Here it is convenient to use a mirror (horizontal or vertical) reflection of the brush (keyboard shortcuts: Ctrl-I And Ctrl-L).
Step 5. Make a copy of the resulting brush
Other "pieces" of rocks are created in a similar way. You can turn the triangular brushes over so that the expansion of the rock is not from above, but from below - this will help diversify the shape of the rocks.
The following 2D-flat image shows the rocks expanding both at the top and at the bottom.
t24cliffs7 cliffs.zip [19Kb] - in the archive there is an example map in BSP and RMF formats.
20.21

Snow on Map

In this article we will talk about creating falling snow. The following entity objects will be useful to us: This is what falling snow will look like:
This is what snow will look like in the game
What does it take to create a cold, snowy atmosphere?
  1. Pictures of the sky with a snowy landscape
  2. Snow, which we will depict in sprites
  3. The sound of the wind

1. Sky

Of the standard pictures, the sky named snowlake_. Enter this name into the parameter environment map, which is available in the menu Map/Map properties....

2. Snow

We implement falling snow using sprites. And we'll insert sprites using objects env_sprite.
In the figure below you can see that point objects env_sprite located randomly at a certain height above the ground (96-128 units).
Location of objects on the snow map
All objects env_sprite have the same properties, so it is enough to create just one such object, specify properties for it, and then simply multiply it to the required number of objects.
Object Properties env_sprite:
Env_sprite (snow sprites)
Render Mode: additive (this mode removes the black background from the sprite)
FX Amount: 255
FX Color: 220 220 235 (sprite color in RGB format, i.e. red, green, blue)
Framerate: 15 (sprite frame rate per second)
Sprite Name: sprites/snow.spr (path to the snow sprite file)
Scale: 2 (sprite scale)
Flags:
Start on — so that the sprite is played from the very beginning of the round

3. The sound of the wind

Wind sound (object) ambient_generic) we placed it in the middle of the map and set a flag for it "Play Everywhere"so that the wind can be heard across the entire map.
It should be noted that the sound must be played endlessly, and for this it must contain a special mark (in English cue point). You can learn how to create such tags from the article Creating Looping Sounds.
Sound properties:
Ambient_generic (wind sound)
Path: ambience/coldwind_1.wav (path to sound)
Volume: 10 (volume)
Flags:
Play Everywhere - plays all over the map
snow.zip [494Kb] - in the archive there is an example map in BSP and RMF formats, as well as the necessary sound and sprite.
20.22

Music Jukebox (Background Music Selector)

In this article we will talk about creating a scoreboard with buttons, pressing which will change the music that plays during the game. The player will also have the opportunity to turn off the music altogether. You could see a similar board on the map Ka_100x100. A special feature of this scoreboard will be the ability to remember the tune being played and play it back at the beginning of the next round.
We will actively use the following entity objects: The article consists of two parts. In the first part we talk about the structure of the scoreboard. In the second - about the principle of operation of the "storage device".

Part 1. Scoreboard design

The picture below shows what the scoreboard will look like in the game. In the picture we see 3 buttons with numbers - these are buttons for selecting 3 different melodies. The "Stop" button is designed to turn off the music.
This is what the scoreboard will look like in the game
Let's see what should happen when you click on a particular button.
Let's say the player wanted to listen to the first melody. He goes to the scoreboard and presses "button 1". As you know, sounds are inserted onto the map using an object ambient_generic. We can enter the name of this object in the properties of the button (func_button), then when you press the button, the sound will start playing. The next press will turn off the sound.
Now imagine that the first melody is already playing, and the player decides to change it to the second. He comes up and presses "button 2". The second melody begins to play, but (!) the first melody also plays. It turns out to be a superposition of two melodies. And if you also press "button 3", it will turn out very bad :) In this regard, a task arises: it is necessary to automatically turn off any of the playing melodies and turn on the melody selected by the player.
From all this we can conclude that when you press the button (func_button) we will need to simultaneously activate several objects: 2 objects must "muffle" two possibly playing melodies. That is, for example, when choosing a second melody, we must check: "is the first melody playing" + "is the third melody playing" and then mute any of them. Naturally, we don't know in advance which melody will play when the second melody is turned on, so just in case, we will mute both "extra" melodies at the same time: both the first and the third.
Using objects
Well, we've come close to using objects.
Now we know that when you press any button (func_button) 3 objects must be activated, and this can only be done through multi_manager. You can check the status of the melodies using trigger_relay, which, let us remind you, can either only turn on objects, or only turn off objects, well, it can also work like a regular trigger in both directions, but this function is not interesting to us now. We need to turn off "extra" sounds, so we will set the "Trigger State" parameter of this object to "Off".
Let's see what should happen when you press "button 1". The diagram below shows that when you click on the first button, multi_manager is activated, which turns on the first melody, mutes the second melody with an object trigger_relay and muffles the third melody with another object trigger_relay.
t24melody2 The same operations occur when you press the second and third buttons. The only difference is in the melodies that are played and muted. Thus, we need to create:
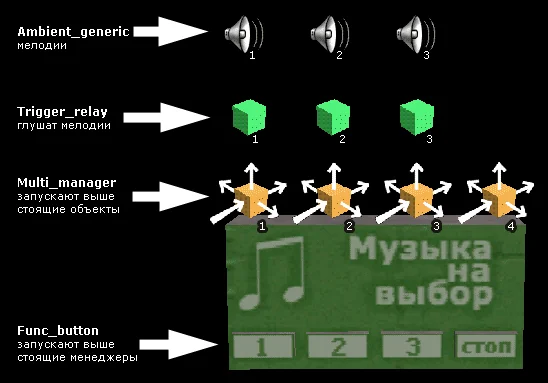
  • 4 buttons : func_button
  • 4 objects: multi_manager
  • 3 jamming triggers: trigger_relay (each of them mutes 1 melody)
  • 3 melodies: ambient_generic
Here's how we placed these objects on the test map:
t24melody3 In order not to get confused in the numerous properties of the objects given below, use the diagram.
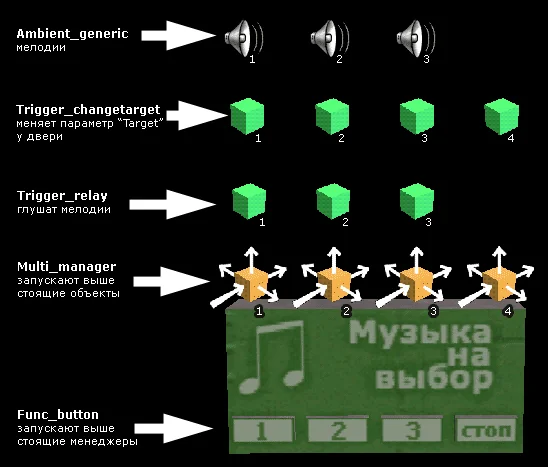
Func_button 1 (first button)
Name: button_1 (button name)
Targetted object: multi_1 (write the name of the first multi_manager here)
Delay before reset: 2 (time after pressing, during which the button is inactive)
Sounds: Keycard Sound (sound when pressing a button)
Multi_manager 1 (this object launches other objects in turn)
Name: multi_1 (name of this object)
sound_1 — 0.1 (starts the first melody after 0.1 seconds)
sound_2_off — 0.1 (launching a trigger_relay object that mutes the second melody)
sound_3_off — 0.1 (launching a trigger_relay object that mutes the third melody)
change_1 — 0.1 (explained in the second part of the article)
Ambient_generic 1 (first melody)
Name: sound_1 (name of the first melody)
Path: ambience/guit1.wav (path to the first melody)
Volume: 10 (melody volume, maximum)
Flags:
Play Everywhere: the melody can be heard throughout the map
Start Silent: at the beginning of the round the melody does not play
Trigger_relay 2 (muffles the second melody)
Name: sound_2_off (name of this object)
Target: sound_2 (the name of the second melody that needs to be muted is indicated here)
Trigger State: Off (means the trigger will only turn off the melody, but not turn it on)
Trigger_relay 3 (muffles the third melody)
Name: sound_3_off (name of this object)
Target: sound_3 (here is the name of the third melody that needs to be muted)
Trigger State: Off (means the trigger will only turn off the melody, but not turn it on)
Properties of objects when selecting the second melody. If you carefully review the properties of the objects below, you will notice their similarity with the properties of the previous objects.
Func_button 2 (second button)
Name: button_2 (button name)
Targetted object: multi_2 (write the name of the second multi_manager here)
Delay before reset: 2 (time after pressing, during which the button is inactive)
Sounds: Keycard Sound (sound when pressing a button)
Multi_manager 2 (this object launches other objects in turn)
Name: multi_2 (name of this object)
sound_2 — 0.1 (starts the second melody after 0.1 seconds)
sound_1_off — 0.1 (launch of the trigger_relay object, which mutes the first melody)
sound_3_off — 0.1 (launching a trigger_relay object that mutes the third melody)
change_2 — 0.1 (explained in the second part of the article)
Ambient_generic 2 (second melody)
Name: sound_2 (name of the second melody)
Path: ambience/opera.wav (path to the second melody)
Volume: 10 (melody volume, maximum)
Flags:
Play Everywhere: the melody can be heard throughout the map
Start Silent: at the beginning of the round the melody does not play
Trigger_relay 1 (muffles the first melody)
Name: sound_1_off (name of this object)
Target: sound_1 (here is the name of the first melody that needs to be muted)
Trigger State: Off (means the trigger will only turn off the melody, but not turn it on)
Trigger_relay 3 (muffles the third melody)
Name: sound_3_off (name of this object)
Target: sound_3 (here is the name of the third melody that needs to be muted)
Trigger State: Off (means the trigger will only turn off the melody, but not turn it on)
Properties of objects when selecting the third melody. The properties are similar to the previous two groups of objects.
Func_button 3 (third button)
Name: button_3 (button name)
Targetted object: multi_3 (write the name of the third multi_manager here)
Delay before reset: 2 (time after pressing, during which the button is inactive)
Sounds: Keycard Sound (sound when pressing a button)
Multi_manager 3 (this object launches other objects in turn)
Name: multi_3 (name of this object)
sound_3 — 0.1 (starts the third melody after 0.1 seconds)
sound_1_off — 0.1 (launch of the trigger_relay object, which mutes the first melody)
sound_2_off — 0.1 (launching a trigger_relay object that mutes the second melody)
change_3 — 0.1 (explained in the second part of the article)
Ambient_generic 3 (third melody)
Name: sound_3 (name of the third melody)
Path: ambience/lv_jubilee.wav (path to the third melody)
Volume: 10 (melody volume, maximum)
Flags:
Play Everywhere: the melody can be heard throughout the map
Start Silent: at the beginning of the round the melody does not play
Trigger_relay 1 (muffles the first melody)
Name: sound_1_off (name of this object)
Target: sound_1 (here is the name of the first melody that needs to be muted)
Trigger State: Off (means the trigger will only turn off the melody, but not turn it on)
Trigger_relay 2 (muffles the second melody)
Name: sound_2_off (name of this object)
Target: sound_2 (the name of the second melody that needs to be muted is indicated here)
Trigger State: Off (means the trigger will only turn off the melody, but not turn it on)
Now let's think about what should happen when you press the fourth button? We know that any playing melody must "shut up". That is, when we click on the fourth button, we need to launch the fourth multi_manager, which will launch all 3 jamming objects (trigger_relay) created earlier for the first three cases.
Func_button 4 (fourth button)
Name: button_4 (button name)
Targetted object: multi_4 (write the name of the fourth multi_manager here)
Delay before reset: 2 (time after pressing, during which the button is inactive)
Sounds: Keycard Sound (sound when pressing a button)
Multi_manager 4 (this object launches other objects in turn)
Name: multi_4 (name of this object)
sound_1_off — 0.1 (launch of the trigger_relay object, which mutes the first melody)
sound_2_off — 0.1 (launching a trigger_relay object that mutes the second melody)
sound_3_off — 0.1 (launching a trigger_relay object that mutes the third melody)
change_off — 0.1 (explained in the second part of the article)
Trigger_relay 1 (muffles the first melody)
Name: sound_1_off (name of this object)
Target: sound_1 (here is the name of the first melody that needs to be muted)
Trigger State: Off (means the trigger will only turn off the melody, but not turn it on)
Trigger_relay 2 (muffles the second melody)
Name: sound_2_off (name of this object)
Target: sound_2 (the name of the second melody that needs to be muted is indicated here)
Trigger State: Off (means the trigger will only turn off the melody, but not turn it on)
Trigger_relay 3 (muffles the third melody)
Name: sound_3_off (name of this object)
Target: sound_3 (here is the name of the third melody that needs to be muted)
Trigger State: Off (means the trigger will only turn off the melody, but not turn it on)
That's it! :)
Now let's move on to the final part of the article and explain the principle of operation of the "memory device", which remembers the playing melody (or that the melodies are not playing) and in the next round starts the same melody (or mutes all melodies).

Part 2. Storage device

Now we will slightly modernize the created system, add some parameters and additionally create 6 more objects.
We will use the device that starts the melody at the beginning of a new round. func_door. What does it mean that we will play a melody? This means that the door (func_door) will automatically activate one of the 4 objects multi_manager (after all, it is these objects that control the entire system: three of them play melodies, and the fourth mutes them).
In the "Target" parameter of the door we will write: multi_4 — the name of the fourth multi_manager, who mutes all melodies. However, this option will change each time you press any of the buttons: when you press the first button, this option will change to multi_1 (launch the first multi_manager), when you click on the second button the parameter will change to multi_2, when you press the third button the parameter will change to multi_3 and when you press the fourth button (the "Stop" button), the parameter will return to the value multi_4.
The object allows you to change the "Target" parameter of any object (and for us it will be a door) trigger_changetarget. Let's create 4 such objects. Their names are as follows: change_1, change_2, change_3, change_off. These names must be written to objects multi_manager, according to the properties given in the first part of the article.
Now the layout of objects will look like this (4 objects have been added trigger_changetarget):
t24melody4 So, now when we press, for example, the first button, the first one is activated multi_manager , which already activates 4 objects: turns on the first melody, mutes the second melody, mutes the third melody, changes the "Target" of the door to the value multi_1. When you press other buttons, similar operations occur.
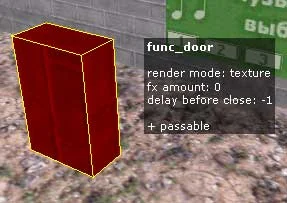
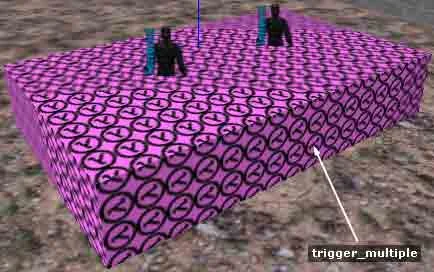
Let's go back to the door (func_door). It needs to be made transparent and intangible so that players don't even know about its existence. This is achieved by setting certain display parameters and the "Passable" flag (the properties are given below). In the picture below you can see that on our map the door is painted in a regular texture (the same as on the wall) and it is placed right next to the scoreboard, but thanks to the displayed properties and flags, the door will not interfere with the players - it will be invisible and intangible.
Door that plays a melody at the start of each new round
You also need to think about activating the door at the beginning of the round, because it cannot be activated itself, and therefore cannot start the melody. To do this, you need to create one object at a time on the command bases trigger_multiple. These triggers must be placed so that all players' spawn points are blocked (see figure below).
Trigger that activates the door
It turns out that players are born and immediately fall into the field of action of objects trigger_multiple, which activate the door, and because We set the door parameter "Delay before close: -1", which does not allow the door to be activated several times per round, the melody will only be played once at the beginning of the round.
Properties of new objects:
Trigger_changetarget 1 (changes the "Target" parameter of the door to multi_1)
Name: change_1 (name of this object)
Target: memory (the door name is indicated here)
New Target: multi_1 (means that now the "Target" parameter of the door will have the value multi_1)
Trigger_changetarget 2 (changes the "Target" parameter of the door to multi_2)
Name: change_2 (name of this object)
Target: memory (the door name is indicated here)
New Target: multi_2 (means that now the "Target" parameter of the door will have the value multi_2)
Trigger_changetarget 3 (changes the "Target" parameter of the door to multi_3)
Name: change_3 (name of this object)
Target: memory (the door name is indicated here)
New Target: multi_3 (means that now the "Target" parameter of the door will have the value multi_3)
Trigger_changetarget Off (changes the door's "Target" parameter to multi_4)
Name: change_off (name of this object)
Target: memory (the door name is indicated here)
New Target: multi_4 (means that now the "Target" parameter of the door will have the value multi_4)
Func_door (door, starts a melody at the beginning of the round)
Name: memory (door name)
Target: multi_4 (this is the default value, however it is changed by trigger_changetarget objects)
Render Mode: texture (this mode along with the following "FX Amount" makes the door transparent in the game)
FX Amount: 0
Delay before close: -1 (this value does not allow the door to be activated several times per round)
Flags:
Passable: makes the door intangible so that it does not interfere with player movements
Trigger_multiple (trigger, activates the door)
Target: memory (door name is written here)
That's all for the simple display board :) You may never need this display board, but the task we faced when writing this article was to familiarize you with the capabilities of such entity objects as: trigger_relay And trigger_changetarget. This article should help you understand that you can do a lot of interesting things in CS, the main thing is to know the properties of objects and be able to connect 10, 20, 30 objects into one working system.
melody.zip [37Kb] - in the archive there is an example map in BSP and RMF formats.
20.23

Hills

In this article we will introduce you to the technique of creating small hills and hillocks. The article shows how you can decorate a map and make the relief more diverse.

1. Creating a hillock near the wall and drawer

Create a brush of suitable height and length.
Hillock near the wall and drawer, Fig. 1Hillock near the wall and drawer, Fig. 2
We switch it to the vertex mode and lower the upper front vertices so that they align with the lower ones. To the question "Merge Vertices?" We always answer "Yes."
For greater aesthetics, you can apply textures equally to both the hillock and the main ground.
Hillock near the wall and drawer, Fig. 3A hump near the wall and drawer, Fig. 4

2. Creating a mound in the corner

Create a brush and turn it into a corner by cutting it in half.
Hillock in the corner, Fig. 1Hillock in the corner, Fig. 2
We combine the upper front vertexes with the lower ones. We align the textures and we get a wonderful mound :)
Hillock in the corner, Fig. 3Hillock in the corner, Fig. 4

3. Creating hills

The hill will have a flat, rectangular middle section. We will create triangular brushes around it. Then we will turn them into inclined planes.
Hill, Fig. 1
We turn the first triangular brush into an inclined plane, aligning the upper vertexes with the lower ones.
Hill, Fig. 2
We do the same with the rest of the side brushes.
Hill, Fig. 3
We have given only a few of the simplest examples of hills. With a little practice, you can make something more beautiful. The main thing is to make sure that you do not end up with irregularly shaped planes. Press often [Alt-P]to check the map geometry for errors.
20.24

Rotating Advertisement Billboard

In this article we will talk about creating a very beautiful billboard, which will consist of rotating flaps. Each sash will feature parts of two advertising designs. Each time the doors rotate, the advertising design will change. We express our gratitude to the mapper Yarko for providing the technology for creating such a shield :)
We will need the following entity objects: This is what the billboard in the game will look like (the moment the picture changes is filmed):
This is what the billboard will look like in the game

How does this work?

We will create 12 rotating doors (func_door_rotating) And 1 multi_manager, which will activate each leaf in turn with an interval of 0.1 seconds.
We will apply different advertising designs on different sides of the sashes, so that when the sashes are rotated, a solid image is obtained. Since objects func_door_rotating have the property of automatically closing after some time, the doors will close on their own, showing the first advertisement, until they are activated again multi_managerto show the second ad.

We create sashes

In the picture below you can see that we have created 12 "triangular" rotating doors func_door_rotating. Why triangular? It's just that triangular doors rotate more beautifully than square ones :) By the way, the triangles need to be made equilateral so that different advertising pictures coincide after rotation.
Create 12 "triangular" func_door_rotating
Func_door_rotating — a rotating object, so don't forget about the ORIGIN brush.
Doors func_door_rotating (close)
The "Delay before close" parameter determines after how many seconds the shutter will automatically return to its initial position. For all sashes it is necessary to set the same time intervals.
Also pay attention to the "Distance (deg)" parameter, which determines the angle of rotation of the shutters. Since on our map we used leaves in the form of equilateral triangles, the angle is 120°.
The picture should be applied to the sashes by selecting all the desired sides of the sashes, clicking the "Tread as one" checkbox and the "Fit" button, this will be more convenient.
Func_door_rotating (leaf)
Name: door1 (leaf name)
Speed: 180 (rotation speed)
Distance (deg): 120 (leaf rotation angle in degrees)
Delay before close: 10 (time until automatic return to home position)
With the same parameters, but different names, you need to create 11 more leaves (there will be 12 in total).
We named the doors: door1, door2, door3 ... door12.

Sash management (multi_manager)

We will force the doors to rotate using the multi_manager object. We activate the first leaf after 0.1 seconds, the second - after 0.2 seconds, the third - after 0.3 seconds... etc. until the 12th leaf is activated in 1.2 seconds.
We will make the last 13th activation object (ATTENTION!) ourselves multi_manager! This is necessary so that advertising changes occur endlessly, without additional activations on the part of the player.
For object multi_manager You must check the "Multithreaded" checkbox, otherwise multi_manager will not be able to activate itself.
Multi_manager (this object launches the shutters one by one)
Name: door_multi (multi_manager name)
door1 — 0.1 (start of the first leaf after 0.1 seconds)
door2 — 0.2 (start of the second leaf in 0.2 seconds)
door3 — 0.3 (launch of the third leaf in 0.3 seconds)
door4 — 0.4
door5 — 0.5
door6 — 0.6
door7 — 0.7
door8 — 0.8
door9 — 0.9
door10 — 1.0
door11 — 1.1
door12 — 1.2
door_multi — 20 (activate itself after 20 seconds)
Flags:
Multithreaded: this flag must be checked so that the multi_manager can activate itself
If you plan to create some kind of frame around the sashes, then it must be turned into func_wall. It is known that entity objects transmit light, which means that advertising images on different sides of the doors will be normally illuminated. Otherwise (when the frame around the shield is made with brushes), the "internal" advertising after compilation will turn out to be darkened, because brushes do not let light through.
The frame for the billboard must be made from func_wall

Automatic start at the beginning of the map

In order for our advertising changing system to work at the very beginning of the game, we will place it on the map trigger_auto and in the "Target" parameter we indicate the name of the multi_manager (i.e. door_multi). We set the time before activation ("Delay before trigger") to 4 seconds so that all objects have time to appear on the map before trigger_auto will start to activate something.

How to properly apply textures to sashes?

There is a certain complexity here, because when one advertising picture is visible in its entirety, another must be applied to several flaps turned at an angle. You can, of course, first apply the first picture to one side of the shield, made up of 12 panels, then unfold each panel and apply the second picture, but we offer another method, without reversing the panels.
Below is a diagram (top view) of transferring the sashes for applying the second advertising picture. There are only 6 leaves on the diagram instead of 12, we were just a little too lazy to draw all 12 :)
So, let's look at the horizontal 6 sashes. This is the so-called "starting position" of the billboard. The red sides of the flaps mean the first picture compiled into a single whole. The blue arrow on the right shows how the shutters rotate when activated, i.e. counterclockwise.
Now let's imagine which sides of the doors need to be painted so that when turning, a second picture appears? That's right - bright green. Bright green sashes must be painted in the second advertising picture.
t24reklama1 In order not to rotate the wings in the editor in order to apply the second picture, we suggest temporarily moving them, as shown in the same diagram, but a little lower. As soon as the flaps are transferred, we apply the second picture (see figure below), selecting all sides of the flaps, clicking the "Tread as one" checkbox and the "Fit" button.
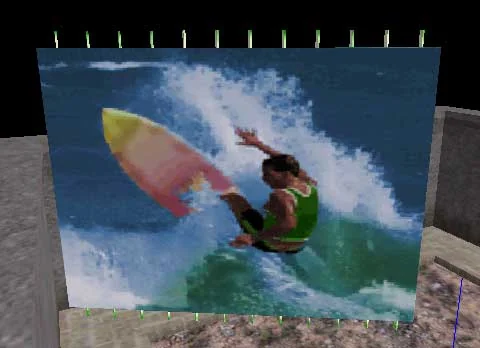
We paint the temporarily moved doors with the second picture
We return the doors to their original position and enjoy the beautiful effect of changing advertisements :)
reklama.zip [24Kb] - in the archive there is an example map in BSP and RMF formats.