In this article we will talk about the use of such a group of entity objects as triggers (from the English "trigger" - initiate, give a start). You can get additional information about the properties of these objects from the "Entity" section.
Triggers are combined into a group of entities consisting of 11 objects. Trigger names begin with the word trigger_. These are the objects:
This trigger opens a group of triggers. This trigger is a point object. You can place it anywhere on the map. It is designed to automatically activate some object when loading a map, i.e. Once the map has loaded, this trigger fires and activates the object specified in the "Target" field. You can place multiple trigger_auto if needed.
Example of use: activation via trigger_auto of a game_text object, which displays information about the author of the map on the screen of the joining player.
More detailed information about this object: "Entity: trigger_auto".
2. Trigger_camera.
This trigger is also a point object. Essentially, by inserting such an object onto the map, you get a camera that will "look" in the specified direction. In order for the player to be able to see what the camera is showing, it is necessary to create a button (func_button) and enter the name of the camera in its "Target" parameter. Cameras on the maps cs_assault, cs_militia and many others were created in a similar way.
If you do not click the button, the image from this camera will be shown when the player joins the server. If there are several cameras, then images from them will be shown in turn for some time. For example, after joining a server with de_dust, You alternately see images from cameras (i.e. trigger_camera objects) located in different places on the map.
It is possible to create moving cameras or cameras that follow a moving target. You can read more about this in the articles from the "Cameras" section.
More detailed information about this object: "Entity: trigger_camera".
3. Trigger_changetarget.
This is another point trigger, the location of which does not affect its operation (i.e. this trigger can be placed anywhere on the map). This trigger has a specific action that is not visually manifested in any way. As you already know, many objects have a "Target" parameter. So, this trigger allows you to change this parameter for any object right during the game.
In order for the "Target" parameter of an object to change, you need to activate this trigger. This can be done in any available way. The simplest is using a button (func_button).
More detailed information about this object: "Entity: trigger_changetarget".
4. Trigger_counter.
This trigger belongs to the class of brush objects, i.e. the action of this trigger extends to the space limited by its own dimensions. The trigger_counter should be painted over like any other brush trigger with a special AAATrigger texture on all sides.
This trigger remembers how many times it was activated (how many times players passed through it) and, with a certain value set in its properties, activates the object specified in the "Target" field.
The figure below shows how brush triggers that activate any objects are usually placed. And they are placed so that some player will definitely pass through them. Then the trigger is activated and in turn activates the object specified in the "Target" field. For example, a sound is heard.
More detailed information about this object: "Entity: trigger_counter".
5. Trigger_gravity.
This trigger, like the previous one, belongs to the brush class. It should be painted over with the AAATrigger texture, which is specifically designed for triggers (hence the name).
Using this trigger you can change the gravity on the map. But it should be remembered that gravity does not change for all players, but only for the player who has passed through the trigger! All other players will not feel any changes. To return normal gravity it is necessary to create another trigger_gravity, which sets the normal value (800). Also remember that the gravity level does not reset at the beginning of the round, i.e. if the player has turned on reduced gravity, then in the next round he will "fly".
More detailed information about this object: "Entity: trigger_gravity".
6. Trigger_hurt.
Another brush trigger that should be painted over with the AAATrigger texture. This trigger can cause damage to players. Place this trigger somewhere on the map, set the level and type of damage (there are a dozen different types, but the difference is only in the damage icon displayed on the screen: fire, poison, electric shock, etc.) and then, having passed through this trigger, the player will lose some of his health.
This trigger can be used with fire, electrical wires, transformers, and much more. You just need to create this object around the "kill zone". Alternatively, this trigger can be used outside the map if you have such places (where the player can fall through). Examples: de_prodigy And de_vertigo (skyscraper). On these maps, players can fall outside of it, and to prevent them from running there, triggers are installed trigger_hurt with a high enough level of damage to kill the player "for sure" :)
Our Tutorial also has an example of use trigger_hurt in an article about the creation of fire.
More detailed information about this object: "Entity: trigger_hurt".
7. Trigger_multiple And trigger_once.
These two brush triggers are champions for use on maps. They perform a very simple, but at the same time very useful function - they simply activate the object specified in the "Target" parameter (most often these are sounds or a multi_manager object). It's hard to find a map that doesn't have trigger_multiple.
The difference between objects is the number of activations: trigger_multiple can activate an object indefinitely, and trigger_once only 1 time. Like all other brush triggers, trigger_multiple and trigger_once should be painted on all sides with a special AAATrigger texture.
More detailed information about these objects: "Entity: trigger_multiple", "Entity: trigger_once".
8. Trigger_push.
Using this brush trigger, you can create an invisible area, upon entering which the player will be pushed in a certain direction. For example, you can place this trigger in water to create the illusion of an underwater current, or near a powerful fan to create the illusion of air flow. This trigger was used when creating a catapult on the notorious map de_rats3. The trigger_push should be painted over with the AAATrigger texture on all sides.
More detailed information about this object: "Entity: trigger_push".
9. Trigger_relay.
This trigger belongs to the class of point triggers, i.e. its location on the map does not matter. This trigger can operate in three different modes: only turns on objects, only turns off objects, and activates the object in any case. For example, you can create a chain of three objects: button + trigger + light bulb. When you press the button, a trigger is activated, which works, for example, only to turn on. If the light is not on, it will come on. If the light is already on, it will not be turned off. In general, this is such a clever system :) However, sometimes it can be useful.
More detailed information about this object: "Entity: trigger_relay".
10. Trigger_teleport.
As the name of the trigger suggests, this is a teleport. The player runs through this trigger and ends up somewhere else on the map. This location is specified by another object - info_teleport_destination.
More detailed information about this object: "Entity: trigger_teleport".
Triggers are combined into a group of entities consisting of 11 objects. Trigger names begin with the word trigger_. These are the objects:
- trigger_auto
- trigger_camera
- trigger_changetarget
- trigger_counter
- trigger_gravity
- trigger_hurt
- trigger_multiple
- trigger_once
- trigger_push
- trigger_relay
- trigger_teleport
This trigger opens a group of triggers. This trigger is a point object. You can place it anywhere on the map. It is designed to automatically activate some object when loading a map, i.e. Once the map has loaded, this trigger fires and activates the object specified in the "Target" field. You can place multiple trigger_auto if needed.
Example of use: activation via trigger_auto of a game_text object, which displays information about the author of the map on the screen of the joining player.
More detailed information about this object: "Entity: trigger_auto".
2. Trigger_camera.
This trigger is also a point object. Essentially, by inserting such an object onto the map, you get a camera that will "look" in the specified direction. In order for the player to be able to see what the camera is showing, it is necessary to create a button (func_button) and enter the name of the camera in its "Target" parameter. Cameras on the maps cs_assault, cs_militia and many others were created in a similar way.
If you do not click the button, the image from this camera will be shown when the player joins the server. If there are several cameras, then images from them will be shown in turn for some time. For example, after joining a server with de_dust, You alternately see images from cameras (i.e. trigger_camera objects) located in different places on the map.
It is possible to create moving cameras or cameras that follow a moving target. You can read more about this in the articles from the "Cameras" section.
More detailed information about this object: "Entity: trigger_camera".
3. Trigger_changetarget.
This is another point trigger, the location of which does not affect its operation (i.e. this trigger can be placed anywhere on the map). This trigger has a specific action that is not visually manifested in any way. As you already know, many objects have a "Target" parameter. So, this trigger allows you to change this parameter for any object right during the game.
In order for the "Target" parameter of an object to change, you need to activate this trigger. This can be done in any available way. The simplest is using a button (func_button).
More detailed information about this object: "Entity: trigger_changetarget".
4. Trigger_counter.
This trigger belongs to the class of brush objects, i.e. the action of this trigger extends to the space limited by its own dimensions. The trigger_counter should be painted over like any other brush trigger with a special AAATrigger texture on all sides.
This trigger remembers how many times it was activated (how many times players passed through it) and, with a certain value set in its properties, activates the object specified in the "Target" field.
The figure below shows how brush triggers that activate any objects are usually placed. And they are placed so that some player will definitely pass through them. Then the trigger is activated and in turn activates the object specified in the "Target" field. For example, a sound is heard.
More detailed information about this object: "Entity: trigger_counter".
5. Trigger_gravity.
This trigger, like the previous one, belongs to the brush class. It should be painted over with the AAATrigger texture, which is specifically designed for triggers (hence the name).
Using this trigger you can change the gravity on the map. But it should be remembered that gravity does not change for all players, but only for the player who has passed through the trigger! All other players will not feel any changes. To return normal gravity it is necessary to create another trigger_gravity, which sets the normal value (800). Also remember that the gravity level does not reset at the beginning of the round, i.e. if the player has turned on reduced gravity, then in the next round he will "fly".
More detailed information about this object: "Entity: trigger_gravity".
6. Trigger_hurt.
Another brush trigger that should be painted over with the AAATrigger texture. This trigger can cause damage to players. Place this trigger somewhere on the map, set the level and type of damage (there are a dozen different types, but the difference is only in the damage icon displayed on the screen: fire, poison, electric shock, etc.) and then, having passed through this trigger, the player will lose some of his health.
This trigger can be used with fire, electrical wires, transformers, and much more. You just need to create this object around the "kill zone". Alternatively, this trigger can be used outside the map if you have such places (where the player can fall through). Examples: de_prodigy And de_vertigo (skyscraper). On these maps, players can fall outside of it, and to prevent them from running there, triggers are installed trigger_hurt with a high enough level of damage to kill the player "for sure" :)
Our Tutorial also has an example of use trigger_hurt in an article about the creation of fire.
More detailed information about this object: "Entity: trigger_hurt".
7. Trigger_multiple And trigger_once.
These two brush triggers are champions for use on maps. They perform a very simple, but at the same time very useful function - they simply activate the object specified in the "Target" parameter (most often these are sounds or a multi_manager object). It's hard to find a map that doesn't have trigger_multiple.
The difference between objects is the number of activations: trigger_multiple can activate an object indefinitely, and trigger_once only 1 time. Like all other brush triggers, trigger_multiple and trigger_once should be painted on all sides with a special AAATrigger texture.
More detailed information about these objects: "Entity: trigger_multiple", "Entity: trigger_once".
8. Trigger_push.
Using this brush trigger, you can create an invisible area, upon entering which the player will be pushed in a certain direction. For example, you can place this trigger in water to create the illusion of an underwater current, or near a powerful fan to create the illusion of air flow. This trigger was used when creating a catapult on the notorious map de_rats3. The trigger_push should be painted over with the AAATrigger texture on all sides.
More detailed information about this object: "Entity: trigger_push".
9. Trigger_relay.
This trigger belongs to the class of point triggers, i.e. its location on the map does not matter. This trigger can operate in three different modes: only turns on objects, only turns off objects, and activates the object in any case. For example, you can create a chain of three objects: button + trigger + light bulb. When you press the button, a trigger is activated, which works, for example, only to turn on. If the light is not on, it will come on. If the light is already on, it will not be turned off. In general, this is such a clever system :) However, sometimes it can be useful.
More detailed information about this object: "Entity: trigger_relay".
10. Trigger_teleport.
As the name of the trigger suggests, this is a teleport. The player runs through this trigger and ends up somewhere else on the map. This location is specified by another object - info_teleport_destination.
More detailed information about this object: "Entity: trigger_teleport".
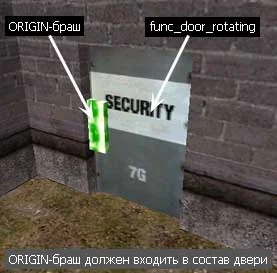
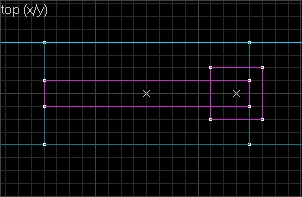 If the center of the ORIGIN brush is placed to the right (on the edge of the door), then when opened, it will partially "get" into the wall. In general, this is not scary, it just looks ugly. In real life, doors don't fit into walls :). Therefore, place the ORIGIN brush as shown in the figure.
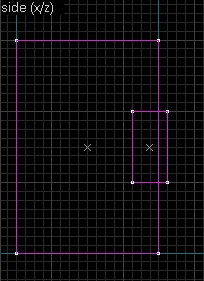 In the figure below you can see that the shape of the ORIGIN brush, its size and placement along the vertical axis of rotation of the door do not play a role. Compare the shape and placement of the ORIGIN brush in the picture above and the picture below - they are different, but this does not affect the functionality of the door. The door will open in the same way.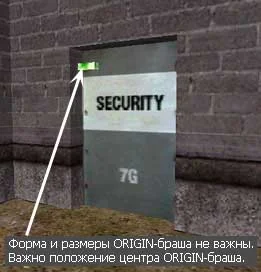
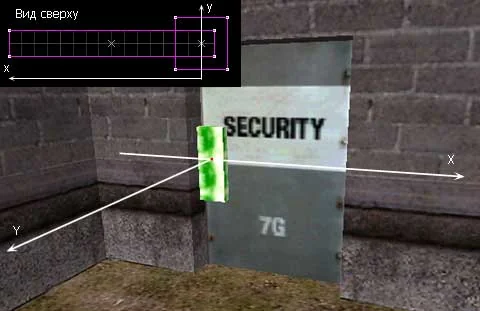
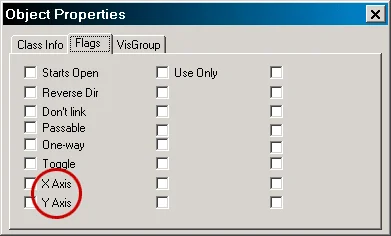 If you "insert a needle" along the Y axis into the center of the ORIGIN brush, then the door will rotate in an interesting way :), as if clockwise or counterclockwise. In this case (if we need such rotation), check the "Y Axis" checkbox. No need to check 2 boxes at the same time!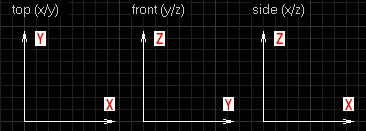

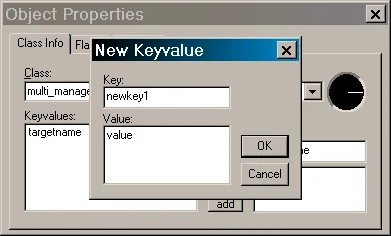 Multi_manager allows you to activate up to 16 different objects. And if you consider that as an activated object the object itself can multi_manager
, then the total number of controlled objects can be quite large.
Multi_manager allows you to activate up to 16 different objects. And if you consider that as an activated object the object itself can multi_manager
, then the total number of controlled objects can be quite large.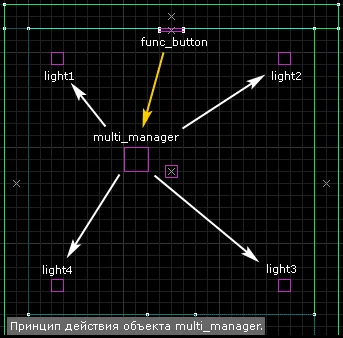 So, the sequence of actions is as follows:
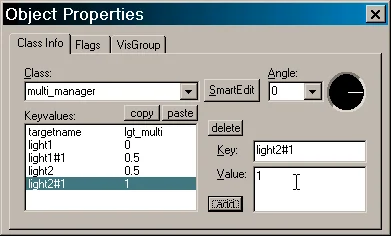 object multi_manager let's give it a name lgt_multi
and enter this name into the properties of the button (func_button) in the "Targeted object" parameter. That's all. When the player presses the button, four lights in the corners of the room will turn on and off in turn.
object multi_manager let's give it a name lgt_multi
and enter this name into the properties of the button (func_button) in the "Targeted object" parameter. That's all. When the player presses the button, four lights in the corners of the room will turn on and off in turn.