Chapter XIII. Trees, Grates, Buttons, Crates.

Common map objects: trees, transparent fences and grates, buttons, levers, and crates.

13.1

Creating Trees

In this article we will talk about different ways to create trees. We will use the following entities: Creating a realistic tree in CS is quite difficult. The key to success is the selection of high-quality tree textures. The first way to create trees is based on the use of an object func_illusionary. As you know, you can freely pass through such an object, in addition, if you use a texture with a mask (with blue parts), you can make these parts of the object transparent. It is these properties that we will use.
The picture below shows the wood texture we will be using.
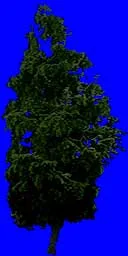
Wood texture
Let's build a brush with dimensions of 224 units in height, 128 units in width and 1 unit in thickness and place it perpendicular to the ground, as shown in the figure below.
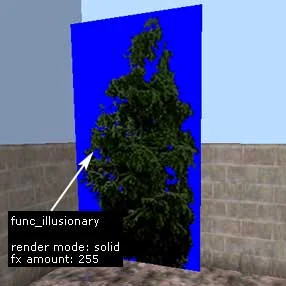
Create a func_illusionary object colored with a wood texture
Let's turn this brush into func_illusionary and set the following display parameters:
Render Mode — Solid;
FX Amount — 255
Thanks to these parameters, the blue parts of the texture will be transparent in the game, so only the crown of the tree will remain.
Now let's copy func_illusionary and insert it perpendicular to the first object (see figure below).
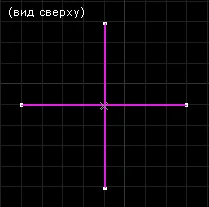
t14tree3 Thus, we have a rather nice tree :) You can also add branches, turning them at an angle of 45° to the main crown. The only thing we're still missing is the barrel. Let's make it using a tool Block and its functions Spike. In the "New objects" panel, in the "Objects" list, select the function Spike, indicate the number 8 in the "Faces" line (number of sides) and build a brush in the center of the tree measuring 256 units in height and 7x7 units in width and thickness (see figure below).
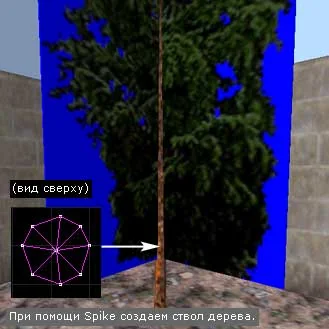
Create a tree trunk using the Spike function
Let's turn the trunk into func_wall, so that it does not break the ground into a large number of polygons (you can read more about this in the chapter on R_speeds). We additionally placed 4 more such trees on our test map. To prevent them from appearing similar to each other, we rotated them at different angles.
In the game, our small garden looks like the picture below, on the right:
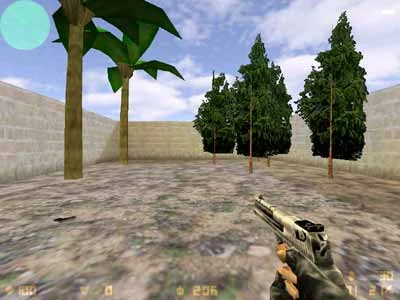
This is what our garden looks like in the game
In the same picture, on the left, you can see other trees (palm trees). Now we will talk about how they differ from the trees described above.
The difference is that palm trees are not objects func_illusionary with tree textures applied to them. These are pre-made tree models saved in files with the extension *.MDL. The archive with our test card contains one tree model (palm tree). To run the map you need to copy the tree model to the directory cstrike/models..
And now let's talk about how to insert a tree model or any other model onto a map.
A point entity object is used to insert models cycler or cycler_sprite. Just insert such an object in the desired location on the map. In properties you must specify the path to the file *.mdl with the required model. If the object is used cycler_sprite, which is actually intended for inserting sprites (*.SPR), then in the properties, where the model name is indicated, you must first register *.*to display all file types, not just *.SPR. Then select the desired model.
In our case, the properties of the object cycler look like this:
Model — models/tree_palm.mdl
That's all the properties.
By the way, use the object cycler_spriteperhaps even better than cycler, because in this case, black and white blood will not spill out from the MODEL when shooting at it (sometimes there is such a thing), as happens when the model is inserted by an object cycler.
Since CS 1.6, we can use models that have masked textures (the blue parts that are transparent in the game). Now the trees look good and can even have animation: sway in the wind.
trees.zip [116Kb] - in the archive there is an example map in BSP and RMF formats, as well as the necessary models and textures.
13.2

Transparent Fences and Grates

In this article we will tell you how to create transparent, shootable grilles, fences, etc. To create we need an object: As you probably already know, transparent objects are painted over with textures with a mask (blue parts). The names of such textures begin with a curly brace {. You also need to set the display parameters:
Render Mode — Solid;
FX Amount — 255.
Well, let's choose a texture {BARS and build a brush of arbitrary size with a thickness of 4 units. Let's turn it into func_wall. Let's set the display parameters as written above. As a result, we will get a transparent lattice.
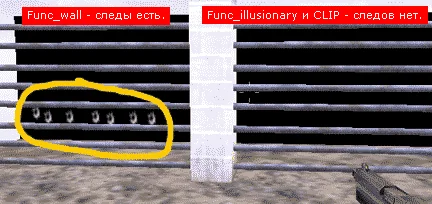
Why is she bad? But it is bad because, firstly, not all types of weapons shoot through entity objects (for example, pistols do not shoot through) and, secondly, they remain on the grid bullet marks (see picture below). We placed a black wall behind the bars to make the marks easier to see.
t13grate1 Instead of func_wall must be used func_illusionary . Let's set exactly the same display parameters. The only thing that still needs to be done is to place it in front of the grille CLIP brush (regular brush, painted on all sides with a special texture CLIP). This must be done because through func_illusionary the player can pass freely, and CLIP brush will not allow you to do this (see figure below). CLIP brush Usually they are made the same size as the grate, but this is not important, the main thing is that the player does not get through :)
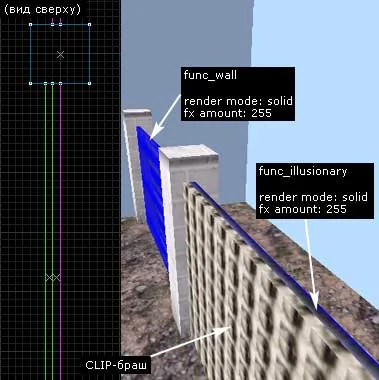
In front of the grid from func_illusionary we additionally place a CLIP brush
Thus, through the lattice of func_illusionary bullets and grenades fly freely, leaving no traces, but the player, at the same time, cannot pass through it.
If it is necessary to make a breakable grille (as in a ventilation pipe on cs_assault), then the brush needs to be turned into func_breakable with Render Mode - Solid, FX Amount - 255. A CLIP brush in this case, of course, is not needed.
grates.zip [11Kb] - in the archive there is an example map in BSP and RMF formats.
13.3

Buttons and Rotating Levers

In this article we will talk about creating buttons and rotating levers. Before reading the article, we recommend that you familiarize yourself with the following entity objects:

1. Creating buttons

In several previous articles we have already briefly talked about creating buttons, let's look at them in more detail.
Buttons are used mainly to open doors, call the elevator and turn on/off lights. Initially, a brush of the required shape is created, then it turns into an object func_button. Let's consider a case where pressing a button turns off the light.
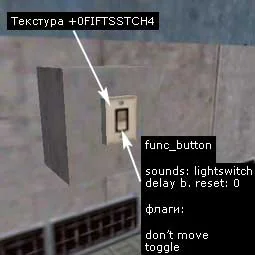
Somewhere on the wall we will place a brush with dimensions of 10x8x2 units (the dimensions are quite small, since it is just a switch). Let's paint over this brush from the visible side with an animated texture with a long name +0FIFTSSTCH4 (see picture below). This is a nice switch texture. When we press the button, the texture will change and it will look like a switch has been pressed.
Create a button
Let's turn a brush into an object func_button and set the following properties and flags:
Targetted object — light1 (this will be the name of the light source that we will turn on with this button);
Sounds — lightswitch (sound when you press the switch);
Delay before reset — 0 (time in seconds during which the button does not work after being pressed. In this case, the button can be pressed as often as desired. If you set the value to "-1", the button can be used only once per round).
Flags:
Don't move — if checked, then when pressed the button is not pressed into the wall, but remains in place. A very useful flag, because... allows you to avoid the need to set a number of additional parameters (see below);
Toggle - if checked, the button will remain pressed until it is used again. In our case, because the button does not move, this flag will "hold" the switched texture. In this case, the texture will change once with each press.
Now let's look at the remaining possible parameters of the button.
Angle — the direction in which the button moves when pressed, specified in degrees. We recommend determining the direction in the top view, because... this is the most convenient;
Speed — the speed at which the button will be pressed into the wall (if the "Don't move" flag is set, then this parameter is useless);
Health — "life" button. If you want the button to be pressable with a shot, then set a value greater than 0 here, for example, 1;
Delay before trigger — time in seconds that will pass after pressing the button and activating the object specified in the "Targeted object" parameter. For example, if you specify the value here 5, then the light will turn on only 5 seconds after pressing the button;
Lip — with this parameter you can change the distance at which the button is pressed into the wall. By default, the button is pressed at a distance of its thickness, so it appears to be hidden in the wall when pressed. If Lip is positive (Lip is measured in units), then the button will "travel" a shorter distance, and if it is negative, it will travel a greater distance.
You can read more about the definition of Lip in the article Sliding and Rotating Doors.
The buttons also have rarely used "Sparks" and "Touch Activates" flags. If the first one is checked, then sparks will fly from the button, if the second one, then the button will be pressed by a simple touch of the player (no need to press the "Use" button).
We figured out the properties.
We placed two objects on the test map light with the same names light1 (we entered this name in the "Targeted object" parameter of the button). We also marked both lights with an "Initially dark" flag so that they would not be lit at the beginning of the round.

2. Creating leverage

Now let's look at creating a rotating arm. Remember the lever in the underground tunnel on cs_militiathe one that turns off the lights? Now we will tell you how to make the same one. In our example, the lever will open the door (object func_door), which leads from the room to the street.
In the picture below you can see a very simple lever, consisting of just one brush (vertical "stick"). All other brushes (a large box and a small brush on its side) were made for greater realism. Since the lever in this case is a rotating object, it is necessary to determine the axis of rotation for it. As you already know, the point in space through which the rotation axis passes is determined by the center of the ORIGIN brush.
Create a lever and axis of rotation (ORIGIN brush)
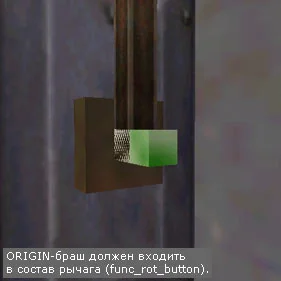
The figure below shows how it is placed ORIGIN brush. For clarity, we have extended it along the axis of rotation (this is the horizontal axis).
Placement of ORIGIN brush
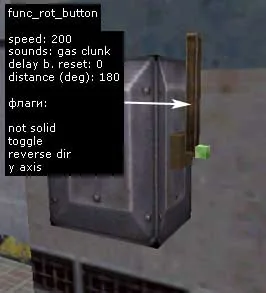
Now select the "stick" and the ORIGIN brush and turn them into func_rot_button. Then we set the following properties and flags (refers to the lever used in our test card):
Targetted object — door1 (this is the name of the door that the lever will open);
Speed — 200 (the rotation speed of the lever, in this case quite high);
Sounds — gus clunc (sound when you press the lever, there are several options, choose any);
Delay before reset — 0 (time in seconds during which the lever does not work after being pressed. In this case, the lever can be pressed as often as desired. If you set the value to "-1", the lever can be used only once per round);
Distance (deg) — 180 (the angle at which the lever will rotate when moving. In our case, the lever will stop in the lower vertical position).
Flags:
Not Solid — it is advisable that you always mark this flag. It makes leverage intangible. Such a lever does not touch the players when rotating, and vice versa, the players do not interfere with the rotation of the lever. If the lever is quite long and this flag is not checked, then a situation may arise where the lever will touch the player pressing it and, accordingly, will not rotate;
Reverse Dir - this flag causes the lever to rotate counterclockwise. The direction is easy to determine from the top view: if the end of the lever moves from right to left in the top position of the lever, then this movement is counterclockwise and vice versa. It is useful to note the flag in the case when the lever, when rotating, passes through the wall, which in theory should not happen;
Toggle — if checked, then the lever, after activation, will remain in the pressed position until it is activated again;
Y Axis — in our example, the axis of rotation of the lever in the top view runs vertically, therefore this is the Y axis. If the axis in the top view runs horizontally, then the "X Axis" flag should be checked. Naturally, if the lever rotates around the Z axis, then there is no need to mark any flags.
The lever is ready. All that remains is to create a door named door1 to test the operation of the lever.
As always, if something remains unclear to you, you can download an example map and figure it out yourself using the source code.
buttons.zip [30Kb] - in the archive there is an example map in BSP and RMF formats.
13.4

Everything About Crates

In this article you will learn how to make crates explode with a bomb, why some mappers lift crates off the ground, how to make a crate that cannot be shot, how to solve a problem with two breakable crates standing on top of each other, and some other useful information.
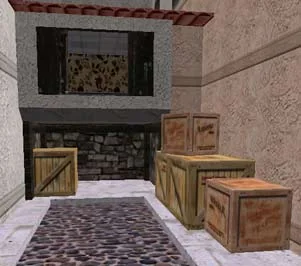
So, boxes or crates in English. Crates have become an integral part of maps in Counter-Strike. They are used as cover in places where teams clash, they are installed on bomb places, they are used to climb into inaccessible places, etc. It's hard to find a map that doesn't have boxes on it. And, for example, a card like DE_DUST2 in general, he is probably the champion in the number of boxes :) If you remember the map DE_SURVIVOR (snowy one), then on it you will find only 1 box, on which it is written with ridicule: "This is the only box on the entire map!" This is how the author of the map, 3D_Mike, decided to joke.
Let's leave the boxes on his conscience on one of the bomb places, on the one where the truck is parked. Although Mike himself calls them not boxes, but boxes... Oh, yes! A big difference... - in general, almost all mappers use boxes.

1. We blow up the boxes along with the bomb

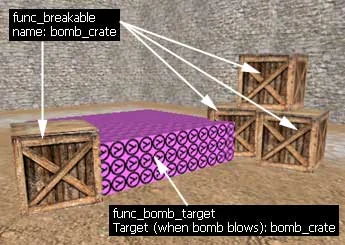
We all remember perfectly well how on the map DE_DUST The boxes explode along with the bomb. Let's see how this feature is implemented. The picture below shows a diagram in which the boxes will explode along with the bomb.
With such properties of objects, the boxes explode along with the bomb
So we have an object func_bomb_target, painted with a special texture AAATrigger. This object, as you know, determines the location of the bomb. We also have several boxes (for now these are ordinary brushes). All these boxes need to be turned into an object func_breakable (select all the boxes and click [Ctrl-T], select func_breakable from the list).
You can turn each box into a separate one func_breakable, or you can turn all the boxes into 1 single box at once func_breakable. If you decide to make several func_breakable, then give them all the same name.
Main properties of func_breakable:
Name — bomb_crate (be sure to specify a name, it can be anything);
In the Flags tab you should note:
Only Trigger - so that the boxes explode only from a trigger, i.e. bombs in our case.
Set the remaining parameters, such as: material type (material), explode magnitude (explosion power) at your discretion.
Now let's move on to the object func_bomb_target. All you need to do with it is to enter the name of our boxes in the "Target (when bomb blows)" parameter, i.e. bomb_crate. That's all.

2. Why mappers hang boxes above the ground

For example, on the map DE_NUKE there is this "bug":
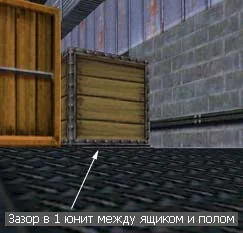
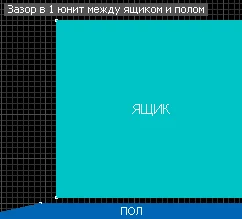
The box "floats" above the ground
And the organizers of various Counter-Strike championships call this a bug. They even monitor the players so that they do not look through this crack, through which the opponent's legs can be seen.
In side view it looks like this:
t20crate1 Perhaps the author of the map specifically wanted to make such a feature, but this is in this particular case, and so, usually, the box is not brought to the ground by 1 unit, in order to reduce the parameter r_speeds, which shows the number of polygons drawn by the game engine. If the box is a regular brush (not an entity object) and is in contact with the floor, then the floor will be divided into smaller polygons, which will increase their number and, accordingly, the parameter r_speeds.
If the box is an entity object, for example, func_wall, or it does not come into contact with the floor (as in our case), then no splitting occurs and r_speeds does not increase. This way we can save a few polygons. Learn more about map optimization and reduction r_speeds You can read in the corresponding section of the Tutorial.

3. How to make an impenetrable box

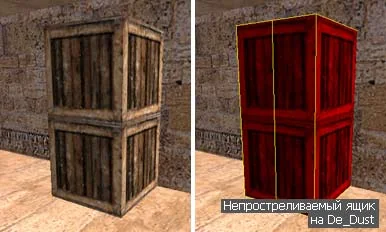
Let's return again to the De_Dust map. The picture below shows a box that cannot be penetrated by any type of weapon.
"Device" of an impenetrable box
As you can see from the picture, the box is cut into two halves vertically. The Half-Life engine is designed in such a way that one brush or entity object is pierced by piercing weapons, but two standing close to each other are not. This is the answer to the question why larger boxes standing in the "gut" break through, but this seemingly not very thick box does not.
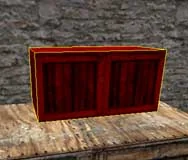
In some cases, you may need to make two boxes side by side so that they are punchable. Then, instead of two boxes, you need to create one, but the size is equal to two (see figure below).
We create "two" punchable boxes standing next to each other (brush one)
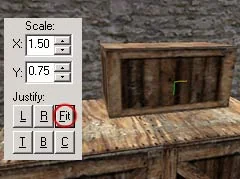
Here's how easy it is to texture this box. Select the desired texture of the box, select the larger side of the box and in the panel for working with textures (Face Properties) click the button Fitto stretch the texture along the entire side of the brush.
Press the Fit button to stretch the texture over the entire side of the brush
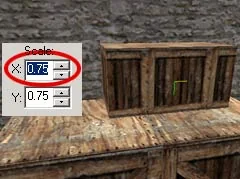
Then, on the same panel, reduce the Scale of the texture by 2 times along the X or Y axis (depending on the position of the box). If you decide to make not 2 boxes, but say 4, then reduce the scale by 4 times, etc.
Reduce the Scale of the texture by 2 times along the X or Y axis depending on the position of the box
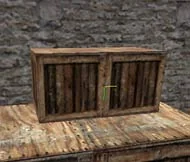
Then you will most likely need to press the side alignment buttons L, R, T, B, Cso that the texture lies evenly, as in the picture below.
Align the texture with the L, R, T, B, C buttons
It seems to the player that there are two boxes, although in fact there is only one brush. And since there is only one brush, it means it will break through.

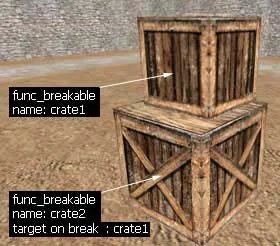
4. Two breakable boxes on top of each other

The picture below shows two breakable boxes, each of which is a separate object func_breakable.
The task is to break the bottom drawer, the top one would also collapse
If the player breaks the top box first and then the bottom one, nothing strange will happen. But what happens if the player breaks the bottom drawer first? Will the top one fall? No matter how it is!
The top one will remain hanging in the air without support as if nothing had happened. It doesn't happen that way. Therefore, it is necessary to ensure that when the bottom drawer is destroyed, the top one is also destroyed. Here's how to achieve it.
Let's give each box (object) func_breakable) Name. Let's call the top one crate1, and the lower one - crate2. We will set the necessary properties (material, strength, etc.). Now the important point. In the "Target on Break" parameter of the bottom drawer, write the name of the top one: crate1.
Now if we break the bottom box, it will activate the top one, and it will also break, but without the help of the player. Well, if we first take apart the top drawer, then the bottom one, as expected, will remain intact. This way we will give our map more realism. The main thing is that someone needs it :)

5. Boxes instead of stairs

In some places on the map, crates can replace stairs. For example, on CS_ITALY Using the boxes you can climb into the room near the counters' spawn or get into the house near the terrorists' spawn.
Boxes can replace stairs
The only thing you need to consider when creating these boxes is their size. Standard box sizes are:
48x48x48
64x64x64
80x80x80
96x96x96
112x112x112
128x128x128
However, standard does not mean that the boxes must be exactly those sizes. In addition, on boxes and generally any other obstacles above 62 units the player cannot climb. So a player cannot climb a standard 64x64x64 box without the help of his teammates.
In order for the player to climb onto the box on his own, its size needs to be reduced, say to 60x60x60 units or up to 56x56x56 units (56 units are convenient because in the editor you will not need to make the cell size too small; 8 units will be enough).

6. Movable boxes

There is nothing complicated here, let's turn the box into func_pushable and set the required properties. The only thing you need to remember is if you set the flag for this object breakable, then the box can be broken only 1 time, because after his first break, he will disappear for the rest of the game until the map is restarted. This happens, for example, with a stool on the map CS_ESTATEwhich blocks the door. If the stool is broken, it will no longer appear.
CS received this "gift" from its parent – ​​Half-Life. There is no such thing as rounds in Half-Life, which is why objects in HL disappeared forever. In CS, unfortunately, the exact same thing happens, so you have to constantly be on your guard.
What else can you add to what has been said? You should probably advise not to turn your card into a warehouse. Yes, boxes are irreplaceable in some cases, and a box with a beautiful texture can fit perfectly into the design of the map and improve its appearance, but still try not to overdo it, come up with more natural hiding places, or, at worst, replace the boxes with trash cans, barrels, worn out tires, some devices, transformers - in general, come up with them!
This is perhaps the basic information about boxes that every mapper should know.