In this article we will talk about a very important parameter R_SPEEDS, which shows how slow your card is. You will learn how to view R_SPEEDS on the map you created and how to reduce it if the map is slow.
Contents of the article:
R_SPEEDS is a dynamic parameter; it changes depending on the player's position on the map and the direction of his view. Indeed, if you look at a wall or corner, the number of frames per second will most likely be a maximum of 99-100. If you go out into open space, then FPS will be lower, and R_SPEEDS will be correspondingly higher.
Check that you have the parameter specified in the shortcut for CS -console, which will allow us to open the console in the game. Those. The game launch line looks something like this: C:\Games\HL\hl.exe -game cstrike -console.
Let's create a server on our map. After loading the level, pull up the console and write:
developer 1
r_speeds 1
After this, numbers will appear in the left corner of the screen and in the console (see figure below), which will change as the player moves around the map or when the direction of view changes.
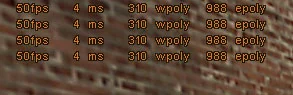
As you can see, the numbers are divided into 4 columns. We are interested in columns with words wpoly And epoly (these are the 2 right columns).
310 wpoly — (from the English world polygons) the number of polygons that brushes create: ground, walls, roofs, rocks, etc. This is the main indicator of R_SPEEDS. The more wpoly, the more the card slows down.
988 epoly — (from the English entity polygons) the number of polygons that models create (hands with weapons, players, other models). When you see 4-5 players on the screen, then epoly noticeably higher than if you see 1 player.
If you type the command in the console r_drawviewmodel 0, then this will remove the image of hands and weapons from the screen and thereby reduce the indicator epoly to zero (if you don't see other players). On weak computers, this can significantly increase FPS (note: this console command was relevant for CS versions 1.5 and earlier; in CS 1.6 you cannot remove weapons from the screen due to the shield).
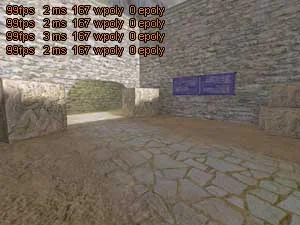
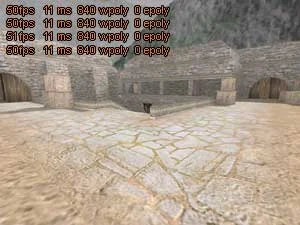
The two pictures below clearly demonstrate the dependence of R_SPEEDS (and FPS) on the size of the visible space.
This screenshot was taken at the terrorist base on the de_aztec map. Here R_SPEEDS is equal to 167 polygons (in a given viewing direction). The number of frames per second is maximum and equal to 99 FPS.
Now let's move closer to the bomb planting point (near the water). Here R_SPEEDS is much higher and is about 800-850 wpoly, which causes a decrease in FPS to 50, as can be seen from the figure. The computer on which the test was carried out: Pentium III 600 MHz + GeForce 256.
We are of the following opinion:
1) In places where teams clash, where there are constant skirmishes, the number of wpoly should be minimal - up to 600 (ideally: 400-450).
2) At team bases, in places where players appear rarely or meet 1 on 1, and not 5 on 5, the number of wpoly may be greater - up to 750.
After you have compiled the map, you need to run through all its places and look at R_SPEEDS. If you notice high wpoly values (more than 750), then this part of the map needs to be optimized (see below) or completely redone.
And one more tip, run on standard CS maps with the R_SPEEDS parameter enabled. You will see that the amount of wpoly on them is quite low, which allows you to play comfortably even on weak machines. So the conclusion is: the fewer R_SPEEDS on your card, the better.
Epoly is not as important as wpoly, but too high values (more than 4000-5000 epoly) of this parameter also cause a significant decrease in FPS. In principle, you should not pay attention to the epoly indicator. When testing the card, you only need to consider the wpoly values.
4.1 Splitting into polygons when brushes touch
The Half-Life game engine is designed in such a way that when a small brush comes into contact with a larger one (for example, a box is on the ground), the ground is split into smaller polygons. Here's how it works (the white stripes indicate the boundaries of the polygons).
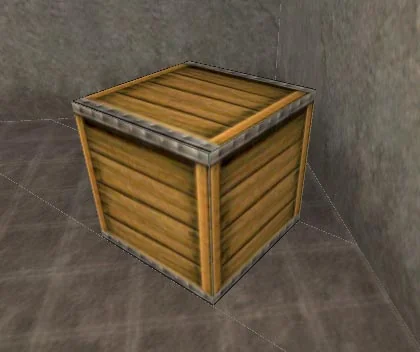
It can be seen from the picture that a box standing on the floor breaks it into polygons with its lower edges.
In the following picture, the box is turned into an entity object func_wall, and entity objects DO NOT SPLIT brushes into polygons. Hence the first way to optimize the map - small objects like boxes can be turned into func_wall (other options: func_breakable, func_pushable, other options are possible). This is the first important rule to remember.
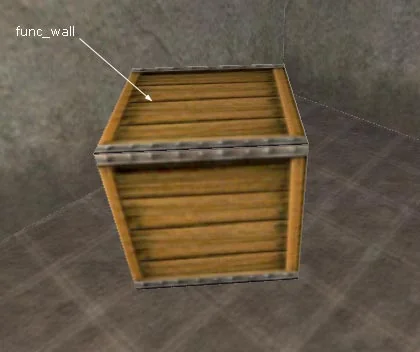
It absolutely does not matter what entity object you use (func_wall, func_breakable, func_train, func_illusionary, func_button, func_vehicle or any other entity object) - when it comes into contact with brushes, no breaking occurs!
Another example: a lamp made from several brushes breaks a wall.
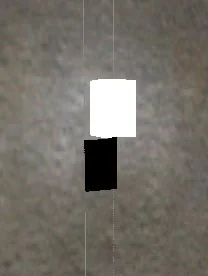
But if we turn the lamp into a func_illusionary, there will be no more splitting and we will thereby save several polygons.
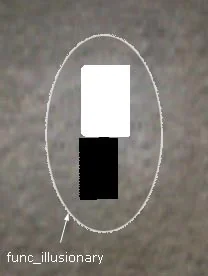
By the way, very often in bottlenecks on maps (corridors, tunnels) small objects (lamps, paintings...) turn into func_illusionary. This helps, firstly, to save several landfills, eh? secondly, it does not interfere with the player's movement (the player can easily pass through func_illusionary).
From all this, of course, it does not follow that you should turn all the boxes on the map into func_wall. In most cases, mappers leave them as brushes. But there are times when you simply need to turn this or that brush into an entity object. Here is one such example.
Let's say you created magnificent columns with stands on the map (see figure below). Each column has 16 side faces.
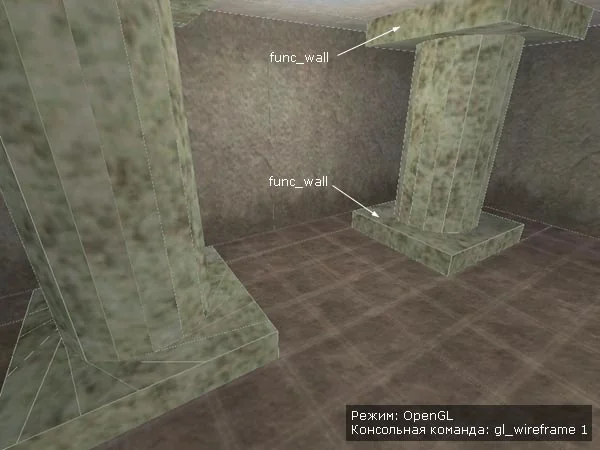
On the left, both the column and the stands are left as regular brushes. In this case, both supports (lower and upper) are each divided into 16 polygons (according to the number of sides of the column). Thus, in this area of the map the number of polygons increases by 32. What if we make 10 such columns? There will already be 320 polygons!
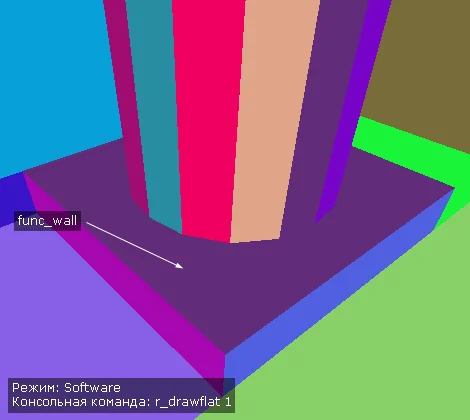
On the right, both stands were turned into func_wall, but we left the column itself as a brush. No splitting occurs. We saved 32 landfills!
The figure shows that to display the boundaries of polygons we launched CS in the mode OpenGL and entered the command gl_wireframe 1 (you can also use gl_wireframe 2, then the objects will become translucent and all polygons drawn by the engine will be displayed).
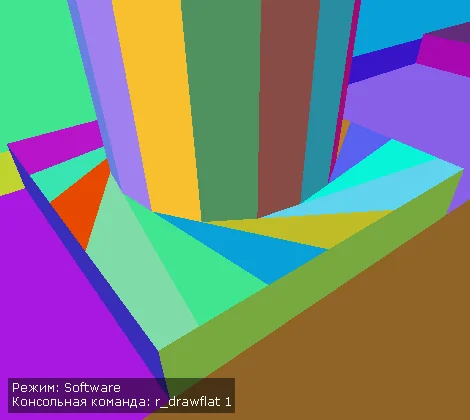
Another useful console command is r_drawflat 1, which can only be used in mode Software. In this case, each individual polygon is painted in its own color.
This is what the left brush column will look like in this mode:
 The second column with stands from func_wall looks like this:
 It should be noted that in both cases, in order to be able to use the specified console commands, the card should be launched from the console (that is, we launch CS, go to the console and write
map map_name). If you create a server, as usual, from the menu, the commands will not work, because they are prohibited in multiplayer.
It should be noted that in both cases, in order to be able to use the specified console commands, the card should be launched from the console (that is, we launch CS, go to the console and write
map map_name). If you create a server, as usual, from the menu, the commands will not work, because they are prohibited in multiplayer.
IMPORTANT: never turn the walls (or God forbid the floor!) that form the basis of your map into entity objects. The fact is that the game engine "sees" through entity objects and draws everything that is behind them. For example, if there is half a card behind some wall and you turn it into func_wall, then there will be big "brakes" in this place due to high R_SPEEDS.
4.2 Splitting into polygons with textures
As you know, textures have a certain size, for example, 128x128 pixels. Let's imagine that we have a wall on the map with dimensions larger than the texture size, for example, 256x256 units. In this case, even though we have one brush, there will be more polygons.
For example, if the wall has dimensions of 256x256, and the texture is 128x128, then this brush will be divided into 4 polygons, because The texture area is exactly 4 times smaller than the brush area.
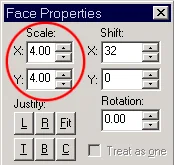
In the Hammer editor we have the ability to change the scale of the texture. This is done (remember:) in the "Face Properties" panel in the Scale parameter.
 Take a look at the image below, it clearly shows how much the number of polygons varies when using different texture scales.
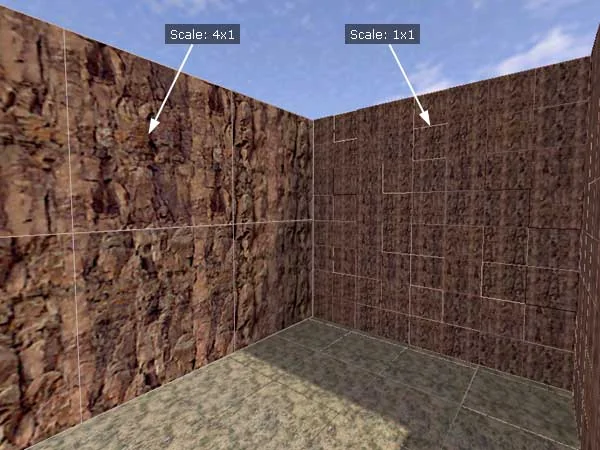
On the left wall the textures are applied at a scale of 4x1 (there are only 6 polygons), and on the right - 1x1 (16 times more polygons!). Of course, the wall on the left looks more blurry, but in cases where it is necessary to reduce the number of polygons, this method can be successfully applied. You can achieve the best results by increasing the scale of textures on brushes that are large in area (rocks, earth).
4.3 Large open spaces
Well, the last reason for the large R_SPEEDS, which, in fact, follows from the two listed above, is the openness of the map and excessive saturation of details.
The Half-Life game engine is not designed for large spaces (it doesn't have to be an open space (with the sky). A large hangar with a lot of parts will also slow down). Remember what game you are creating maps for, this is not Unreal :) Half loves closed spaces, all kinds of corridors and gets very upset when you force him to draw tall mountains or 50 multi-story buildings on one street. If the map you created is slow and R_SPEEDS is approaching several thousand wpoly, you need to radically (using surgical methods :) change the map.
5.1 Closing view of players
Actually, it's not even a method as such. The map just needs to be built in such a way that there are no large open spaces.
What do you mean by large open spaces?
Let's give specific examples.
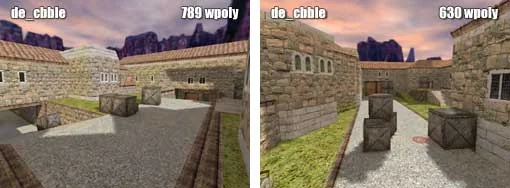
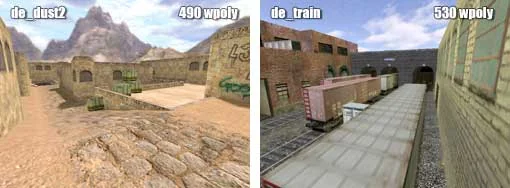
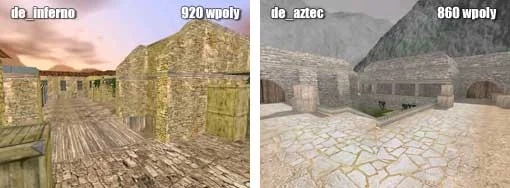
The above examples show what the maximum dimensions should be for open spaces in CS. Please also keep in mind that the authors of these maps are professionals who have optimized their maps in the best possible way. You can become the same professionals, all you need to do is read all the articles in our Tutorial :).
So, when creating an open space, do not go beyond what is reasonable. All paths and approaches to such a "loaded" place should either be fenced off with something (as on de_cbble with a huge thick gate, Fig. 1), or they should simply be curved (Fig. 2).
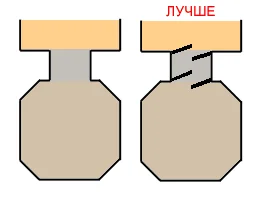
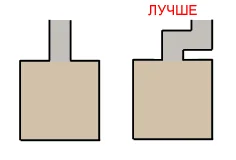 In both cases, the player's view is blocked, he sees fewer polygons, and therefore the map slows down less. Naturally, we have given only a few options, for example, you can also "play" with the terrain (make the approaches inclined, like to the base of the counters on de_cbble), especially since players really like "multi-story" maps (de_aztec, de_dust2). You can come up with a lot of options, the main thing is to understand how the game engine works, how it divides the map into visible spaces (this will be discussed in more detail in the article about the 8th method with HINT brushes).
5.2 1 unit gap method
This is a very common method, the essence of which is to raise the brush by 1 unit (more is possible) above the surface of the earth.
Indeed, if you think about it, in this case a box hanging above the ground at a distance of only 1 unit does not touch its surface. And if there is no contact, then there is no division of the earth into polygons. In addition, an ordinary player (not a mapper :) will not notice that the box is hanging above the ground, because it is suspended just a little bit. Naturally, in this case the box does not need to be turned into an entity object.
This method is widely used on such maps as: de_train, de_aztec, cs_backalley. Here, for example, is a picture from de_train:
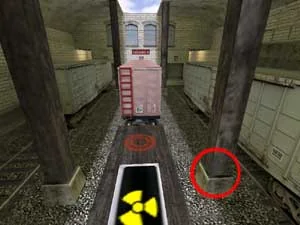
The picture shows that the concrete stand for the pillar is larger in area. This means that upon contact, it would be divided into 4 polygons. The author of the map made a small gap between the pillar and the stand (1-2 units). Now there is no contact, and instead of 4 polygons we have only 2 (the "bottom" of the pillar and the top of the stand). And if we paint the "bottom" of the pillar with the SKY texture, which does not create polygons, then only 1 polygon will be drawn (read about using SKY textures to optimize the map below).
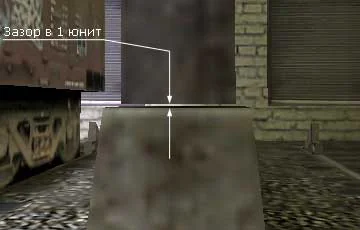
Also on this map, all the carriages and some boxes are raised above the ground - this allowed us to avoid numerous splits of the ground.
On de_aztec the wires and lamps are not extended to the ceiling. There is also a gap between them and the ceiling.
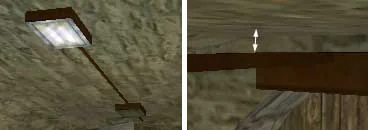
This method is also used on de_nuke (see figure below).
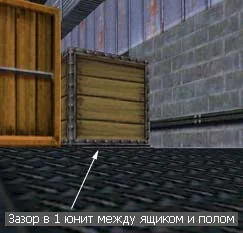
Naturally, you shouldn't go to extremes and hang absolutely all the boxes and other objects. Do this if necessary, when R_SPEEDS is large.
5.3 Method using 240x240 pixel textures
This is a very effective (super effective :) method of reducing the number of polygons. The bottom line is that the Half-Life engine breaks absolutely all surfaces every 240 pixels of the texture. It doesn't matter that you "stretched" a 256x256 pixel texture onto the box, it will still be broken after 240 pixels.
Now we will again use launching the map from the console and the invaluable command gl_wireframe 1 (OpenGL mode). The picture below shows a box measuring 256x256 units with a texture superimposed on it, also with dimensions of 256x256, but of course pixels. Having used the console command gl_wireframe 1, we are surprised to notice that instead of 1 polygon (after all, there is only 1 texture), we have drawn as many as 4! What's the matter? Why are there 4 polygons on each side of the box? After all, now it turns out that one single box creates as many as: 4 x 5 = 20 polygons (5 is the number of visible sides)???
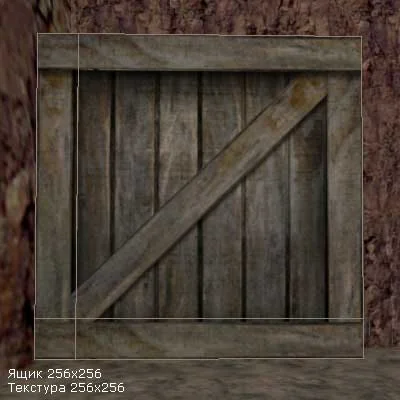
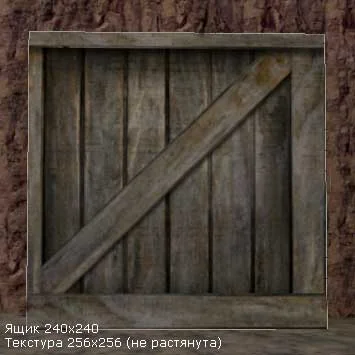
As you already know, the Half-Life engine breaks all surfaces into polygons every 240 pixels of the texture. To make it clearer, here is another drawing. On it we see the same box, but a little smaller - 240x240 units. The texture is also applied on a 1x1 scale. Here we seem to not see part of the texture (16 pixels in width and 16 in height are hidden from us).
And the point is precisely in the texture pixels, and not in the size of the box in units. Here's another example. Here the box is already quite small, 96x96 units, and the texture is still 256x256. In the editor, we applied a "Fit" to the texture (a button in the Face Properties panel), which compressed our large texture to the size of a box.
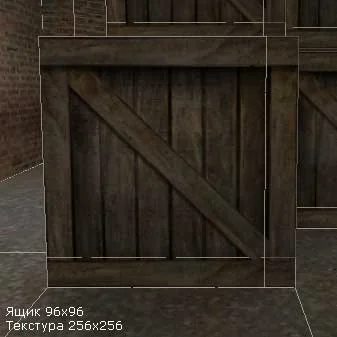
As you can see, even such a small surface of the box is divided into 4 polygons. That is, 240 pixels are counted on the texture and a "seam" is made. Thus, if a box has 5 visible sides (we don't see the bottom), then instead of the expected 5 polygons we have 20! And if we have 10 boxes, therefore, instead of 50 polygons we will have 200! The same applies to all objects on which a 256x256 texture is applied (in general, this is now a very popular texture size, but in vain!). Mappers often apply 256x256 textures to walls, roofs, passages, rocks - all this SIGNIFICANTLY increases the number of polygons.
The outputs here are as follows:
This option does not work with official ZHLT 2.5.3 (it only appeared in Custom Build). The author of improved compilers notes that in Software mode problems may arise due to this parameter, but for us and many other mappers it does not work at all! In general, the idea is not bad, but the implementation is lame.
5.4 Using SKY textures
You already know that SKY textures are used to create the sky. But they have another very good property: the sides of objects painted with the SKY texture do not create polygons! That is, if we paint some objects with a SKY texture, they will not create polygons, however, they will be absolutely transparent (the sky will be visible through them :).
SKY textures need to be applied to surfaces that the player cannot see in the game. What are these surfaces? The roofs of houses, the top edges of fences, walls - in general, everything that the player cannot see under normal conditions.
Indeed, the player cannot see the roofs of houses, for example, here (see figure below).
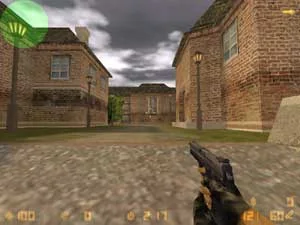
In this case, we simply take and paint over all the roofs with the SKY texture (see figure below).
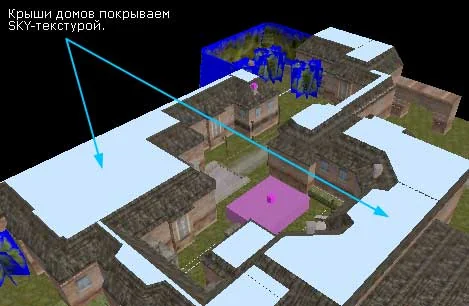
Now we will have fewer polygons on the map, plus it will take less time to compile, because SKY surfaces do not need lighting calculations (they are simply ignored).
We all noticed, playing for example on de_dust, that if in spectator mode we rise a little higher than the walls, the ceilings become transparent (see figure below).
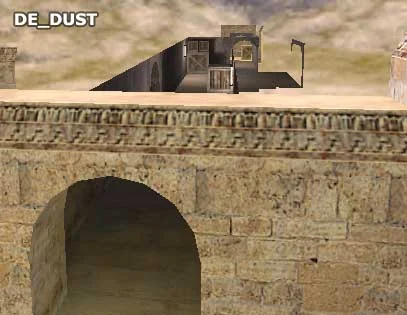
This is precisely proof that the SKY texture was applied to them in order to reduce the number of polygons.
Note: if for some reason you create the sky in the form of a large box around the card, then you should paint over all the outer sides of the card, as well as its bottom, with the SKY texture (see the figure below).
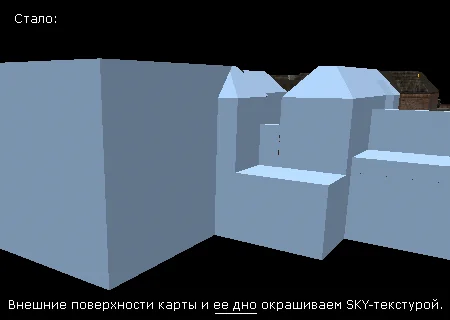
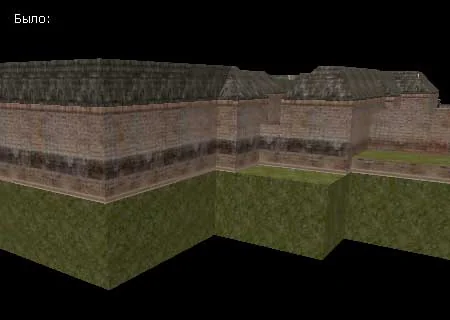
In this case, we sharply reduce the compilation time (since now the outer sides of the map (and its bottom), which the player will never see anyway, are not calculated for lighting).
Well, if you are building the correct sky (with a dome above the map), then there is no need to do this. But the roofs must be painted over in any case, because... they are 100% exposed to lighting.
5.5 Dividing the map into separate spaces
Now let's look at the last method (in this article) - the method of dividing the map into separate spaces.
In principle, this method is essentially a method for creating the correct sky, when SKY brushes are built along the perimeter of the map, as if repeating its external and internal walls.
Let's look at the principle of constructing a map using the popular de_dust2 as an example.
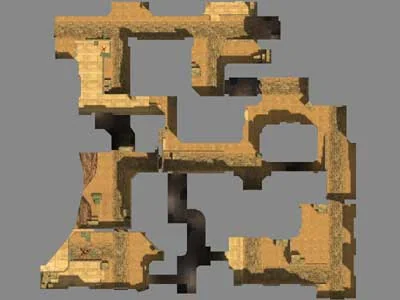
De_Dust2 can be schematically divided into 5 main areas (spaces). It is clear how this division occurs - each space is separated from the neighboring one either by a gate or a passage in the wall.
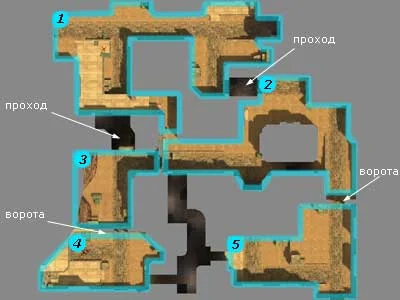
Being in one of these spaces, the player sees only one of them, well, and an insignificant part of the adjacent space (the Half-Life engine does not draw the rest of the map areas - it dismaps them). All this allows us to achieve excellent R_SPEEDS and excellent map rendering speed.
It's time to introduce you to another console command useful for testing the card: r_draworder 1.
This command only works in mode Software and provided that you launch the map from the console, and not through the game menu.
When using this command, you can see how the game engine works, which areas of the map it draws.
Here, for example, is what de_dust2 will look like in its first area.
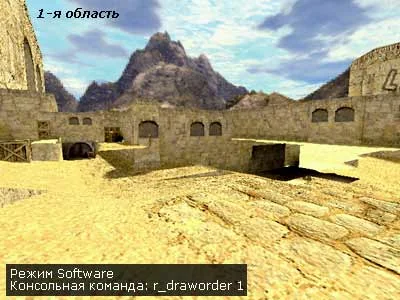
We are located at the counter base (bomb place "A"). The Half-Life engine, in addition to the directly visible parts of the map, draws a little more. So, for example, we see the base of the counters (under the bridge) and another part of the passage (if you go not to the base, but to the left, where there is a descent and a dead end). The engine doesn't draw everything else.
Or here's a picture from the third area (also near the control base, but only near the central passage).
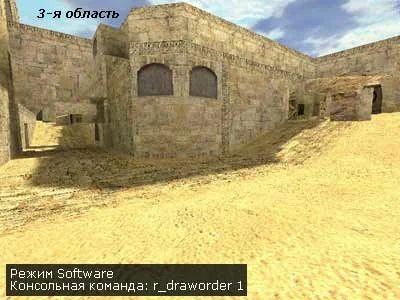
Here you can see the entire central passage (despite the gate) and part of base "B". Everything else is also discarded.
Now let's imagine what would happen if our map was a kind of box in which there were no internal walls or passages?
In this case, the engine would draw the entire map, which, naturally, would noticeably increase its "slowness."
The conclusion from all this is this: the map must be divided into areas. The areas must be connected by some kind of passages or be at different heights (one area is lower, the other is higher).
But there are situations when the game engine, despite the presence of a high wall in front of the player's eyes, still draws the spaces located behind this wall. For example, in this case:
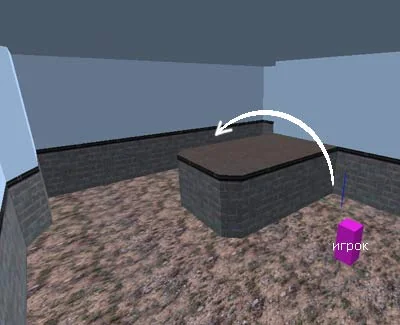
The player, represented by the purple figure, cannot actually see what is behind the wall, but the game engine draws that area of the map. This happens, apparently, due to insufficient wall height. The engine's gaze, as it were, jumps over this low obstacle, draws the map area behind it and thereby increases the number of polygons.
It is difficult to say how tall the wall should be. Sometimes it seems like you've made a really high wall, say 320 units, but the engine still draws what's behind it. What if you don't want to make all the walls on your map 400 units high? What to do?
This can be corrected by creating a SKY brush over the wall. This SKY brush follows the shape of the wall and occupies the entire space from its top to the sky (top SKY brush).
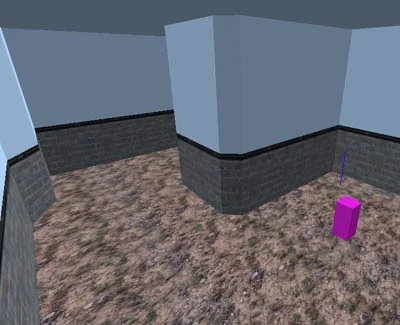
In another example with gates (see figure below), this technique is unlikely to help save landfills, because the engine "sneaks" through the gate opening perfectly. However, if the player does not directly see the gate (will look to the side), then this technique can also work, and the engine will "cut off" part of the map behind the gate.
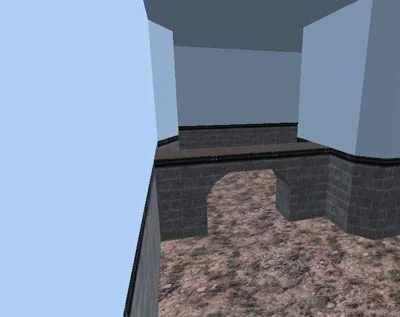
Therefore, in this case, we recommend creating a SKY brush between the gate and the top SKY brush.
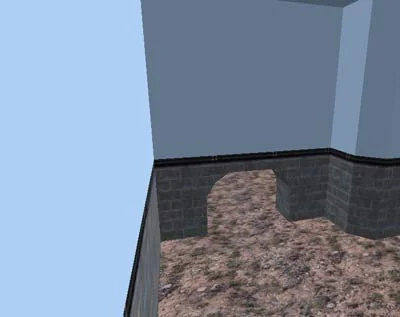
This is what you need to do with the entire map - divide it with SKY brushes into separate areas. By the way, when creating general lighting, you can only create 1 object light_environment, place it in any of the areas, and all areas will be normally illuminated, i.e. There is no need to make several "suns" (previously it was necessary to illuminate each area separately).
By talking about this method, we are already very close to the last method of increasing FPS on the map - using HINT brushes. Naturally, in this article we will not talk about this method (and so the article turned out to be simply huge :), but the initial knowledge about the operation of the game engine obtained in this article will be useful to you.
developer 1 — displays various service messages on the screen;
r_speeds 1 — displays wpoly and epoly indicators;
gl_wireframe 1 / 2 — shows the boundaries of polygons (OpenGL);
r_drawflat 1 — replaces textured surfaces with colored ones (Software);
r_draworder 1 — shows which areas of the map are displayed by the game engine (Software)
The last 3 commands will only work if the map is launched from the console (as a single Half-Life level).
That's all. Don't let R_SPEEDS jump too high and take action in time.
Contents of the article:
- What is R_SPEEDS?
- How can I find out R_SPEEDS on my card?
- What should the maximum R_SPEEDS be?
- Reasons for large R_SPEEDS
- Methods for reducing R_SPEEDS
- Console commands
1. What is R_SPEEDS?
R_SPEEDS is a special parameter that shows the number of polygons visible to the player on the map. The more polygons displayed simultaneously, the lower the FPS (frames per second). If there are too many polygons, then the map begins, as they say, to "slow down". So, FPS depends on the number of polygons, and therefore on the readings of the R_SPEEDS parameter. The more R_SPEEDS (the more polygons), the less FPS and vice versa.R_SPEEDS is a dynamic parameter; it changes depending on the player's position on the map and the direction of his view. Indeed, if you look at a wall or corner, the number of frames per second will most likely be a maximum of 99-100. If you go out into open space, then FPS will be lower, and R_SPEEDS will be correspondingly higher.
2. How can I find out R_SPEEDS on my card?
So how do we look at R_SPEEDS on our map?Check that you have the parameter specified in the shortcut for CS -console, which will allow us to open the console in the game. Those. The game launch line looks something like this: C:\Games\HL\hl.exe -game cstrike -console.
Let's create a server on our map. After loading the level, pull up the console and write:
developer 1
r_speeds 1
After this, numbers will appear in the left corner of the screen and in the console (see figure below), which will change as the player moves around the map or when the direction of view changes.
As you can see, the numbers are divided into 4 columns. We are interested in columns with words wpoly And epoly (these are the 2 right columns).
310 wpoly — (from the English world polygons) the number of polygons that brushes create: ground, walls, roofs, rocks, etc. This is the main indicator of R_SPEEDS. The more wpoly, the more the card slows down.
988 epoly — (from the English entity polygons) the number of polygons that models create (hands with weapons, players, other models). When you see 4-5 players on the screen, then epoly noticeably higher than if you see 1 player.
If you type the command in the console r_drawviewmodel 0, then this will remove the image of hands and weapons from the screen and thereby reduce the indicator epoly to zero (if you don't see other players). On weak computers, this can significantly increase FPS (note: this console command was relevant for CS versions 1.5 and earlier; in CS 1.6 you cannot remove weapons from the screen due to the shield).
The two pictures below clearly demonstrate the dependence of R_SPEEDS (and FPS) on the size of the visible space.
This screenshot was taken at the terrorist base on the de_aztec map. Here R_SPEEDS is equal to 167 polygons (in a given viewing direction). The number of frames per second is maximum and equal to 99 FPS.
Now let's move closer to the bomb planting point (near the water). Here R_SPEEDS is much higher and is about 800-850 wpoly, which causes a decrease in FPS to 50, as can be seen from the figure. The computer on which the test was carried out: Pentium III 600 MHz + GeForce 256.
3. What should the maximum R_SPEEDS be?
There is a lot of debate on the topic of maximum R_SPEEDS. Some say that the wpoly parameter should not be more than 600, others allow 1000 wpoly, citing as an argument the fact that computers are quite powerful at the moment.We are of the following opinion:
1) In places where teams clash, where there are constant skirmishes, the number of wpoly should be minimal - up to 600 (ideally: 400-450).
2) At team bases, in places where players appear rarely or meet 1 on 1, and not 5 on 5, the number of wpoly may be greater - up to 750.
After you have compiled the map, you need to run through all its places and look at R_SPEEDS. If you notice high wpoly values (more than 750), then this part of the map needs to be optimized (see below) or completely redone.
And one more tip, run on standard CS maps with the R_SPEEDS parameter enabled. You will see that the amount of wpoly on them is quite low, which allows you to play comfortably even on weak machines. So the conclusion is: the fewer R_SPEEDS on your card, the better.
Epoly is not as important as wpoly, but too high values (more than 4000-5000 epoly) of this parameter also cause a significant decrease in FPS. In principle, you should not pay attention to the epoly indicator. When testing the card, you only need to consider the wpoly values.
4. Reasons for large R_SPEEDS
So, we already know that the number of frames per second depends on the number of polygons, which at its maximum should be 500-700 wpoly. Now let's look at what the number of polygons depends on and what polygons are made of in general.4.1 Splitting into polygons when brushes touch
The Half-Life game engine is designed in such a way that when a small brush comes into contact with a larger one (for example, a box is on the ground), the ground is split into smaller polygons. Here's how it works (the white stripes indicate the boundaries of the polygons).
It can be seen from the picture that a box standing on the floor breaks it into polygons with its lower edges.
In the following picture, the box is turned into an entity object func_wall, and entity objects DO NOT SPLIT brushes into polygons. Hence the first way to optimize the map - small objects like boxes can be turned into func_wall (other options: func_breakable, func_pushable, other options are possible). This is the first important rule to remember.
It absolutely does not matter what entity object you use (func_wall, func_breakable, func_train, func_illusionary, func_button, func_vehicle or any other entity object) - when it comes into contact with brushes, no breaking occurs!
Another example: a lamp made from several brushes breaks a wall.
But if we turn the lamp into a func_illusionary, there will be no more splitting and we will thereby save several polygons.
By the way, very often in bottlenecks on maps (corridors, tunnels) small objects (lamps, paintings...) turn into func_illusionary. This helps, firstly, to save several landfills, eh? secondly, it does not interfere with the player's movement (the player can easily pass through func_illusionary).
From all this, of course, it does not follow that you should turn all the boxes on the map into func_wall. In most cases, mappers leave them as brushes. But there are times when you simply need to turn this or that brush into an entity object. Here is one such example.
Let's say you created magnificent columns with stands on the map (see figure below). Each column has 16 side faces.
On the left, both the column and the stands are left as regular brushes. In this case, both supports (lower and upper) are each divided into 16 polygons (according to the number of sides of the column). Thus, in this area of the map the number of polygons increases by 32. What if we make 10 such columns? There will already be 320 polygons!
On the right, both stands were turned into func_wall, but we left the column itself as a brush. No splitting occurs. We saved 32 landfills!
The figure shows that to display the boundaries of polygons we launched CS in the mode OpenGL and entered the command gl_wireframe 1 (you can also use gl_wireframe 2, then the objects will become translucent and all polygons drawn by the engine will be displayed).
Another useful console command is r_drawflat 1, which can only be used in mode Software. In this case, each individual polygon is painted in its own color.
This is what the left brush column will look like in this mode:
The second column with stands from func_wall looks like this:
It should be noted that in both cases, in order to be able to use the specified console commands, the card should be launched from the console (that is, we launch CS, go to the console and write
map map_name). If you create a server, as usual, from the menu, the commands will not work, because they are prohibited in multiplayer.IMPORTANT: never turn the walls (or God forbid the floor!) that form the basis of your map into entity objects. The fact is that the game engine "sees" through entity objects and draws everything that is behind them. For example, if there is half a card behind some wall and you turn it into func_wall, then there will be big "brakes" in this place due to high R_SPEEDS.
4.2 Splitting into polygons with textures
As you know, textures have a certain size, for example, 128x128 pixels. Let's imagine that we have a wall on the map with dimensions larger than the texture size, for example, 256x256 units. In this case, even though we have one brush, there will be more polygons.
For example, if the wall has dimensions of 256x256, and the texture is 128x128, then this brush will be divided into 4 polygons, because The texture area is exactly 4 times smaller than the brush area.
In the Hammer editor we have the ability to change the scale of the texture. This is done (remember:) in the "Face Properties" panel in the Scale parameter.
Take a look at the image below, it clearly shows how much the number of polygons varies when using different texture scales.On the left wall the textures are applied at a scale of 4x1 (there are only 6 polygons), and on the right - 1x1 (16 times more polygons!). Of course, the wall on the left looks more blurry, but in cases where it is necessary to reduce the number of polygons, this method can be successfully applied. You can achieve the best results by increasing the scale of textures on brushes that are large in area (rocks, earth).
4.3 Large open spaces
Well, the last reason for the large R_SPEEDS, which, in fact, follows from the two listed above, is the openness of the map and excessive saturation of details.
The Half-Life game engine is not designed for large spaces (it doesn't have to be an open space (with the sky). A large hangar with a lot of parts will also slow down). Remember what game you are creating maps for, this is not Unreal :) Half loves closed spaces, all kinds of corridors and gets very upset when you force him to draw tall mountains or 50 multi-story buildings on one street. If the map you created is slow and R_SPEEDS is approaching several thousand wpoly, you need to radically (using surgical methods :) change the map.
5. Methods for reducing R_SPEEDS
We have just discussed several basic methods for reducing R_SPEEDS in paragraph 4. There are other tricks that will help reduce R_SPEEDS on your card.- Transforming small brushes into entities (reviewed)
- Upscaling textures (reviewed)
- Closing view of players
- 1 unit gap method
- Method using 240x240 pixel textures
- Application of SKY textures
- "Dividing" the map into separate spaces
- Using HINT Brushes
5.1 Closing view of players
Actually, it's not even a method as such. The map just needs to be built in such a way that there are no large open spaces.
What do you mean by large open spaces?
Let's give specific examples.
The above examples show what the maximum dimensions should be for open spaces in CS. Please also keep in mind that the authors of these maps are professionals who have optimized their maps in the best possible way. You can become the same professionals, all you need to do is read all the articles in our Tutorial :).
So, when creating an open space, do not go beyond what is reasonable. All paths and approaches to such a "loaded" place should either be fenced off with something (as on de_cbble with a huge thick gate, Fig. 1), or they should simply be curved (Fig. 2).
In both cases, the player's view is blocked, he sees fewer polygons, and therefore the map slows down less. Naturally, we have given only a few options, for example, you can also "play" with the terrain (make the approaches inclined, like to the base of the counters on de_cbble), especially since players really like "multi-story" maps (de_aztec, de_dust2). You can come up with a lot of options, the main thing is to understand how the game engine works, how it divides the map into visible spaces (this will be discussed in more detail in the article about the 8th method with HINT brushes).5.2 1 unit gap method
This is a very common method, the essence of which is to raise the brush by 1 unit (more is possible) above the surface of the earth.
Indeed, if you think about it, in this case a box hanging above the ground at a distance of only 1 unit does not touch its surface. And if there is no contact, then there is no division of the earth into polygons. In addition, an ordinary player (not a mapper :) will not notice that the box is hanging above the ground, because it is suspended just a little bit. Naturally, in this case the box does not need to be turned into an entity object.
This method is widely used on such maps as: de_train, de_aztec, cs_backalley. Here, for example, is a picture from de_train:
The picture shows that the concrete stand for the pillar is larger in area. This means that upon contact, it would be divided into 4 polygons. The author of the map made a small gap between the pillar and the stand (1-2 units). Now there is no contact, and instead of 4 polygons we have only 2 (the "bottom" of the pillar and the top of the stand). And if we paint the "bottom" of the pillar with the SKY texture, which does not create polygons, then only 1 polygon will be drawn (read about using SKY textures to optimize the map below).
Also on this map, all the carriages and some boxes are raised above the ground - this allowed us to avoid numerous splits of the ground.
On de_aztec the wires and lamps are not extended to the ceiling. There is also a gap between them and the ceiling.
This method is also used on de_nuke (see figure below).
Naturally, you shouldn't go to extremes and hang absolutely all the boxes and other objects. Do this if necessary, when R_SPEEDS is large.
5.3 Method using 240x240 pixel textures
This is a very effective (super effective :) method of reducing the number of polygons. The bottom line is that the Half-Life engine breaks absolutely all surfaces every 240 pixels of the texture. It doesn't matter that you "stretched" a 256x256 pixel texture onto the box, it will still be broken after 240 pixels.
Now we will again use launching the map from the console and the invaluable command gl_wireframe 1 (OpenGL mode). The picture below shows a box measuring 256x256 units with a texture superimposed on it, also with dimensions of 256x256, but of course pixels. Having used the console command gl_wireframe 1, we are surprised to notice that instead of 1 polygon (after all, there is only 1 texture), we have drawn as many as 4! What's the matter? Why are there 4 polygons on each side of the box? After all, now it turns out that one single box creates as many as: 4 x 5 = 20 polygons (5 is the number of visible sides)???
As you already know, the Half-Life engine breaks all surfaces into polygons every 240 pixels of the texture. To make it clearer, here is another drawing. On it we see the same box, but a little smaller - 240x240 units. The texture is also applied on a 1x1 scale. Here we seem to not see part of the texture (16 pixels in width and 16 in height are hidden from us).
And the point is precisely in the texture pixels, and not in the size of the box in units. Here's another example. Here the box is already quite small, 96x96 units, and the texture is still 256x256. In the editor, we applied a "Fit" to the texture (a button in the Face Properties panel), which compressed our large texture to the size of a box.
As you can see, even such a small surface of the box is divided into 4 polygons. That is, 240 pixels are counted on the texture and a "seam" is made. Thus, if a box has 5 visible sides (we don't see the bottom), then instead of the expected 5 polygons we have 20! And if we have 10 boxes, therefore, instead of 50 polygons we will have 200! The same applies to all objects on which a 256x256 texture is applied (in general, this is now a very popular texture size, but in vain!). Mappers often apply 256x256 textures to walls, roofs, passages, rocks - all this SIGNIFICANTLY increases the number of polygons.
The outputs here are as follows:
- use textures with a size of 240x240 pixels (best)
- do not "Fit" for 256x256 textures (i.e. so that only 240 pixels of the texture are visible)
- make walls 240 units high, in which case part of the 256x256 texture will be hidden
- use parameter -subdivide x for the HLBSP compiler (together with ZHLT Custom Build 1.7 and higher)
This option does not work with official ZHLT 2.5.3 (it only appeared in Custom Build). The author of improved compilers notes that in Software mode problems may arise due to this parameter, but for us and many other mappers it does not work at all! In general, the idea is not bad, but the implementation is lame.
5.4 Using SKY textures
You already know that SKY textures are used to create the sky. But they have another very good property: the sides of objects painted with the SKY texture do not create polygons! That is, if we paint some objects with a SKY texture, they will not create polygons, however, they will be absolutely transparent (the sky will be visible through them :).
SKY textures need to be applied to surfaces that the player cannot see in the game. What are these surfaces? The roofs of houses, the top edges of fences, walls - in general, everything that the player cannot see under normal conditions.
Indeed, the player cannot see the roofs of houses, for example, here (see figure below).
In this case, we simply take and paint over all the roofs with the SKY texture (see figure below).
Now we will have fewer polygons on the map, plus it will take less time to compile, because SKY surfaces do not need lighting calculations (they are simply ignored).
We all noticed, playing for example on de_dust, that if in spectator mode we rise a little higher than the walls, the ceilings become transparent (see figure below).
This is precisely proof that the SKY texture was applied to them in order to reduce the number of polygons.
Note: if for some reason you create the sky in the form of a large box around the card, then you should paint over all the outer sides of the card, as well as its bottom, with the SKY texture (see the figure below).
In this case, we sharply reduce the compilation time (since now the outer sides of the map (and its bottom), which the player will never see anyway, are not calculated for lighting).
Well, if you are building the correct sky (with a dome above the map), then there is no need to do this. But the roofs must be painted over in any case, because... they are 100% exposed to lighting.
5.5 Dividing the map into separate spaces
Now let's look at the last method (in this article) - the method of dividing the map into separate spaces.
In principle, this method is essentially a method for creating the correct sky, when SKY brushes are built along the perimeter of the map, as if repeating its external and internal walls.
Let's look at the principle of constructing a map using the popular de_dust2 as an example.
De_Dust2 can be schematically divided into 5 main areas (spaces). It is clear how this division occurs - each space is separated from the neighboring one either by a gate or a passage in the wall.
Being in one of these spaces, the player sees only one of them, well, and an insignificant part of the adjacent space (the Half-Life engine does not draw the rest of the map areas - it dismaps them). All this allows us to achieve excellent R_SPEEDS and excellent map rendering speed.
It's time to introduce you to another console command useful for testing the card: r_draworder 1.
This command only works in mode Software and provided that you launch the map from the console, and not through the game menu.
When using this command, you can see how the game engine works, which areas of the map it draws.
Here, for example, is what de_dust2 will look like in its first area.
We are located at the counter base (bomb place "A"). The Half-Life engine, in addition to the directly visible parts of the map, draws a little more. So, for example, we see the base of the counters (under the bridge) and another part of the passage (if you go not to the base, but to the left, where there is a descent and a dead end). The engine doesn't draw everything else.
Or here's a picture from the third area (also near the control base, but only near the central passage).
Here you can see the entire central passage (despite the gate) and part of base "B". Everything else is also discarded.
Now let's imagine what would happen if our map was a kind of box in which there were no internal walls or passages?
In this case, the engine would draw the entire map, which, naturally, would noticeably increase its "slowness."
The conclusion from all this is this: the map must be divided into areas. The areas must be connected by some kind of passages or be at different heights (one area is lower, the other is higher).
But there are situations when the game engine, despite the presence of a high wall in front of the player's eyes, still draws the spaces located behind this wall. For example, in this case:
The player, represented by the purple figure, cannot actually see what is behind the wall, but the game engine draws that area of the map. This happens, apparently, due to insufficient wall height. The engine's gaze, as it were, jumps over this low obstacle, draws the map area behind it and thereby increases the number of polygons.
It is difficult to say how tall the wall should be. Sometimes it seems like you've made a really high wall, say 320 units, but the engine still draws what's behind it. What if you don't want to make all the walls on your map 400 units high? What to do?
This can be corrected by creating a SKY brush over the wall. This SKY brush follows the shape of the wall and occupies the entire space from its top to the sky (top SKY brush).
In another example with gates (see figure below), this technique is unlikely to help save landfills, because the engine "sneaks" through the gate opening perfectly. However, if the player does not directly see the gate (will look to the side), then this technique can also work, and the engine will "cut off" part of the map behind the gate.
Therefore, in this case, we recommend creating a SKY brush between the gate and the top SKY brush.
This is what you need to do with the entire map - divide it with SKY brushes into separate areas. By the way, when creating general lighting, you can only create 1 object light_environment, place it in any of the areas, and all areas will be normally illuminated, i.e. There is no need to make several "suns" (previously it was necessary to illuminate each area separately).
By talking about this method, we are already very close to the last method of increasing FPS on the map - using HINT brushes. Naturally, in this article we will not talk about this method (and so the article turned out to be simply huge :), but the initial knowledge about the operation of the game engine obtained in this article will be useful to you.
6. Console commands
And at the end of the article, let's recall the console commands that we used to test the card.developer 1 — displays various service messages on the screen;
r_speeds 1 — displays wpoly and epoly indicators;
gl_wireframe 1 / 2 — shows the boundaries of polygons (OpenGL);
r_drawflat 1 — replaces textured surfaces with colored ones (Software);
r_draworder 1 — shows which areas of the map are displayed by the game engine (Software)
The last 3 commands will only work if the map is launched from the console (as a single Half-Life level).
That's all. Don't let R_SPEEDS jump too high and take action in time.