In this article we will look at the creation of breakable and unbreakable glass. Before reading the article, familiarize yourself with the following entity objects:
Create a glass-shaped brush of any size (optimal thickness 2-4 units). Standard textures with the word are well suited for painting GLASS such as: GLASSBRIGHT, GLASSBLUE1, GLASSGREEN. We will use the latter, GLASSGREEN. In fact, almost any texture can be used for glass (except for special ones and water, of course), because... the object will still be transparent, but textures with the word GLASS will work better.
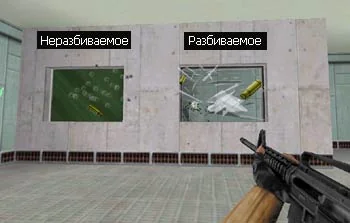
In the picture below you can see three glasses made from different entities with different properties: the left one is breakable, the center and right are unbreakable.
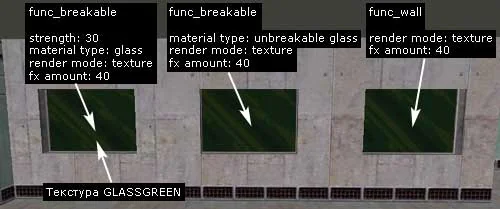
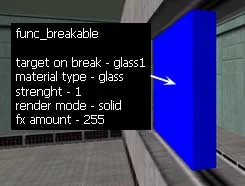
So, you have created a brush, now turn it into func_breakable and set the following properties:
Strength — 30 (glass strength. The higher the value, the more bullets you need to shoot at the glass for it to break);
Material Type — Glass (material, of course, we choose glass);
Render Mode — Texture (this mode makes the object transparent, you can also use Additive);
FX Amount — 40 (degree of transparency. The closer the value is to 0, the more transparent the glass and vice versa, the closer to 255, the more opaque. With fx amount = 0 the glass will be completely invisible)
Breakable glass is ready! We said that it is very simple.
For breakable glass (object func_breakable) you can additionally set the following flags:
Only Trigger — if checked, then the glass will break only from a trigger (the glass, i.e. the func_breakable object must be given a name and activated by a trigger for it to break);
Touch — if checked, the glass will break when touched by the player;
Pressure - if checked, the glass will break due to pressure (the player stood on the glass). Can, for example, be used to create breaking ice;
Instant Crowbar - instant destruction from the mount (used in HL)
a) use func_breakable
Material Type — Unbreakable Glass (material: unbreakable glass);
Render Mode — Texture;
FX Amount — 40
b) use func_breakable and the Only Trigger flag
Material Type — Glass;
Render Mode — Texture;
FX Amount — 40
Flags:
Only Trigger — if this flag is set, the player will not be able to break the glass (neither with a knife nor with a weapon)
c) use func_wall
With func_wall it's even easier, because You only need to set the display parameters.
Render Mode — Texture or Additive;
FX Amount — 40 (degree of transparency. Values from 0 to 255)
And this is what the glass looks like in the game. As you can see, there are no visual differences between breakable and unbreakable glass.
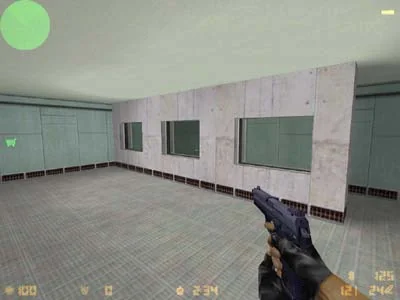
As you can see, there are many options. Which one should I use? Yes, anyone. Although func_wall has fewer properties to set.
glass.zip [13Kb] - in the archive there is an example map in BSP and RMF formats.
1. Breakable glass
There's nothing easier than creating glass :) Here's how to create breakable glass:Create a glass-shaped brush of any size (optimal thickness 2-4 units). Standard textures with the word are well suited for painting GLASS such as: GLASSBRIGHT, GLASSBLUE1, GLASSGREEN. We will use the latter, GLASSGREEN. In fact, almost any texture can be used for glass (except for special ones and water, of course), because... the object will still be transparent, but textures with the word GLASS will work better.
In the picture below you can see three glasses made from different entities with different properties: the left one is breakable, the center and right are unbreakable.
So, you have created a brush, now turn it into func_breakable and set the following properties:
Strength — 30 (glass strength. The higher the value, the more bullets you need to shoot at the glass for it to break);
Material Type — Glass (material, of course, we choose glass);
Render Mode — Texture (this mode makes the object transparent, you can also use Additive);
FX Amount — 40 (degree of transparency. The closer the value is to 0, the more transparent the glass and vice versa, the closer to 255, the more opaque. With fx amount = 0 the glass will be completely invisible)
Breakable glass is ready! We said that it is very simple.
For breakable glass (object func_breakable) you can additionally set the following flags:
Only Trigger — if checked, then the glass will break only from a trigger (the glass, i.e. the func_breakable object must be given a name and activated by a trigger for it to break);
Touch — if checked, the glass will break when touched by the player;
Pressure - if checked, the glass will break due to pressure (the player stood on the glass). Can, for example, be used to create breaking ice;
Instant Crowbar - instant destruction from the mount (used in HL)
2. Unbreakable glass
Safety glass can be made in three ways:a) use func_breakable
Material Type — Unbreakable Glass (material: unbreakable glass);
Render Mode — Texture;
FX Amount — 40
b) use func_breakable and the Only Trigger flag
Material Type — Glass;
Render Mode — Texture;
FX Amount — 40
Flags:
Only Trigger — if this flag is set, the player will not be able to break the glass (neither with a knife nor with a weapon)
c) use func_wall
With func_wall it's even easier, because You only need to set the display parameters.
Render Mode — Texture or Additive;
FX Amount — 40 (degree of transparency. Values from 0 to 255)
And this is what the glass looks like in the game. As you can see, there are no visual differences between breakable and unbreakable glass.
As you can see, there are many options. Which one should I use? Yes, anyone. Although func_wall has fewer properties to set.
glass.zip [13Kb] - in the archive there is an example map in BSP and RMF formats.
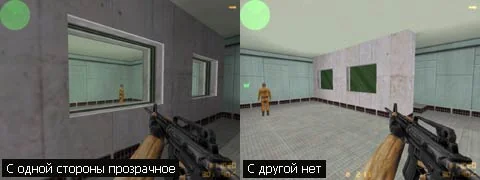
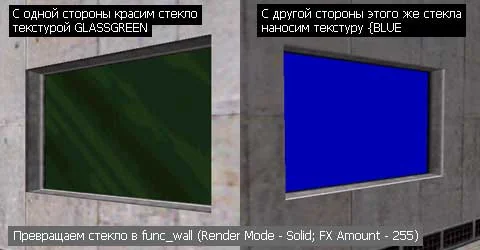
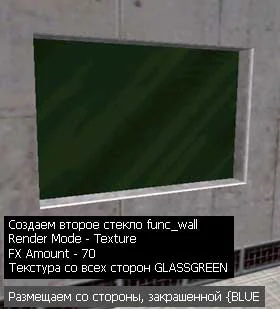
 Well, in what places to use such glass is up to you. You can place it in a place where you need to give one of the teams the opportunity to camp, for example, terrorists defending a room with hostages, etc.
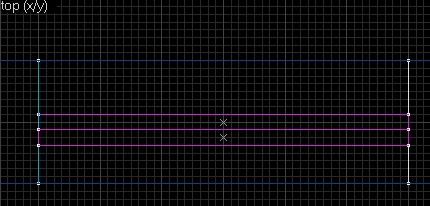
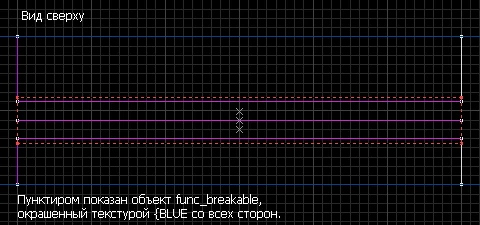 The dotted line indicates a new object that we will now create. This too func_breakable
. The dimensions of this object are exactly the same as those of the glass, only slightly wider in thickness (wider than both glasses combined).
The dotted line indicates a new object that we will now create. This too func_breakable
. The dimensions of this object are exactly the same as those of the glass, only slightly wider in thickness (wider than both glasses combined).