How to use TrenchBroom for Half-Life (Counter-Strike) mapping
Step 1. Downloading TrenchBroom
First thing first, let's download the last version of TrenchBroom from the official repository.
I will use TrenchBroom 2025.1 Release Candidate 2. See Requirements to install necessary libraries. Download archive for your system (Win64 in my case). Extract it to your destination folder.
Step 2. Downloading compiler and wads
You can use the Half-life SDK (not recommended) or just download Zoner's Half-Life Tools (ZHLT / VHLT / SDHLT) fork from another website. I recommend SDHLT.
Optional Step. Configure FGD files.
FGD Files contain definitions for entities and other information. TrenchBroom has halflife.fgd build-in, but you still may need FGD for your mod and compiler's FGD to get special entities such as func_detial, func_group, etc. For this example, I will copy sdhlt.fgd (zhlt.fgd), halflife-cs.fgd inside the Trenchbroom\games\Halflife directory. Now open HalfLife.fgd (loads by trenchbroom by default) and enter the following lines in the bottom of the file.
@include "sdhlt.fgd"
@include "halflife-cs.fgd"
This will make Trenchbroom read our FGDs. It is important to say that Trenchbroom uses custom HalfLife.fgd. Overwriting it or placing includes in the beginning of the file may create problems with models being rendered and lack of new features.
Step 3. Initial setup
Open Trenchbroom. Click "New map..." and select Half-life.
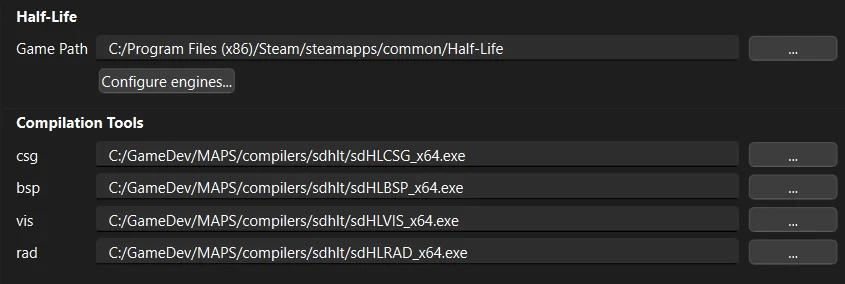
Click View > Preferences > Games >Half-life. Set the game path to your game directory (C:\Program Files (x86)\Steam\steamapps\common\Half-Life). Set CSQ, BSP, VIS, RAD path to your SDK path.
If you are mapping for some mod, select the mod directory in the bottom right area (Mods window). Since I am mapping for Counter-Strike, I will select cstrike. This will make TrenchBroom look for resources (models, sprites, etc) in this directory too.
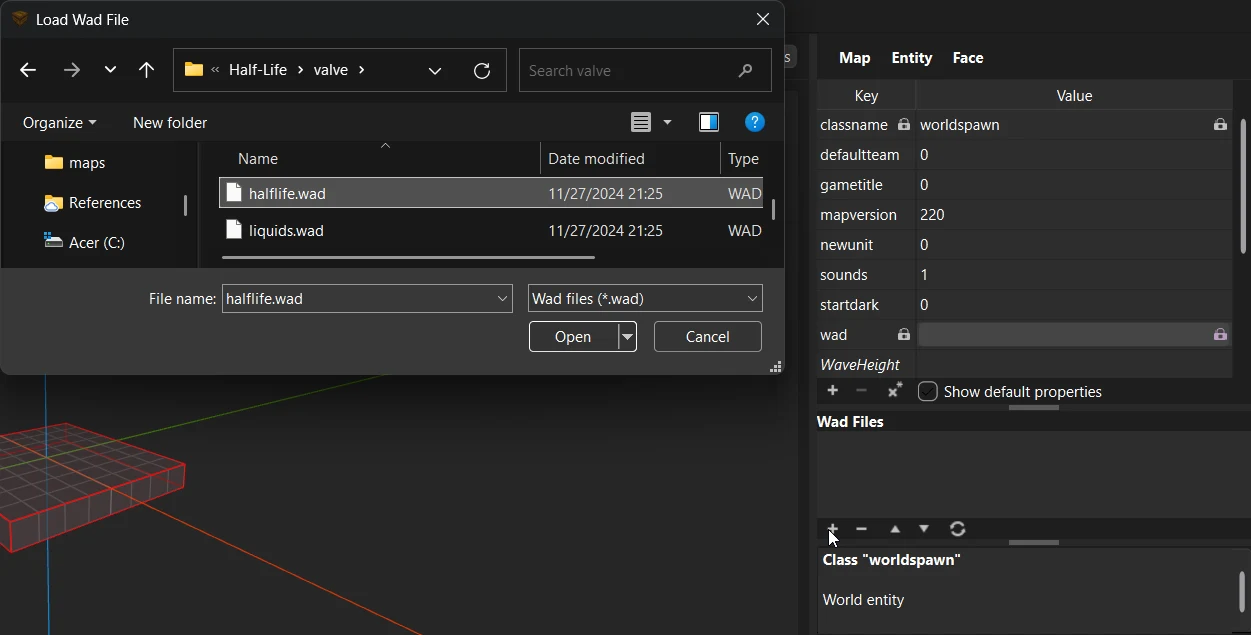
Now select any brush (worldspawn) on your map. On the right you can see entity properties. Find the wad field and add a few wads using the + button. Add zhlt.wad (sdhlt.wad) from compiler directory and a few base wads (if you need them):
- valve/halflife.wad
- valve/decals.wad
- valve/liquids.wad
- cstrike/cstrike.wad
Step 4. Setup compilers.
Make a basic map. Save your file. Now click Run > Compile. Now we need to setup our compiler. Let's rename our "unnamed" profile to "test". We will use it to quickly test the map. Now lets change our working folder to ${MAP_DIR_PATH}/work/. This will create a working folder for the compiler's trash that we can easily remove later. Click on + icon in the middle.
- First directive will be "Export map" with parameter ${WORK_DIR_PATH}/${MAP_BASE_NAME}.map.
- Second "Run tool". Type $ and select CSG (${csg}), in parameters add -nowadtextures and path to our map. ${WORK_DIR_PATH}/${MAP_BASE_NAME}.map. I recommend using -nowadtextures to build textures inside a BSP file. It makes map way more easier to debug and ship.
- After CSG we need to run BSP. Just like with CSG we need to provide a path to map file and a few optional commands.
-nohull2 : Don't generate hull 2 (the clipping hull for large monsters and pushables). Not recommended for final builds.
-viewportal : Show portal boundaries in 'mapname_portal.pts' file. - Next step is to run the VIS tool. Since we are doing a test run add -fast parameter.
- Final tool is RAD. Same parameter here.
- After we are done compiling we need to move our output .bsp file to our maps folder. Use directive "Copy files" with a path to your mod directory.
- Click the "Test" button to verify the setup.
Your final compile profile should look like this: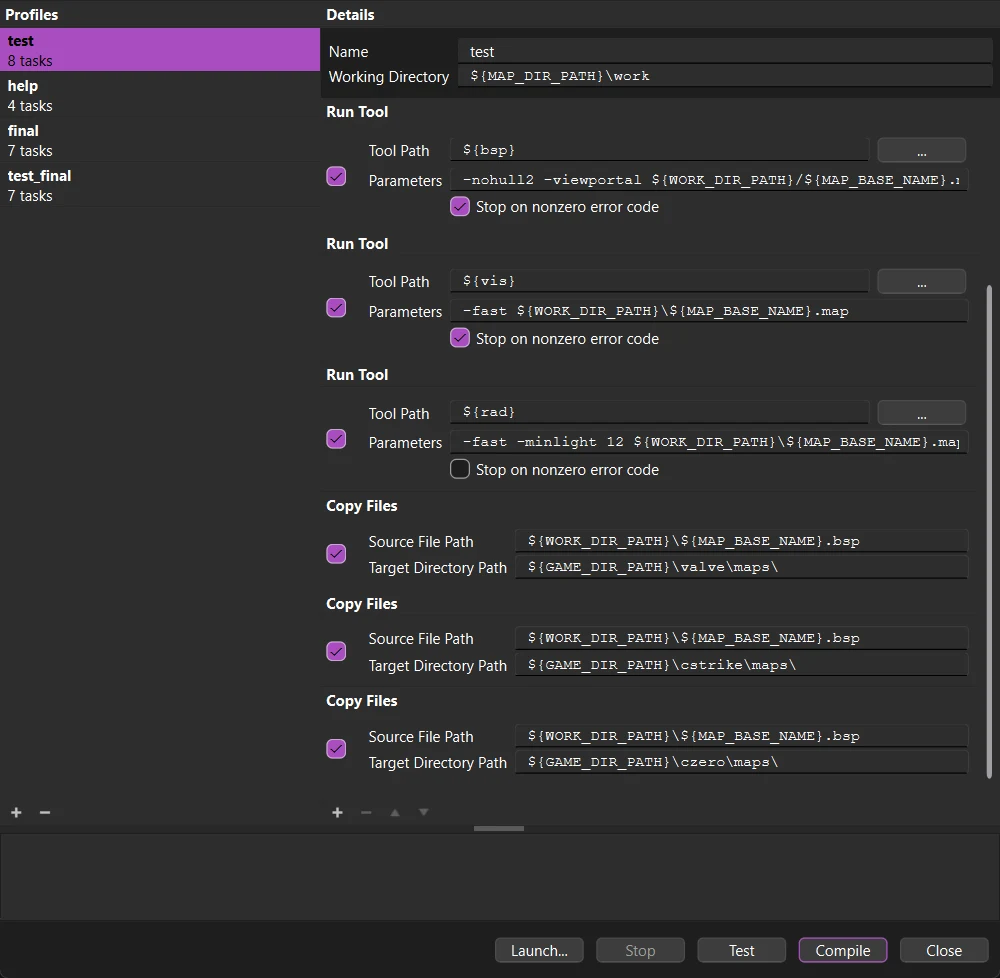
Try to compile your first map. Pay attention to the console log to make sure no steps are omitted and compilation is successful.
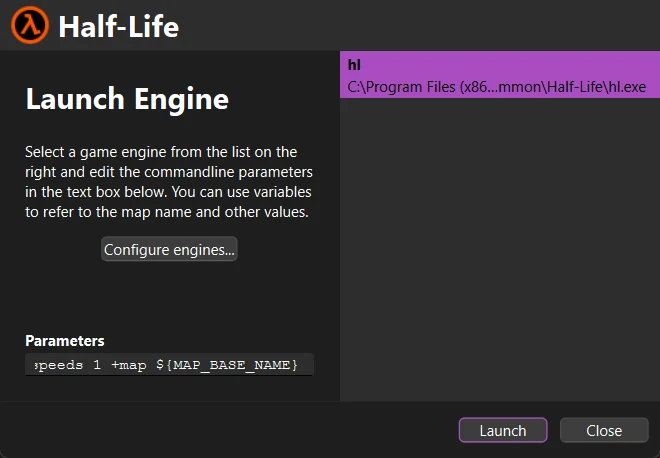
Now lets setup Launch…
Click the Launch… button. Click Configure engines, click plus icon (Add profile). Set path to game executable (C:\Program Files (x86)\Steam\steamapps\common\Half-Life\hl.exe)
Inside Parameters field insert the following line
-game cstrike -novid -window +developer 1 +sv_cheats 1 +r_speeds 1 +map ${MAP_BASE_NAME}
Now let's explain what each parameter does.
-game cstrike : selects Counter-strike 1.6 mod (optional).
-novid : skips intro videos.
-window : run game in a window (optional).
+developer 1 : enable developer mode (need for r_speeds and map debugging)
+sv_cheats 1 : enable cheats (noclip, impulse 101, gl_wireframe 1, etc)
+r_speeds 1 : prints map polygons and other useful info for map debugging and optimization.
+map ${MAP_BASE_NAME} : loads our map.
Click Close and try to launch. You should be able to see your map in game.
Basic TrenchBroom setup is done at this point. Now let's learn some basics.
TrenchBroom Basics
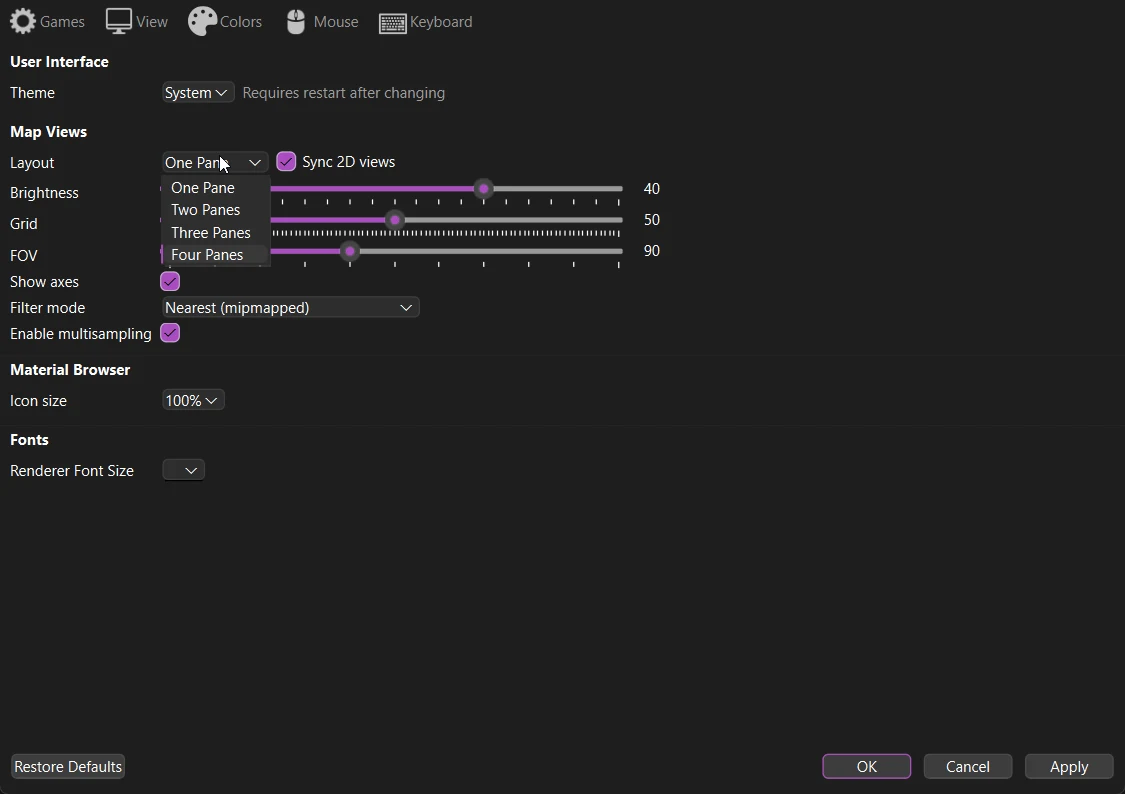
By default, unlike other mapping tools, TrenchBroom does not use 4 views instead it only has a 3D view. This provides a minimalist look, easy viewing and operation. Other views can be enabled in View > Preferences > View > Layout or by pressing Space key to switch between views.
By clicking on the brush we can select it. While selected we can move it with mouse or arrow keys. If we hold Alt we can move brush vertically. While holding Shift we can move single sides and change dimensions of the brush.
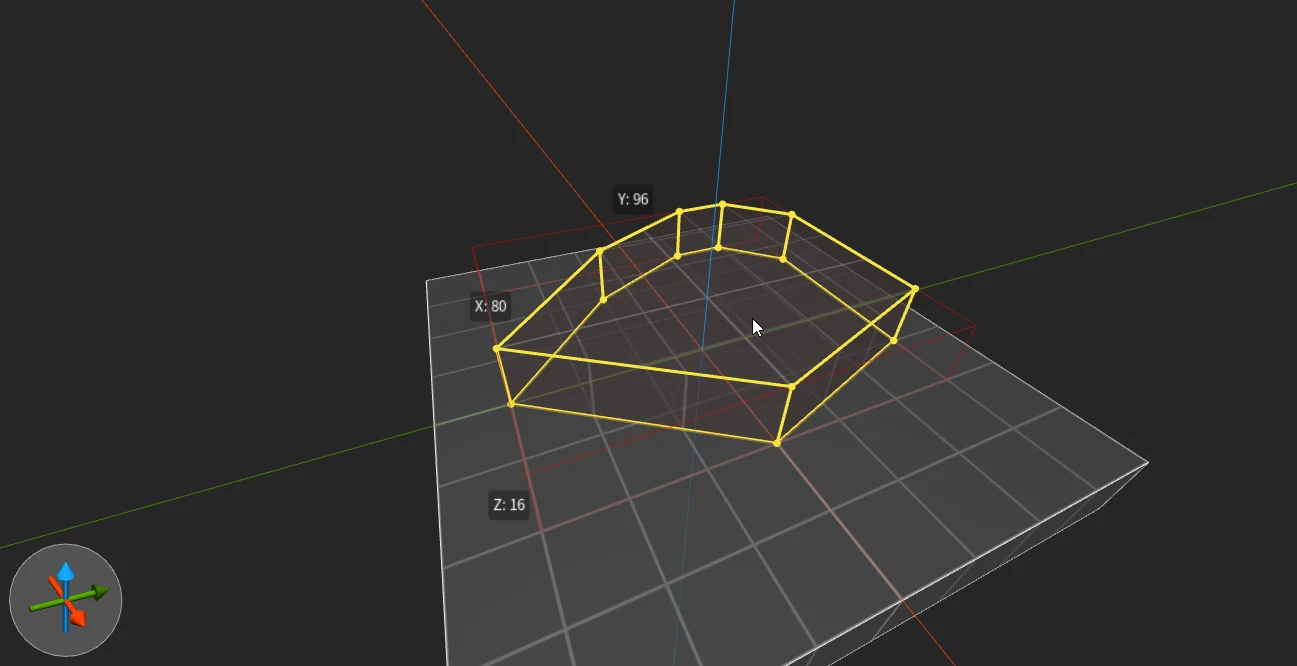
To create a brush deselect all objects and hold and drag the mouse on the surface. Alternatively you can use the Brush Tool (B key). Click on the brush surface to add vertices. Once done creating a base flat shape, hold Shift to extrude brush. Click Enter to Apply and create the brush.
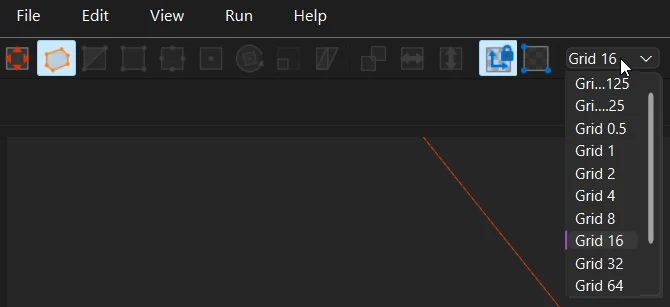
To switch the grid use 1-0 keys or click the grid combo box in the toolbar.
Next tool is the Clip Tool (C Key). Just like with Brush Tool select points on the surface to make a cut. Once done press Ctrl+Enter to select what part of brush you want to keep and press Enter to confirm. If you are unable to make a perfect cut, switch between views using the Space key.
Vertex, Edge and Face tools are simple tools. Move vertices/edges/faces just like you move sides.
Rotation is a little bit different. Use arrow keys to move the rotate origin. After rotation it is recommended to snap vertices to integer by clicking Edit > Snap vertices to integer or by pressing Ctrl+Shift+V.
Now let's talk about texturing. To apply texture to the brush select the brush, then select Face tab in top right corner. In the Material Browser section in the bottom click Settings and select all WADs you want to use. Select null texture to fill brush with null texture. Now hold Shift and select the visible side of the brush that you want to paint. Apply the texture you like. Now while holding the Shift key and Left Mouse button you can paint other sides and brushes with the same texture. It will make the texture fit (seamless). If you are not satisfied with the result, hold both Shift and Alt keys. Usually it is needed for round surfaces. Pay attention to Texture lock and UV Lock in the toolbar. Based on what you are trying to do you may need to turn them on/off.
Now let's discuss CSG Operations. To Merge brushes together select multiple brushes by holding CTRL and clicking on them. Now press CTRL+J (Edit > CSG > Convex Merge). It's important to note that not only can you merge brushes, but you can also merge the sides of different brushes to create a new brush with the selected sides. To do that select a few sides with CTRL+SHIFT+CLICK and then press CTRL+J. You can perform other operations such as Hollow, Subtract, Intersect. See Edit > CSG.
To spawn a point entity. Select the Entity tab and drag and drop the selected entity on the map. While it is selected you can edit entity properties in the top right window.
This covers the basics of mapping with TrenchBroom. In the following tutorials we will take a closer look at the tools, interface and capabilities of TrenchBroom.
Tags: mapping, trenchbroom, half-life, quake, counter-strike
Comments