
Finding Real IP Behind Cloudflare
This guide explains, in plain language, how the real IP address of a website hidden behind Cloudflare (or any other CDN) can be discovered.
Why this is even possible
Cloudflare is a CDN (Content Delivery Network) and security proxy. When a site turns it on, visitors no longer talk to the web server directly. Instead they talk to Cloudflare's edge, and Cloudflare quietly forwards the request to the real server — the origin — in the background.
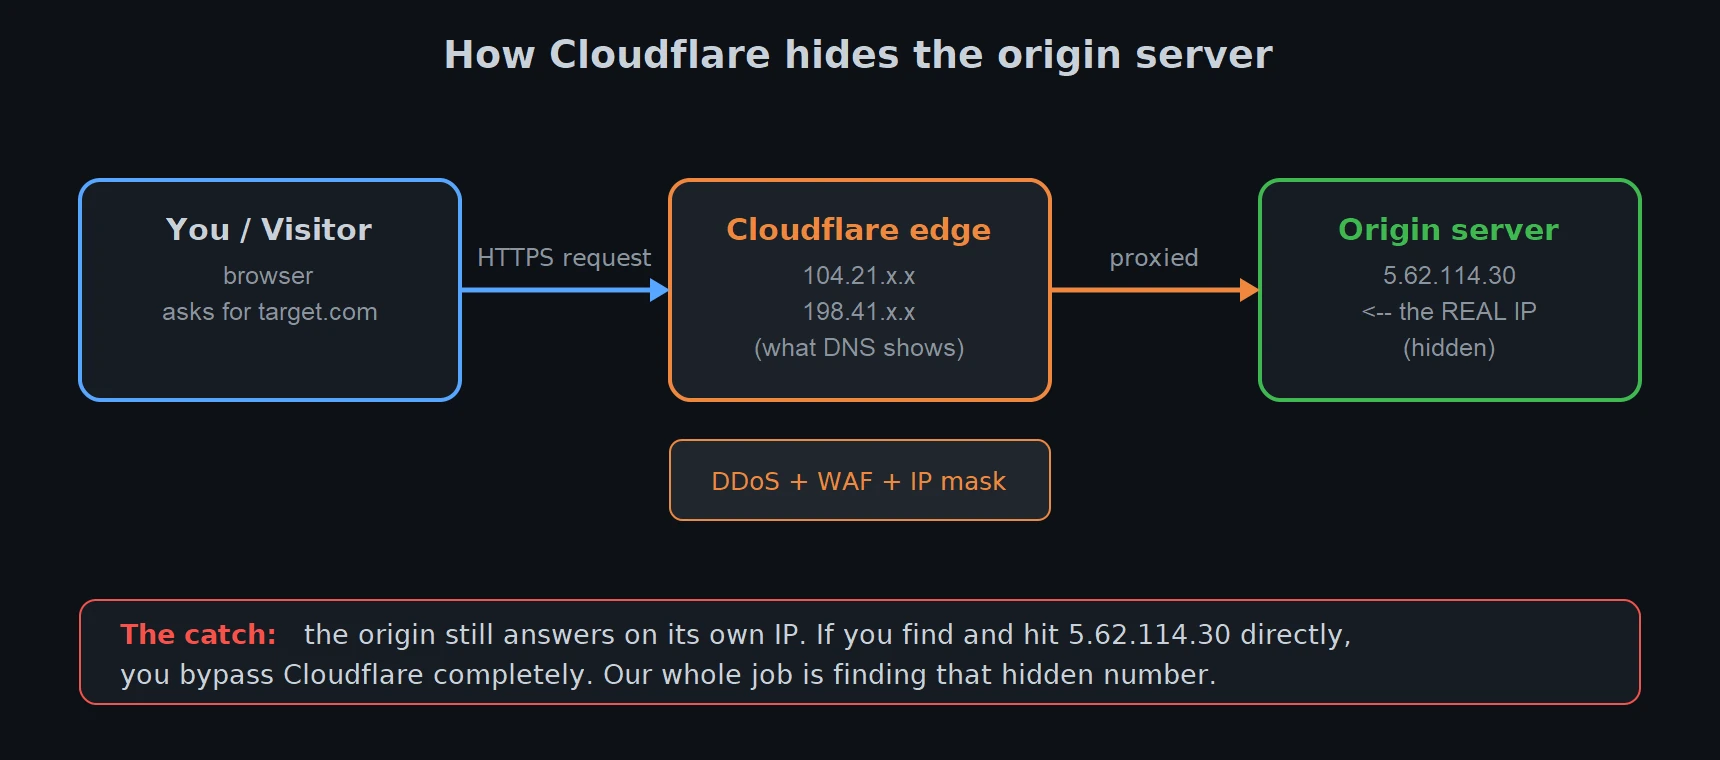
Cloudflare gives the site several things:
- DDoS protection (soaking up floods of traffic)
- A WAF (Web Application Firewall) that blocks common attacks and bots
- Automatic HTTPS and HTTP→HTTPS redirection
- Caching and performance boosts
- And the part we care about: IP masking — the origin's address is replaced in public DNS by Cloudflare's own IPs (ranges like 104.21.x.x and 172.67.x.x).
Here is the key idea the whole tutorial rests on: Cloudflare only hides the front door. The origin server is still sitting on the internet, still answering on its own IP. If an attacker learns that IP and connects to it directly, they walk straight past Cloudflare — no DDoS protection, no WAF. That is why a leaked origin IP matters, and why the rest of this guide is about not leaking it.
What a well-configured server does (and why the leak happens anyway)
A careful admin tries to make the origin refuse anyone who isn't Cloudflare. The two common tricks are shown below. First, make the default site answer with 404 so that hitting the raw IP shows nothing useful:
server {
    listen 80 default_server;
    listen 443 ssl default_server;
    server_name _;
    return 404;
}
Second, reject any request whose Host header isn't the real domain:
if ($host != "target.com") {
    return 404;
}
Other defensive measures include:
- IP allowlisting — the firewall only accepts connections from Cloudflare's published IP ranges (this is the real fix; more on it at the end).
- Secret hostnames or a secret header that only Cloudflare sends.
- GeoIP restrictions (only allow traffic from certain countries).
So why does the origin IP still leak so often? Because hiding one web server is easy, but hiding every trace of it everywhere is hard. The IP fingerprints itself in old DNS records, in mail servers, in TLS certificates, in bounce emails, in a forgotten dev. subdomain. Recon is simply the art of collecting those breadcrumbs. We will go from the passive.
Method 1 — Read the DNS records
Start with the cheapest source: the domain's own DNS. Look at every record type, not just the website's A record. Use nslookup (built into Windows and Linux) or the friendlier dig (Linux/macOS, or via WSL on Windows).
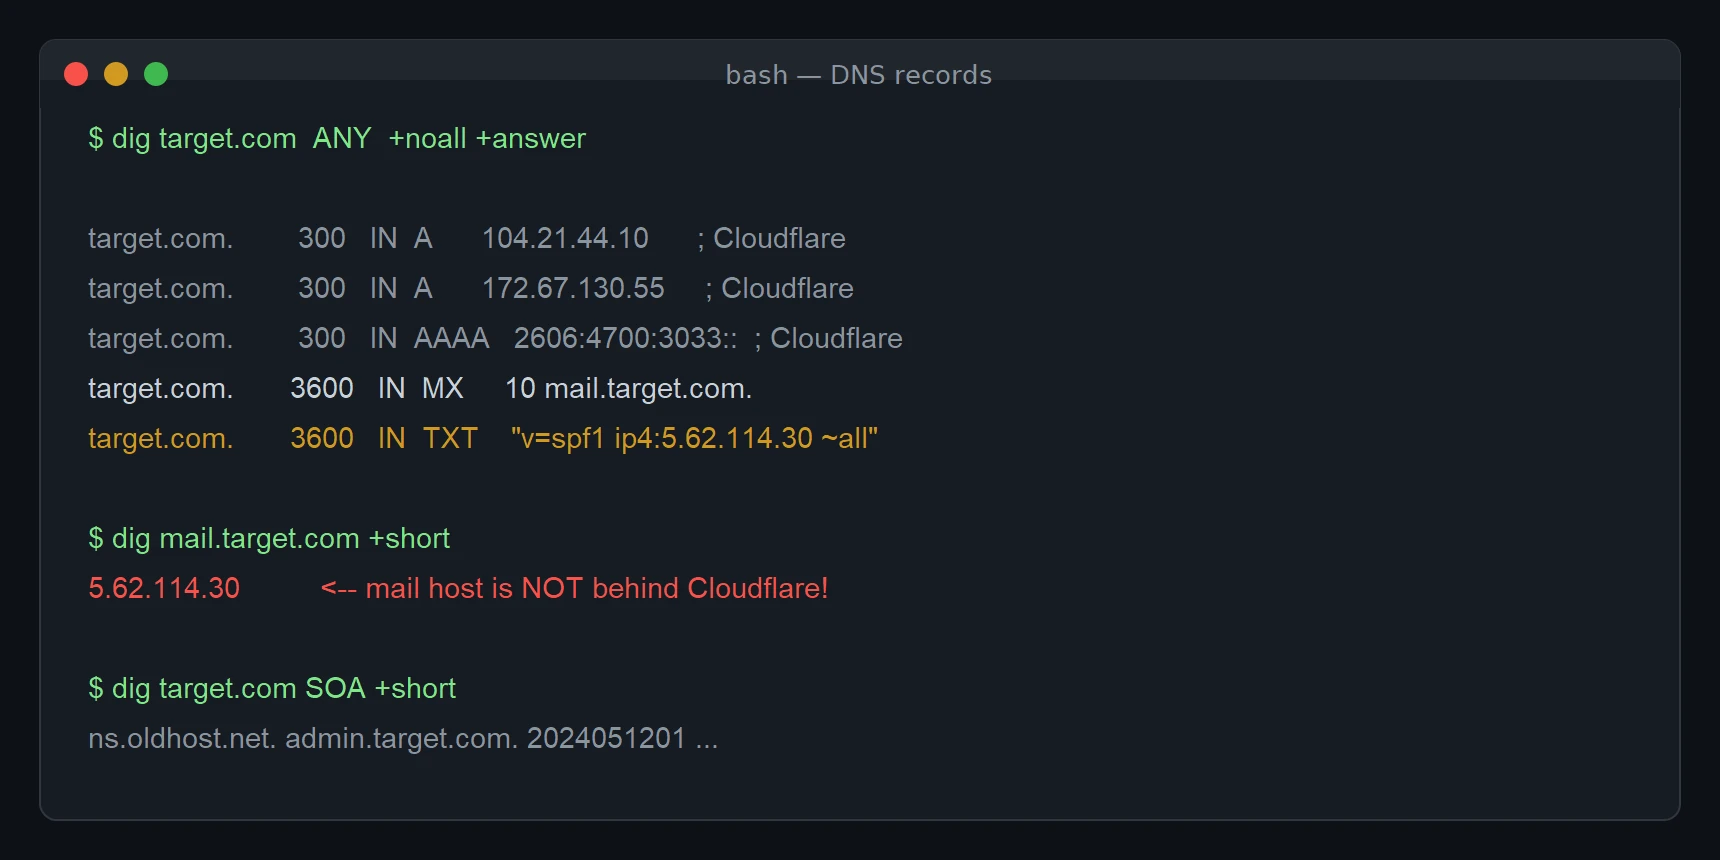
What each record can betray:
- A / AAAA — the website itself. Usually Cloudflare, but not always: a subdomain the owner forgot to proxy can point straight at the origin.
- MX — mail servers. Mail is very often hosted on the same box as the website and is almost never behind Cloudflare (Cloudflare doesn't proxy email). Follow the MX hostname and you may land directly on the origin.
- TXT / SPF — the SPF record lists IPs allowed to send mail for the domain, e.g. v=spf1 ip4:5.62.114.30 ~all. That IP is frequently the origin.
- SOA / NS — can reveal the old hosting provider, which narrows your search.
- CNAME — may point to a provider-specific hostname that resolves outside Cloudflare.
The commands, one at a time:
nslookup -type=MX target.com
nslookup -type=TXT target.com

dig target.com ANY +noall +answer
dig MX target.com +short
dig mail.target.com +short
dig target.com SOA +short
If mail.target.com resolves to something that is not in Cloudflare's ranges, you may already be done. Write that IP down and jump to the verification step at the end.
Method 2 — DNS history and passive DNS
Cloudflare was probably switched on after the site already existed. Before that day, public DNS pointed at the real IP — and the internet remembers. Historical DNS databases store those old answers:
- SecurityTrails — historical A records per domain
- ViewDNS.info — free “IP history” tool
- DNSHistory
- crt.sh and the Wayback Machine for related traces
Look for an A record from before the domain moved to Cloudflare. If that server was never migrated to a new IP, the historical address is still live and still the origin. This is one of the highest-hit, lowest-effort methods.
Method 3 — Hunt for unprotected subdomains
Owners proxy the obvious names (the main site, www) but forget the rest. A dev., staging., test., cpanel., direct., ftp., or mail. subdomain often points straight at the origin. Enumerate them with free tools:
subfinder -d target.com
amass enum -passive -d target.com
dnsx -l subdomains.txt -a -resp
For each subdomain you find, resolve it and check whether the IP is Cloudflare's or something else. Any “something else” that hosts the same site is your origin. You can also try guessing common names against a wordlist — that is all subfinder/amass automate for you, so you don't have to write a script.
Method 4 — The SSL certificate trick (the core method)
This is the technique the whole active approach is built on, so it is worth understanding well.
When you connect to a server over HTTPS, it hands you a TLS certificate. That certificate contains the domain name it was issued for — in the CN (Common Name) field and the SAN (Subject Alternative Names) list. Crucially, the origin server still presents the real certificate for target.com even when you reach it by raw IP, because that is the certificate installed on it.
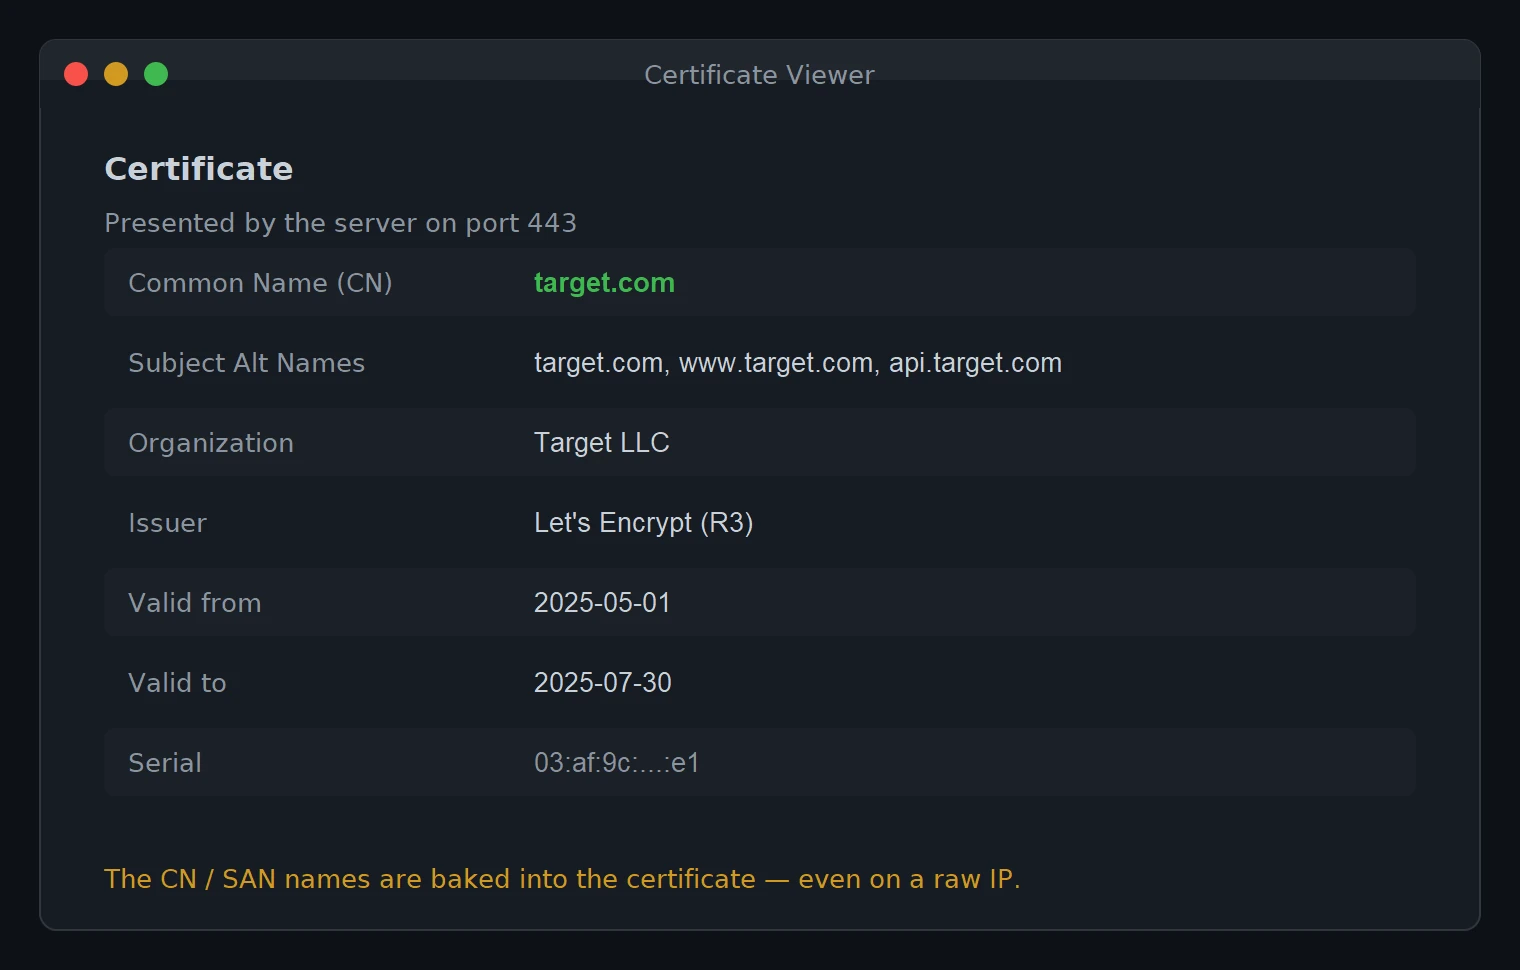
So if you connect to some unknown IP on port 443 and its certificate says CN = target.com, you have almost certainly found the origin. You can read any server's certificate by hand with OpenSSL:
openssl s_client -connect 5.62.114.30:443 2>/dev/null | openssl x509 -noout -subject -issuerReading that command in beginner terms:
- openssl s_client -connect IP:443 opens a raw TLS connection to that IP and prints the certificate.
- 2>/dev/null hides the noisy connection log so only the useful output remains.
- The pipe | feeds the certificate into openssl x509, and -noout -subject prints just the subject line, which contains the CN.
The same certificate data has already been collected for the whole internet by search engines, so you can often skip scanning entirely and just query:
- crt.sh — certificate transparency logs (free): search %.target.com to see every certificate ever issued for the domain and the hostnames on them.
- Shodan — ssl.cert.subject.CN:"target.com"
- Censys — services.tls.certificates.leaf_data.subject.common_name: target.com
- ZoomEye
These search engines constantly scan the internet and index the certificate on every IP. Ask them “which IPs present a certificate for target.com?” and any non-Cloudflare hit is your origin — no scanning of your own required.
Method 5 — The favicon hash
Every site has a little icon (favicon.ico). Shodan stores a hash (a short fingerprint) of the favicon it finds on every server it scans. Two servers serving the same favicon almost always belong to the same site — including the hidden origin serving the same icon as the Cloudflare-fronted front end.
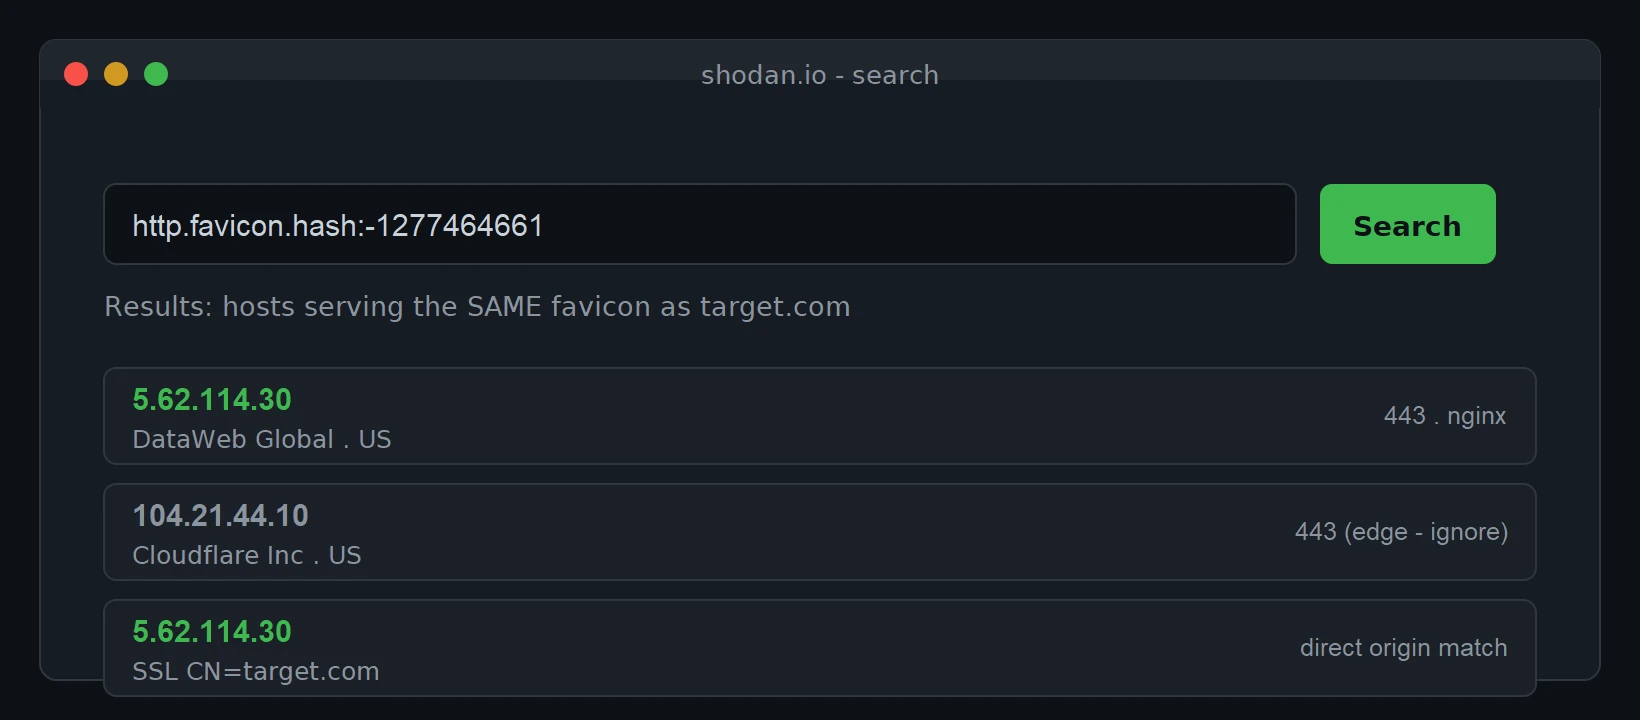
Compute the target's favicon hash, then search Shodan for other servers with the same one:
# Python 3 (needs: pip install mmh3 requests)
import mmh3, requests, codecs
data = requests.get("https://target.com/favicon.ico").content
b64  = codecs.encode(data, "base64")
print(mmh3.hash(b64))
Then in Shodan's search box:
http.favicon.hash:-1277464661Ignore the Cloudflare edge results; the odd one out on a hosting provider's IP is your origin.
Method 6 — Make the server email you
Email is a rich leak because the origin usually sends it directly. Trigger a message and read its full headers:
- Register an account, or use “forgot password”, or submit a contact form.
- Open the received email and view the full headers (in Gmail: “Show original”).
- Look at the Received: chain and any X- headers — the first hop is often the origin's IP or internal hostname.
A variation is the bounce email: send a message to an address that surely doesn't exist, like [email protected]. The bounce (non-delivery report) generated by the target's own mail server frequently carries its real IP in the headers.
Method 7 — Read the page source and misconfigurations
Sometimes the IP is just lying in the open:
- View the HTML source and any JavaScript — hard-coded API endpoints, image URLs, or debug comments can contain a raw IP or an unproxied hostname.
- Check for exposed status/info pages: /server-status (Apache mod_status), /phpinfo.php, error pages that print internal hostnames, or Git/CI config left in the webroot.
- Some frameworks leak the origin in HTTP response headers on error.
Method 8 — The active approach: scan a narrowed IP range
If the passive methods didn't crack it, you fall back to scanning — but scanning all 4 billion IPv4 addresses is hopeless. The trick is to narrow the haystack first using what you learned during recon.
From social media, an SPF record, a support reply, or an old DNS entry you usually get a country, city, or hosting provider. That is enough to reduce the search from ~45 million IPs to a handful of address blocks. Services that list IP ranges by city/provider (or a provider's published ranges) give you exactly those blocks:
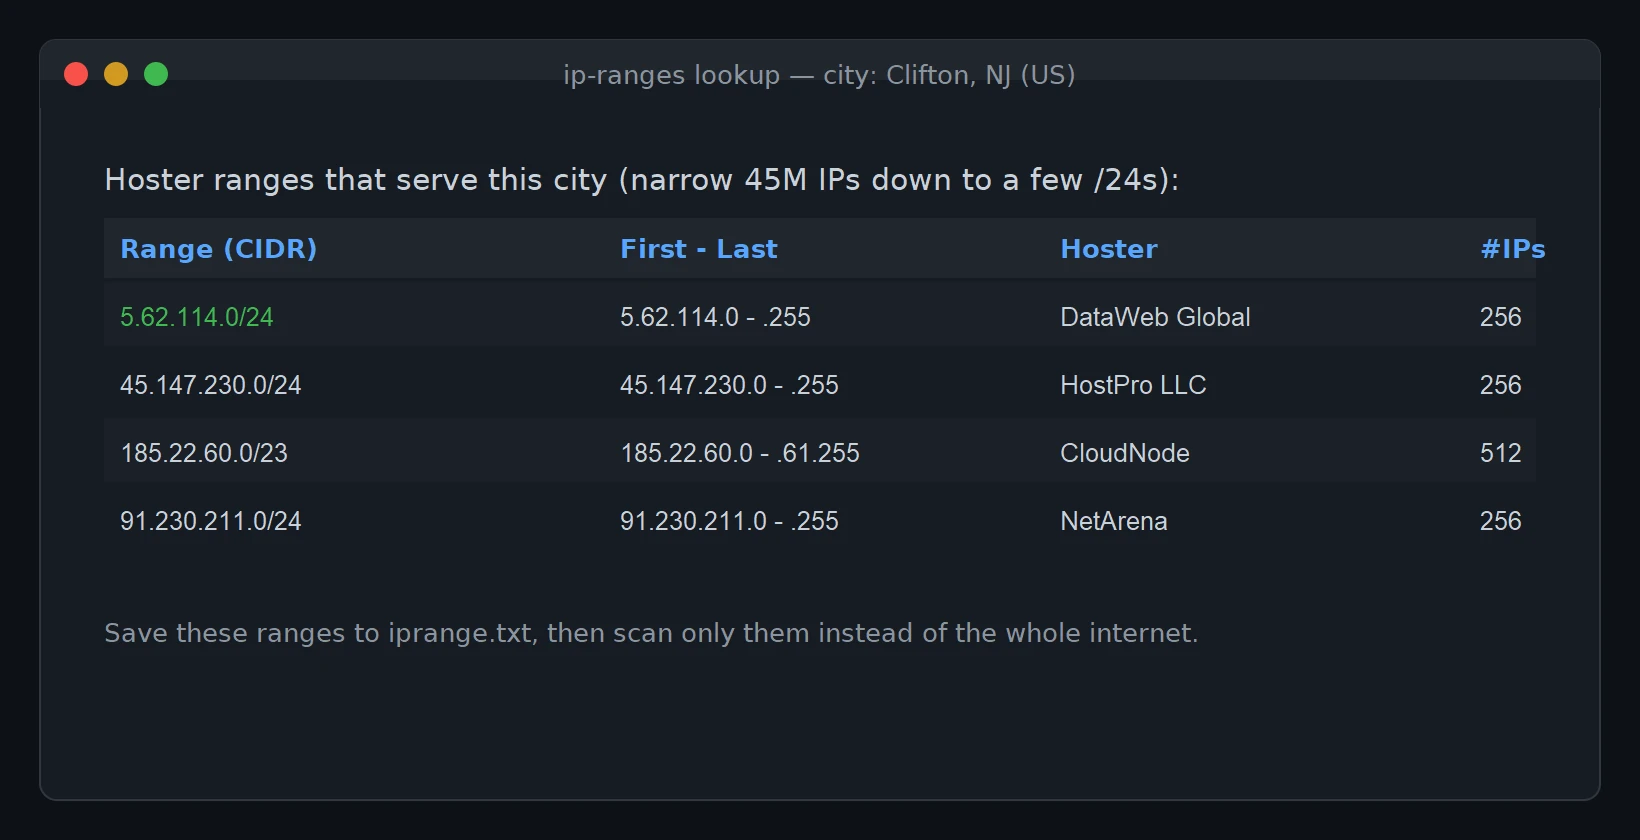
Save the promising ranges into a file, iprange.txt, one CIDR per line. Now scan just those ranges for open HTTPS ports with masscan, then read the certificate on every host that answers — exactly Method 4, but automated across the list.
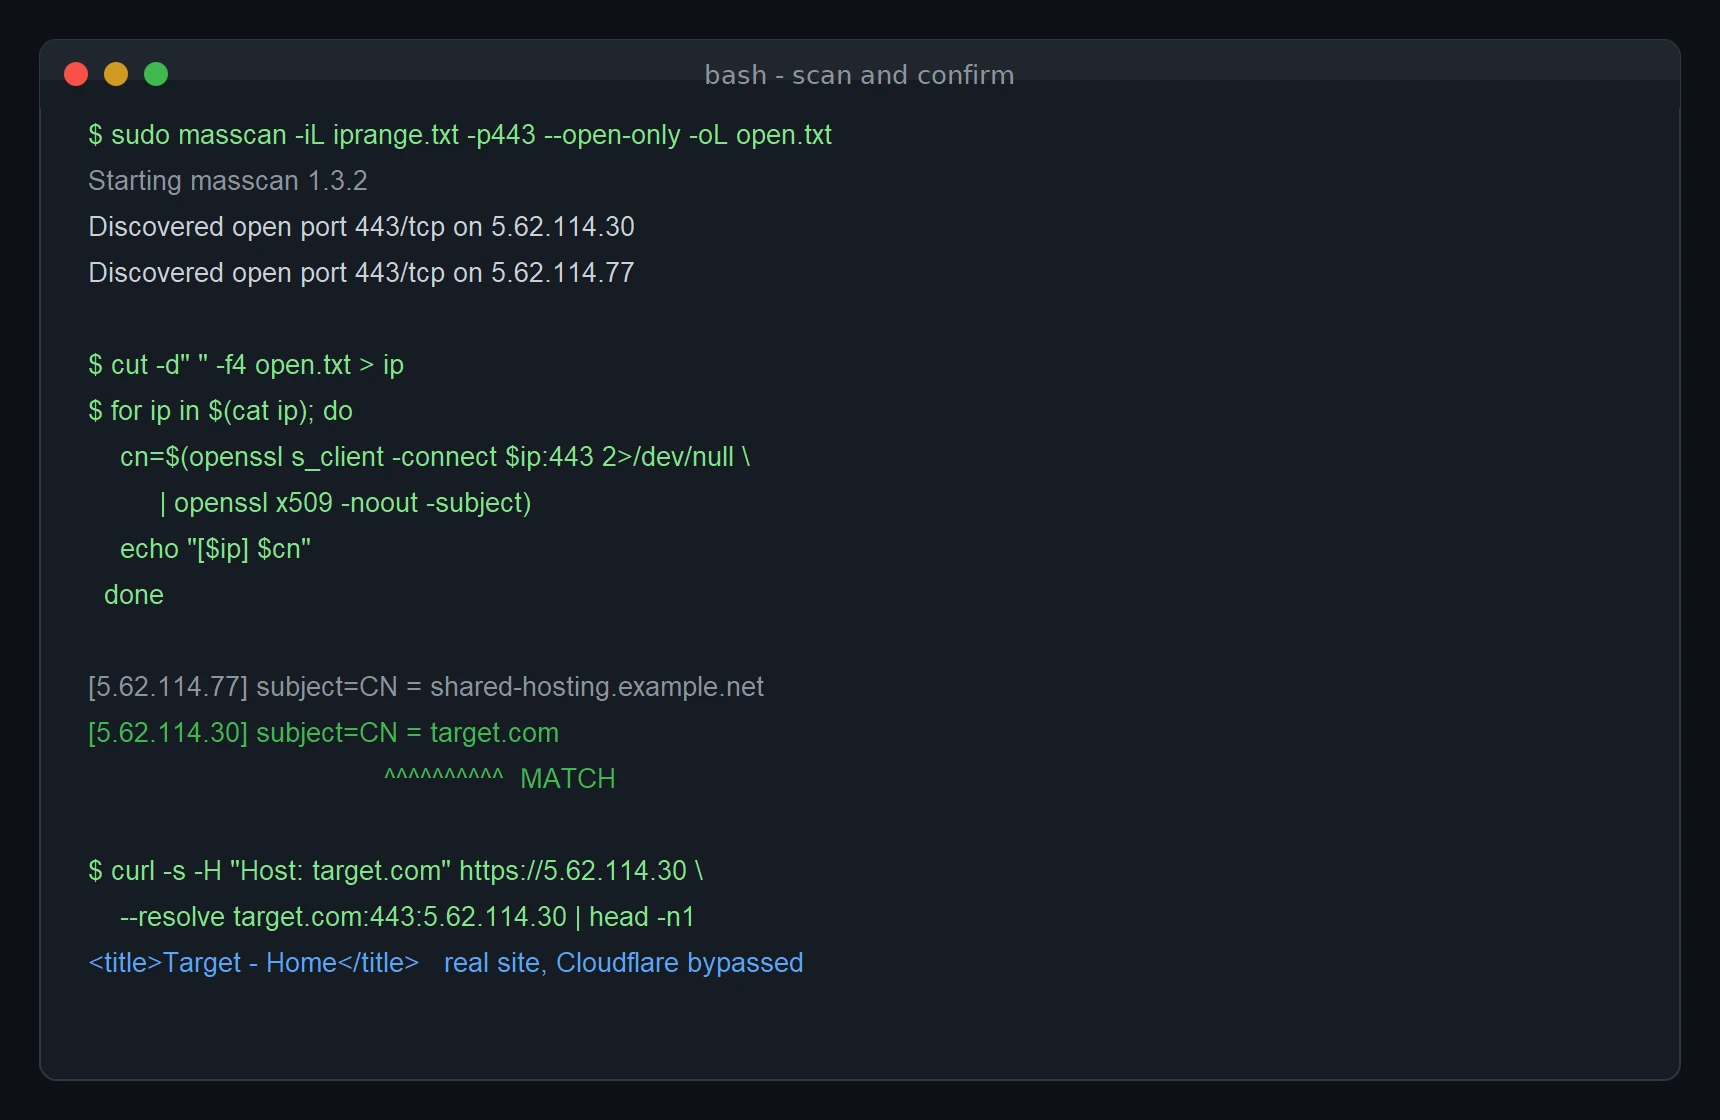
The whole active pipeline, step by step:
# 1. Find every host in your ranges with port 443 open
sudo masscan -iL iprange.txt -p443 --open-only -oL open.txt

# 2. Pull just the IP column into a file called "ip"
cut -d" " -f4 open.txt > ip

# 3. Read the certificate subject of each one and print matches
for ip in $(cat ip); do
    subject=$(openssl s_client -connect "$ip:443" -servername target.com 2>/dev/null \
              | openssl x509 -noout -subject)
    echo "[$ip] $subject"
done | grep "target.com"
That loop is deliberately written in plain shell so you don't need Perl. It walks each IP, grabs the certificate subject, and the final grep keeps only lines mentioning your domain. Whatever survives is your origin candidate.
Doing it faster (optional)
Reading certificates one by one is slow when the list is long. xargs can run many checks in parallel — here, 10 at a time (-P 10):
cat ip | xargs -P 10 -I {} sh -c \
  'echo -n "[{}] "; openssl s_client -connect {}:443 2>/dev/null | openssl x509 -noout -subject' \
  | grep "target.com"
The Perl version
Script is just reading a file of IPs and running the same OpenSSL check on each line, with a timeout so a dead host can't hang the whole run:
#!/usr/bin/perl
use strict;
use warnings;

# Open the file "ip" (one IP per line) or stop with an error
open(my $fh, '<', 'ip') or die "Cannot open IP list: $!";

while (my $ip = <$fh>) {
    chomp($ip);                       # strip the trailing newline

    my $subject = '';
    eval {
        local $SIG{ALRM} = sub { die "timeout\n" };   # give up on slow hosts
        alarm 5;                                       # ...after 5 seconds
        # Same OpenSSL check as before, captured into $subject
        $subject = `openssl s_client -connect $ip:443 2>/dev/null | openssl x509 -noout -subject`;
        alarm 0;                                       # cancel the timer
    };

    # Print the IP only if its certificate mentions our target domain
    print "[$ip] $subject" if $subject =~ /target\.com/;
}
close($fh);
Run it with perl find_origin.pl. Line by line: it opens the ip file, loops over each address, wraps the OpenSSL call in a 5-second alarm so unreachable hosts are skipped, and prints only the IPs whose certificate matches target.com. That is the entire “magic” — identical logic to the one-line shell version.
Commercial mass-scanners exist that wrap all of this in a GUI with a database and multithreading, but they are expensive, rough around the edges, and slow (scanning a single target across tens of millions of IPs can take weeks on a modest server). For a single authorised target, the free tools above are more than enough.
Confirm the IP you found
A certificate match is strong evidence, but always verify by fetching the site directly from the candidate IP while still sending the correct Host header. If the origin isn't locked down, you'll get the real page — served straight from the origin, bypassing Cloudflare:
curl -s -H "Host: target.com" --resolve target.com:443:5.62.114.30 https://target.com | head -n 20If that returns the genuine homepage (matching content, same title), the IP is confirmed. If it returns a 404 or a connection reset, the origin is properly locked to Cloudflare — which is exactly what you want on your own server.
How to defend your own origin
Now flip it around. Everything above fails if you close the breadcrumbs:
- Firewall the origin to Cloudflare only. Allow inbound 80/443 exclusively from Cloudflare's published IP ranges and drop everything else. This is the single most effective fix — even a leaked IP becomes useless.
- Use Cloudflare Authenticated Origin Pulls so the origin only accepts requests carrying Cloudflare's client certificate.
- Change the origin IP after enabling Cloudflare, so historical DNS records point at a dead address.
- Don't run mail on the web server, or route outbound mail through a separate relay so headers and SPF don't expose the web origin.
- Proxy every subdomain (or host dev/staging somewhere isolated). One unproxied record undoes everything.
- Strip revealing headers and disable /server-status, phpinfo, and debug output in production.
- Consider a fresh certificate whose CN/SAN doesn't broadcast the exact domain, or rely on Cloudflare's edge certificate while the origin uses a generic one.
Tags: web, http, html, server, vps, ddos
Comments